Attendance
How to add attendance
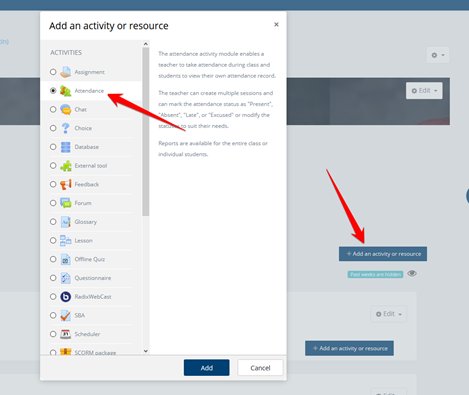
Step1: The first step to adding attendance is to add an "attendance activity" to the course. Go to the course that you want to add attendance and turn the editing on. Click the “add activity” button of the top section and select attendance activity and click “add”.
If you already have an attendance module in your course, skip to step-3
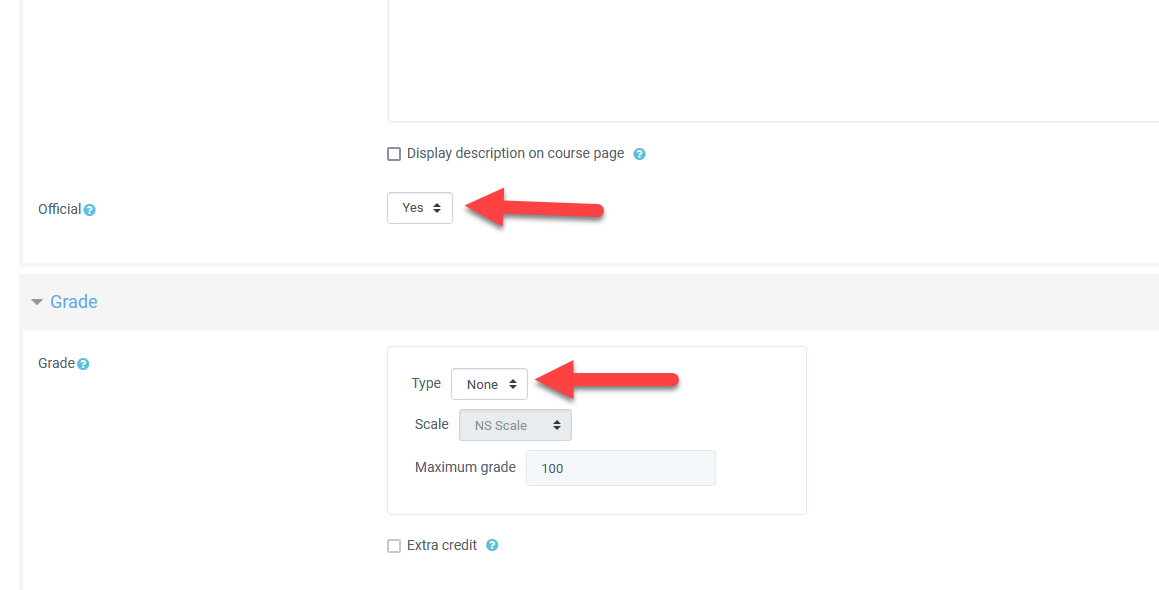
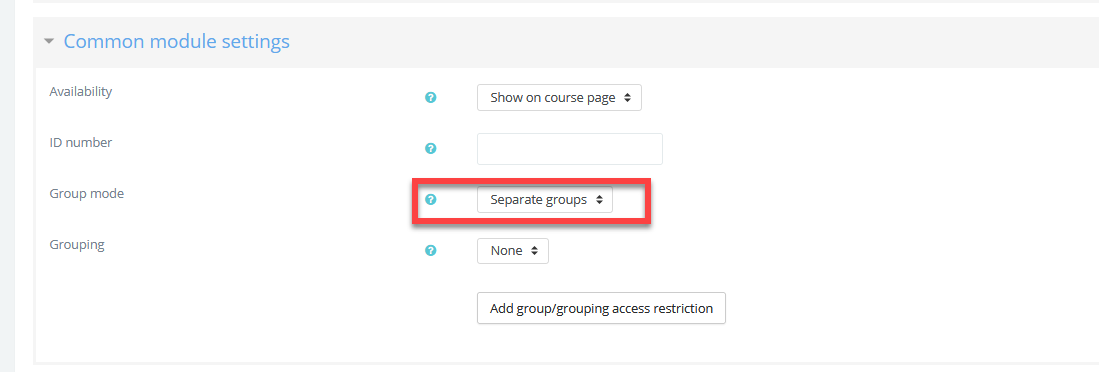
Step2: In the attendance settings, select “yes” for official and “none” for the grade. You may also make this attendance module "unofficial" by selecting "No". This means the attendance records will not show up on student's records such as report cards, attendance reports, etc. Unofficial attendance may be useful for clubs or tutoring courses. Under common module settings, the group mode must be "separate groups". If this setting is not available by default, it may have been turned off in the course settings. if that's the case, please go to the course settings to change the default grouping setting.
When done, click "Save & display"
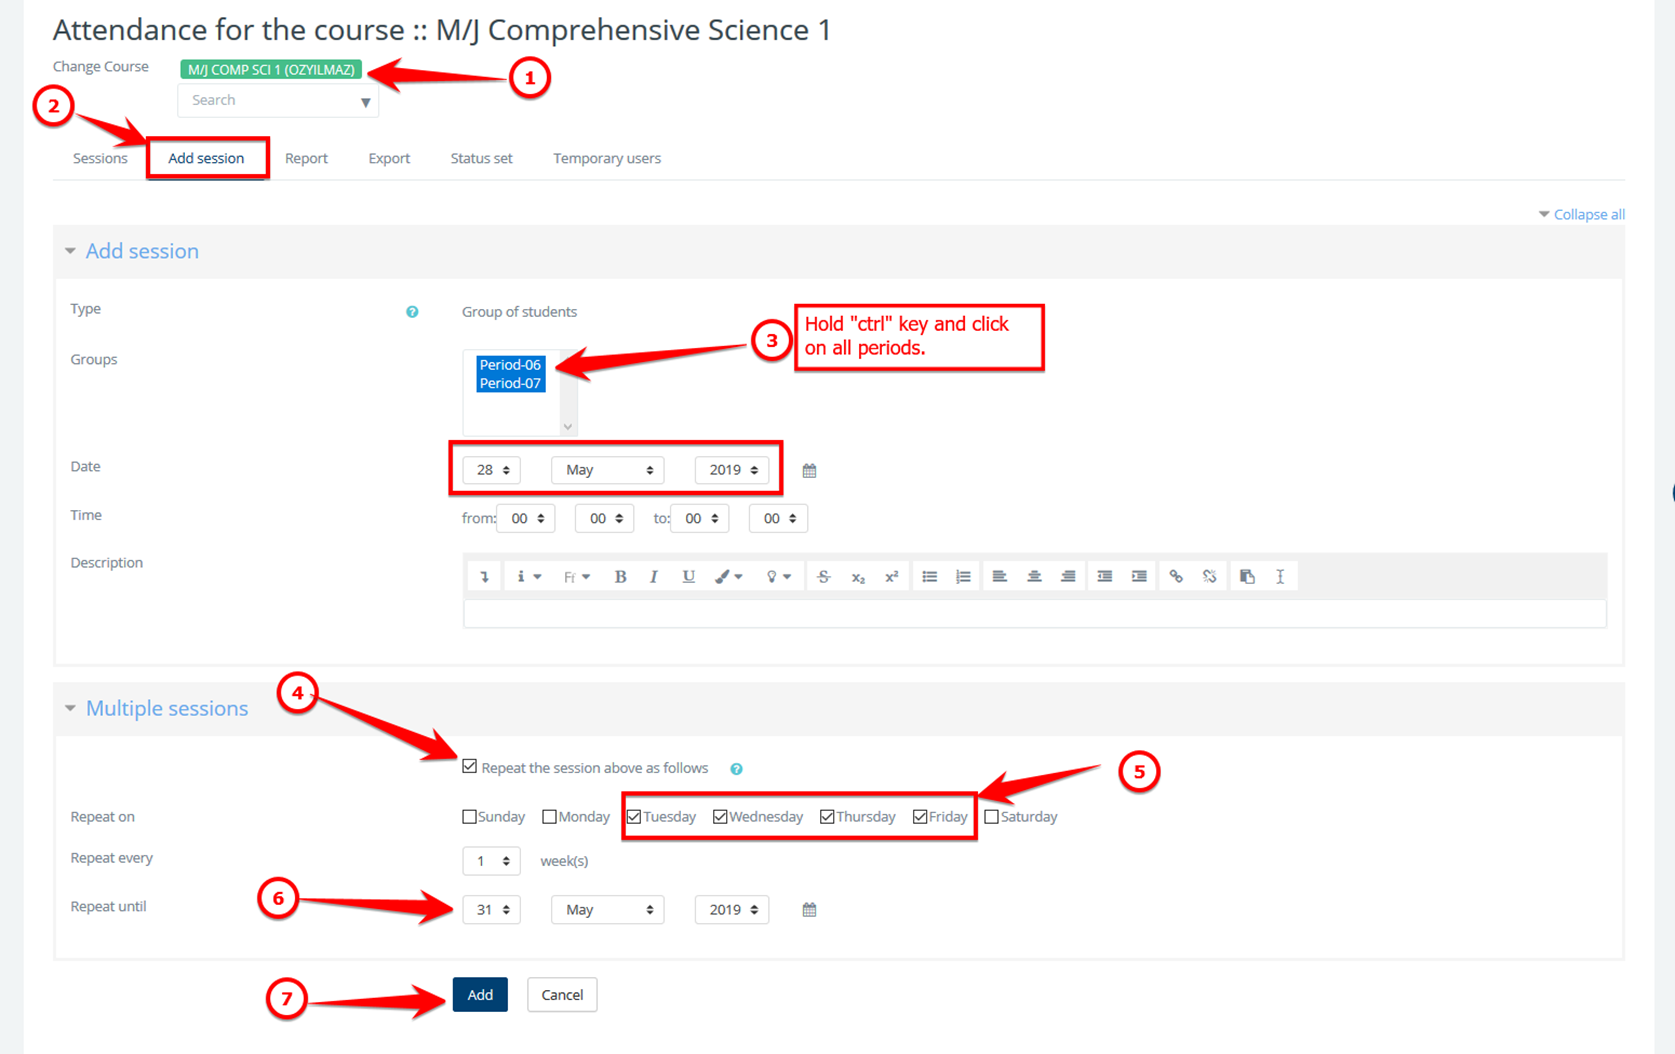
Step3: Add “sessions” by following the steps indicated on the screenshot below. Since you are already in the course, #1 below is just to double-check if you are in the right course. You can create sessions for all or one period of the course. Each period will have a separate attendance session.
If you would like the attendance session to take place within certain times of the day, you should change the time "from" and time "to" as well. This can be used to restrict students to take attendance during the session time.
Step4: Self&Auto marking: If this attendance is going to be enabled for auto-marking or self-marking for students, the "Student recording" section should be configured.
#1 is for self attendance, if checked, students will be able to mark themselves present within the session hours,
#2 is for auto-marking; students will have to go to the course page within the session times to be counted as present,
#3 will make sure the students have been marked the highest available status for auto attendance which should be the "present"
the rest of the setting in this section should be kept as below unless you want to restrict your students to self/auto mark from a specific IP address.

The sessions will not skip your school holidays or off days for students. You can create sessions in multiple times to skip those days or delete those unwanted sessions later as explained in step 4.
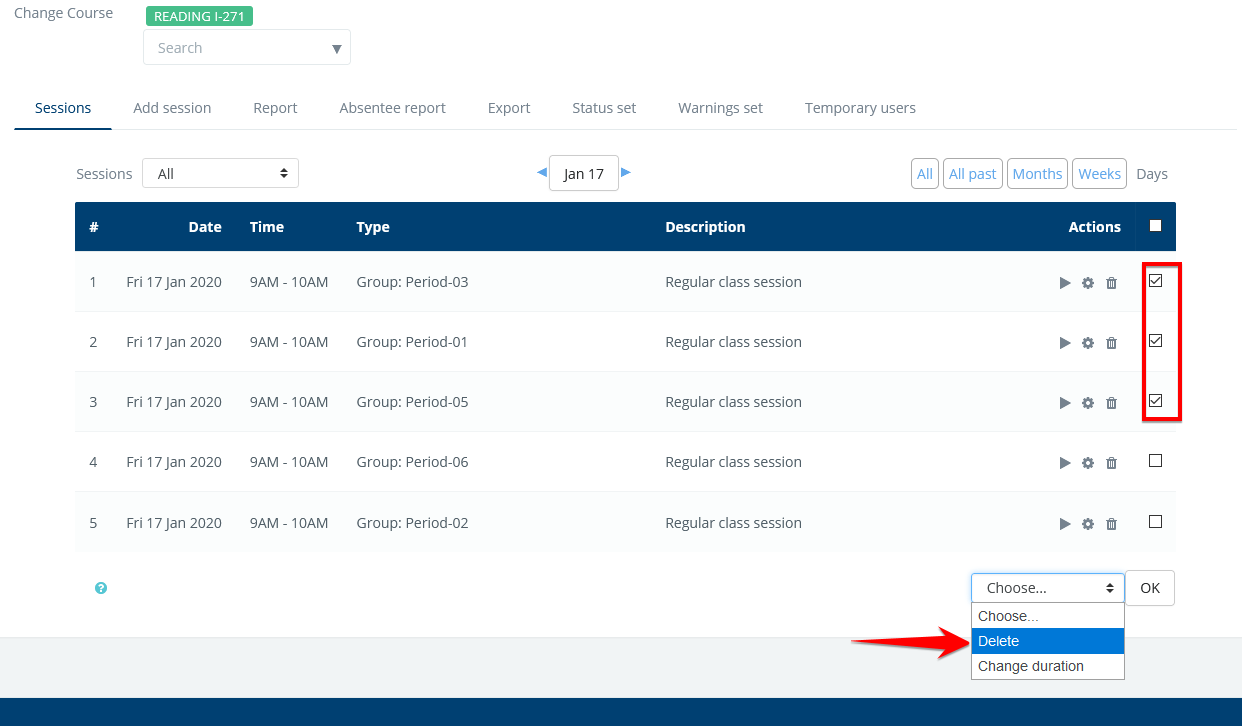
Step5: Deleting unwanted sessions: Any attendance sessions added by mistake can be deleted by going to the "Sessions" tab. Simply select the attendance session you want to delete and go to the bottom of the page and select "Delete" from the drop-down menu. For example, if you need to delete all sessions of a period including past sessions, click on "all" and select the period in the drop-down menu. To select all the periods on the page, check the box next to "Actions", go to the bottom of the page, and delete the selected.
If there are already attendance logs in any of the sessions you are deleting, they will permanently be deleted with the sessions as well.
If an enrolled student does not show up on the attendance list, this may mean the student's enrollment date has ended. You may check and update students' enrollment end dates via course participants.
Attendance Reports
Attendance reports can be accessed via School>Attendance quick menu.
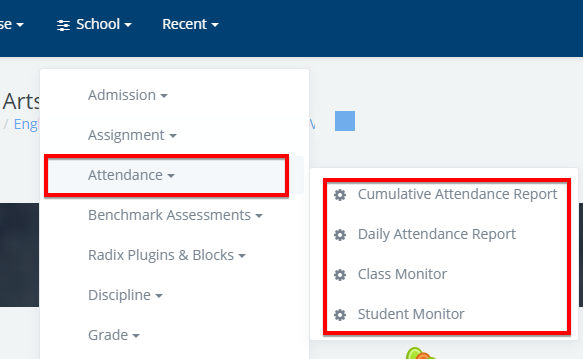
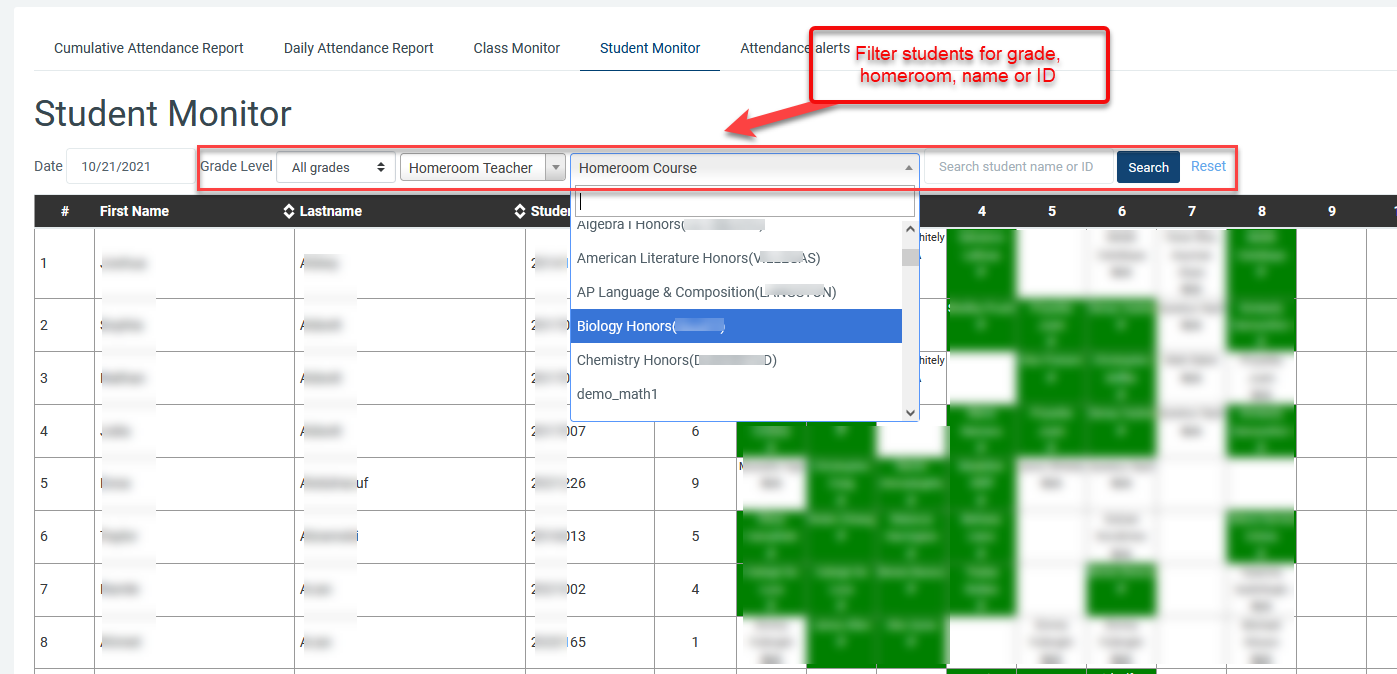
There are 4 different types of attendance reports: Cumulative Attendance Report shows the number of total statuses (present, tardy, absent, etc) within selected dates. The daily report shows the students' attendance status on a selected day-by-period. The class monitor shows the list of teachers and the periods they are required to take attendance. Each box represents a period or the periods (if multiple throughout the week) with a color code and number of students whose attendance has been recorded. The student monitor shows the daily attendance status of students for each period. This report is interactive where the admins (or attendance coordinator) can click on the box and change/update the attendance.
Teachers can also access their own courses' attendance reports via the attendance activity.
Attendance Alerts
There are two types of Attendance Alerts: Habitual absence/tardy alerts, and Incomplete Attendance Alert
Habitual absence/tardy alerts
Admins can create alerts to receive notifications about students' absences, tardiness, or other status and when there is incomplete attendance. Admins can set certain level(s) of absences or tardiness to receive daily notifications when any student reaches to that level in any course or session.
Incomplete Attendance Alert
This alert will send a notification for “incomplete” attendance sessions. Those are the sessions that teachers have not fully taken attendance for. It will send a notification to teachers of that session/period and the designated staff member.
The system doesn't send notifications during weekends or school holidays. Admins can create multiple alerts for different attendance codes, alert levels, or alert times.
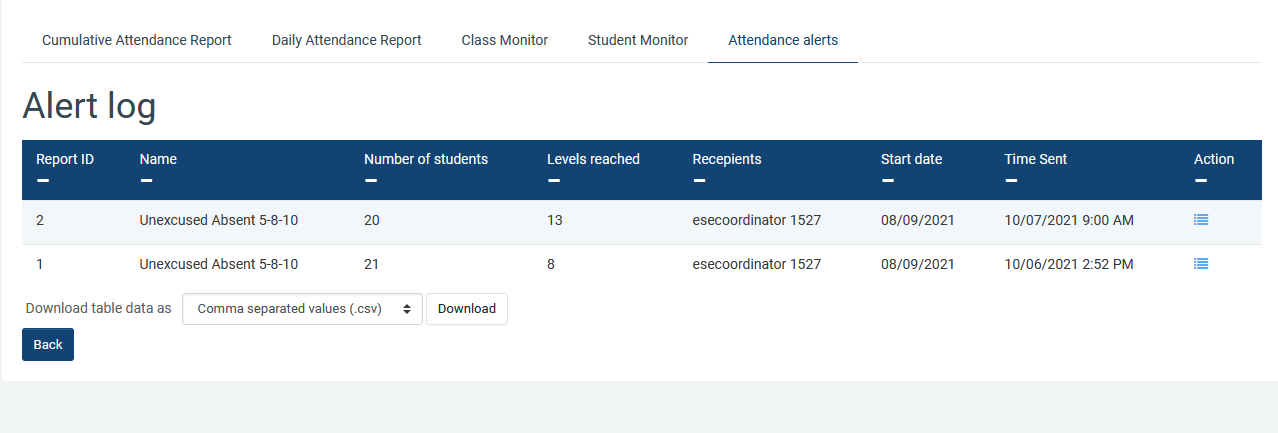
To access the alerts, navigate to School>>Attendance>>Attendance alerts
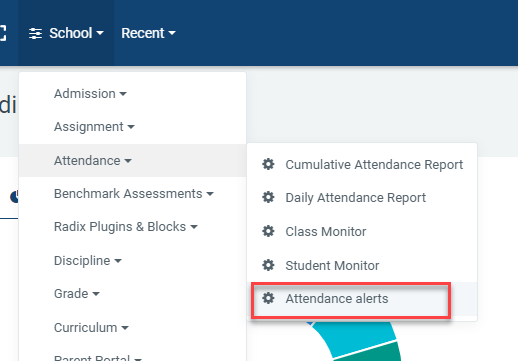
Once you are on the alerts page, you will see the list of alerts previously added.
To create your first alert or add another one, select the alert type from the drop-down menu and click on the "Add" button.
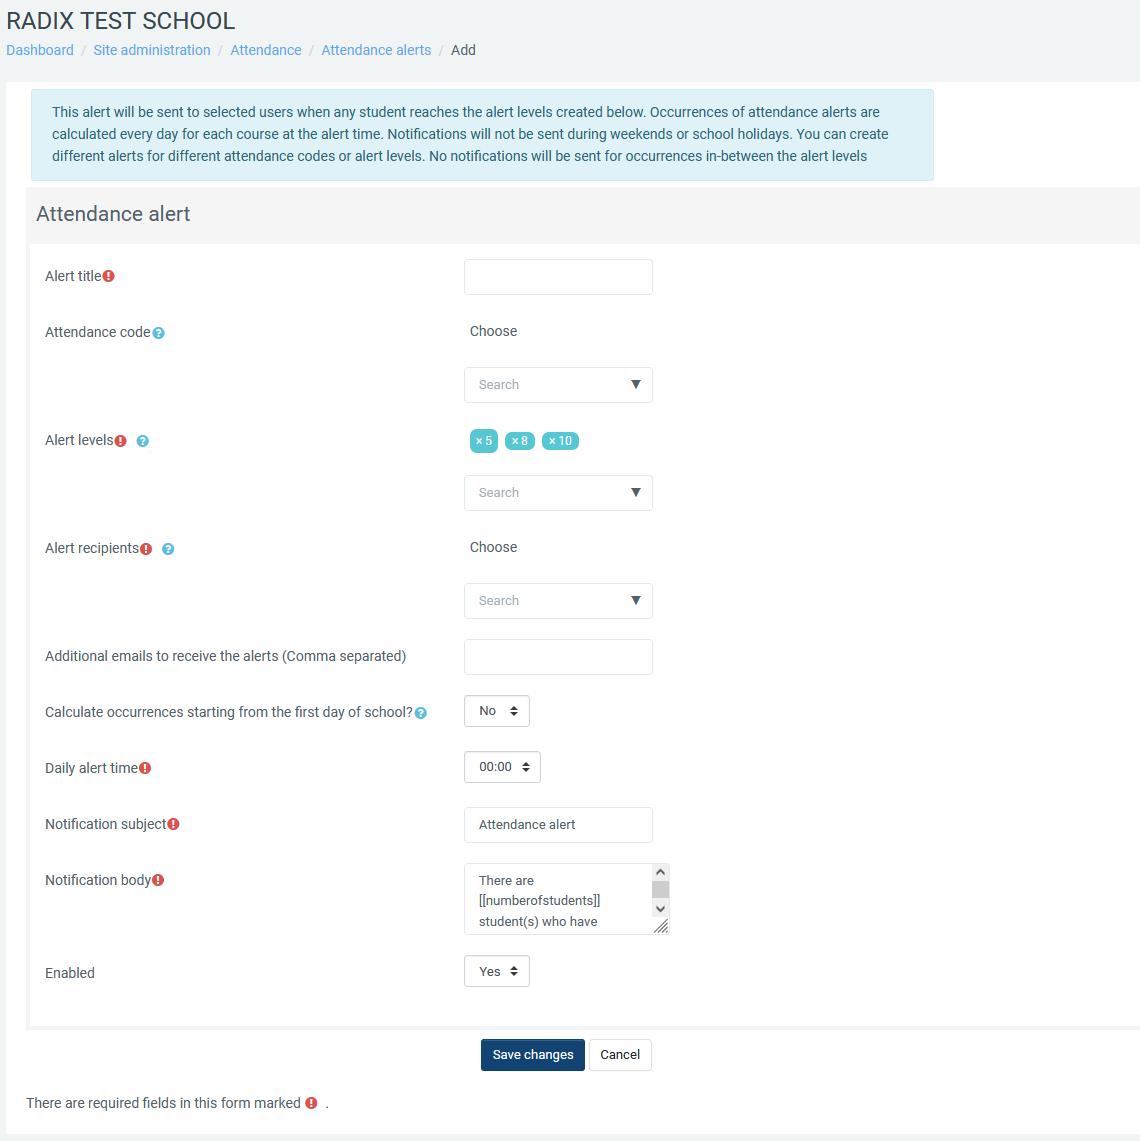
Next, fill in the information required for your alert type:
Attendance code: Select the code or the codes you want to be counted in this alert. For example, if this is just for unexcused absences, you would select "Absent". if it is for unexcused tardies, "Tardy" would be selected. You can select multiple codes to cumulatively count the number of occurrences for the selected codes.
Alert levels: This is where you determine when to receive alerts. the preset numbers are 5, 8, and 10. This means you will receive alerts when any student reaches 5, 8, and 10 occurrences of the selected attendance codes. Notifications are sent only at those counts, not in between those numbers. A student with 6 or 7 absences will not be included in the alert until she/he reaches 8 absences.
Alert recipients and additional emails: Determine to who do you want to send the notifications. It will be sent as an email and a notification on the Radix LMS with a link to the alert report. Only those users with required attendance permission will be listed on the dropdown menu.
Start date: You have the option to start counting the occurrences from the beginning of the school year or from the beginning of the current grading term. Select yes, if you want the beginning of the school year to be the starting point.
Daily alert time: Time of the day you want the alerts to be generated and notifications to be sent to selected users. Keep in mind the time selected here should be a time after all sessions/periods are over.
Subject and notification body: You can also change the subject of the notification and the message. Please do not alter the variables in double brackets "[[ ]]" as they are dynamic values of the alerts.
Enable/disable: if you no longer want to use this alert, you can simply disable it. That way you can keep the reports generated by this alert.
 Habitual absence/tardy alert setup | 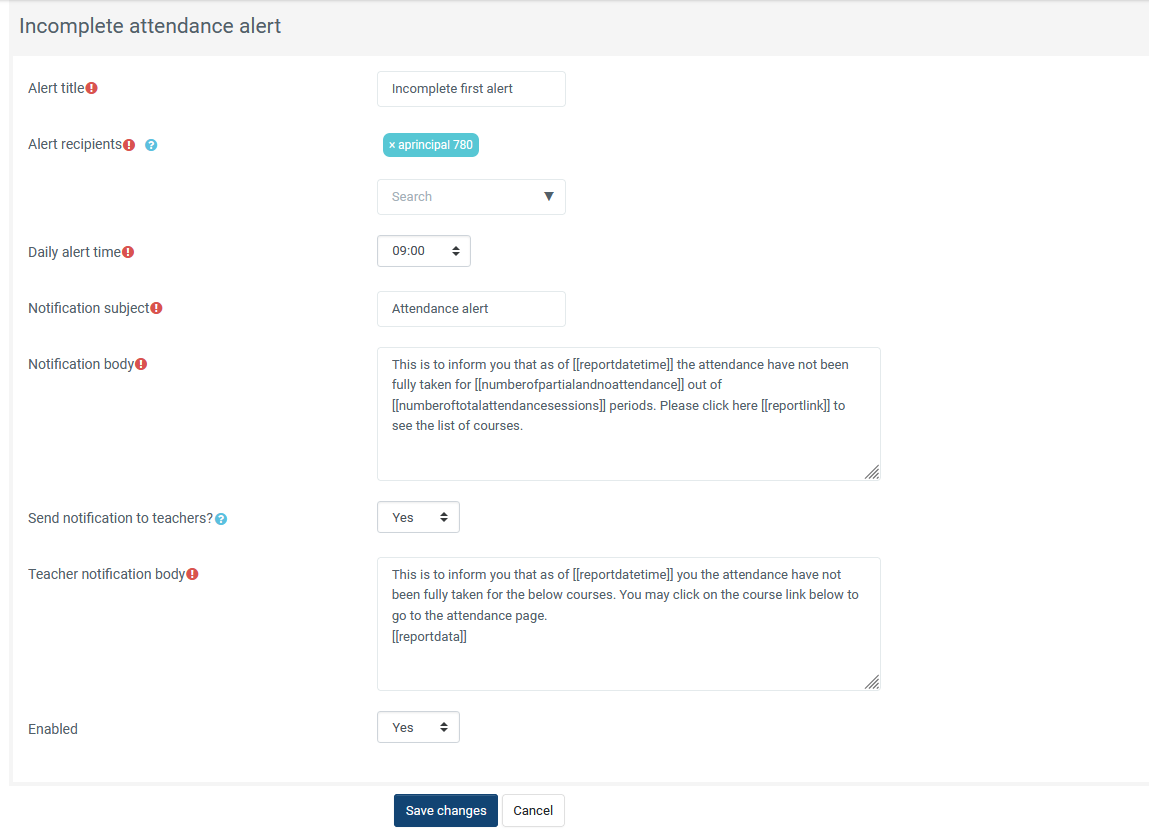 Incomplete attendance alert setup You may send the notification to the teachers of the courses with incomplete attendance. The staff member(s) selected will receive a summary of the incomplete attendance report in the email. |
Once the alert is created, you can change its settings using the action icons.
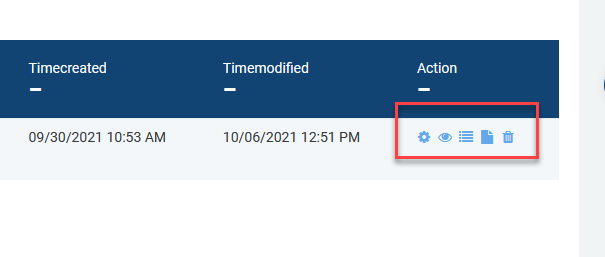 | The action icons at the end of the alert will let you edit the alert, enable/disable, see the alert logs, see the latest report, and delete respectively. If you do not see the latest report icon, that means there haven't been any reports generated yet. |
When the alert is created and you received a notification, click on the link in the message to access the alert report. You can also access the same report by clicking on the "Latest report" icon under the action column of your list of alerts.
The report will show the list of students with the grade levels, and courses they were absent or tardy depending on the alert, alert time, and start date. You will also see the alert level(s) these students reached for these courses.
If you want to see the cumulative attendance report for any of these students, click on the name.
Please note that you will only receive an alert if there are new students reached to any of the alert levels or the alert level of a student has changed. The reports will not show a cumulative list of students, it will only show those students who reached the levels on the day of an alert.
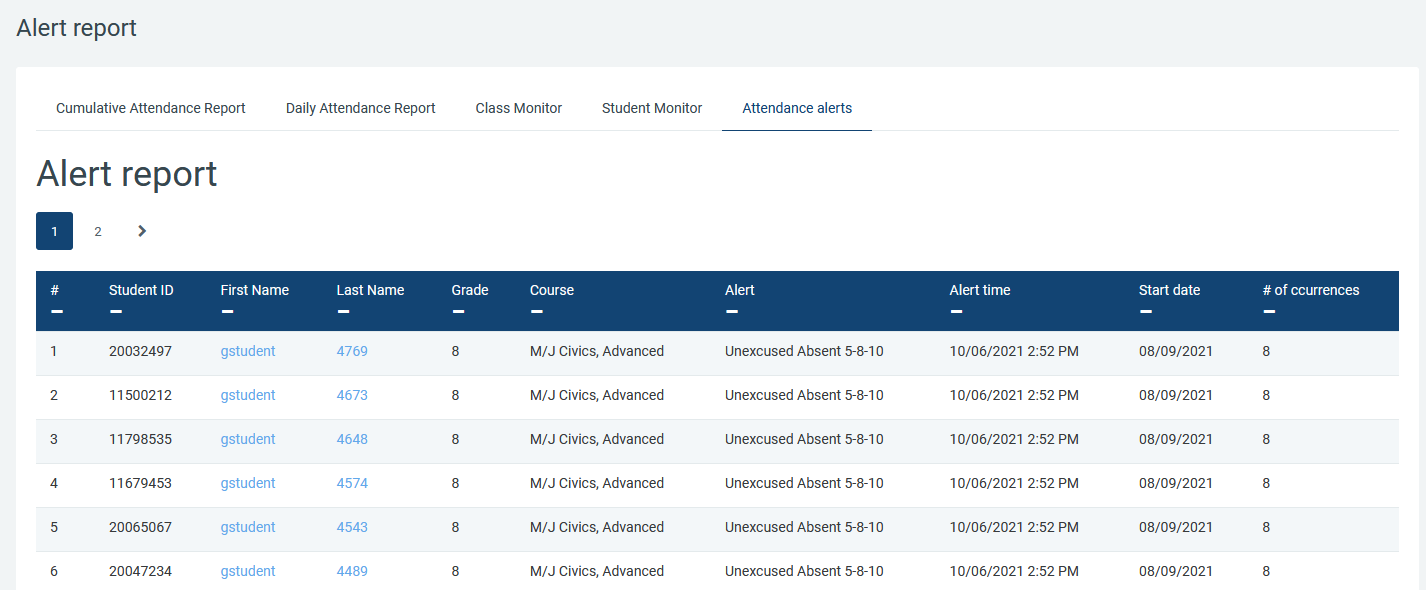 Unexcused absance alert report Click on a student name to see the detailed attendance report. | 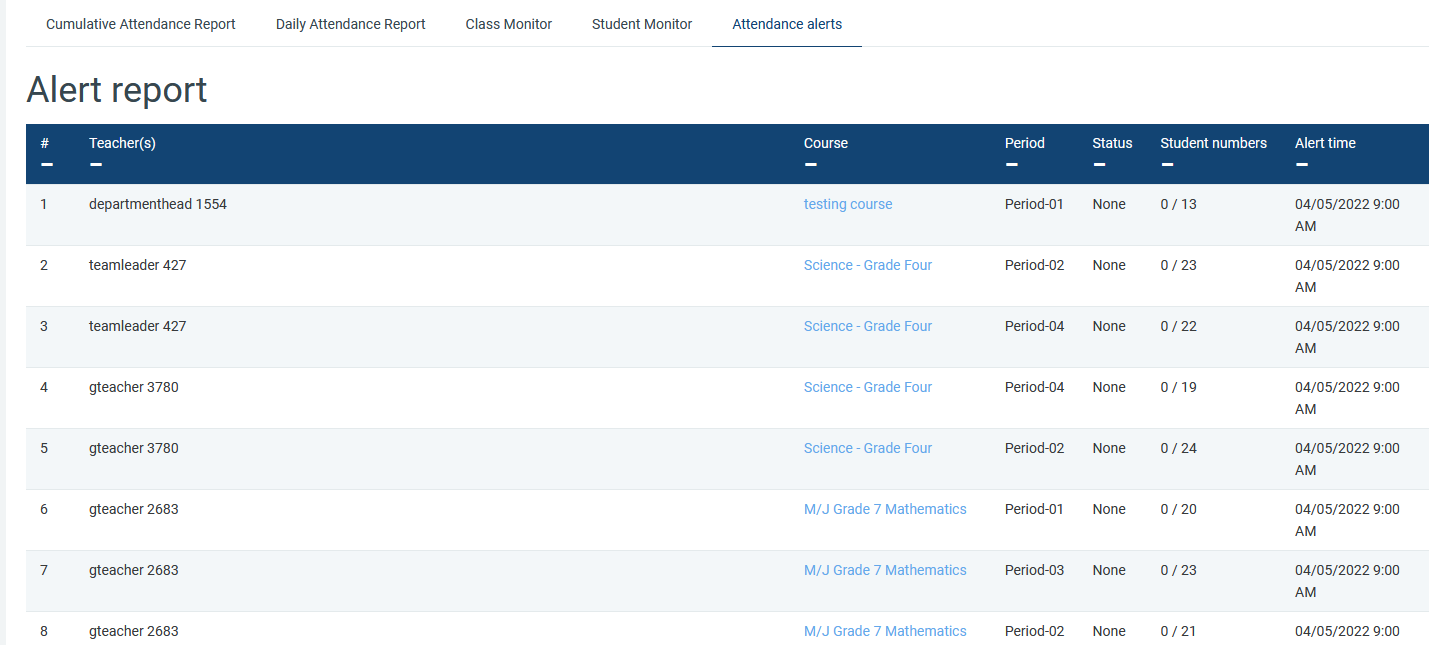 Incomplete attendance alert report Clicking on a course name on this report will take you to the attendance screen of that period. |
You can also see the summary of the report on the logs page by clicking on the alert log icon. This will show the number of students in the report and the alert levels reached by these students. Click on the list icon to access the report for any of the logs.