Scheduler
The Scheduler activity helps you to schedule one-on-one appointments with all your students. You specify the periods during which you are available to see the students and the length of each appointment. The students then book themselves into one of the available timeslots. The module also lets you record the attendance and grade the appointment.
Quickstart for the Scheduler
This section shows you how to quickly make your first scheduler, so only the basics are described. Like any other first attempt, your first scheduler will probably be more for learning than using, but after you finished it, you'll be able to choose which features you want to learn more about.
Prerequisites
- You must have teacher access to a course.
- Teachers and students must be enrolled in the course.
- The scheduler must be installed. (If you do not see it in the list of activities, please contact your site administrator)
Creating a basic scheduler
- Click the "Turn editing on" button.
- Click the link "Add an activity or resource."
- In the box that appears, choose "Scheduler" and click the "Add" button.
- A web page will appear called "Adding a new Scheduler." Type in the name of the scheduler, which can be changed later.
- Scroll to the bottom of the webpage and click the "Save and display" button.
- A webpage will appear with the name of your scheduler at the top. Click the "Add slots" link.

- A drop-down menu will appear that allows you to add repeated slots or a single slot. Click the link to add repeated slots.
- Options will appear to add time slots. For this lesson, the slots you add can be real or fictitious, for practice. All time slots must occur in the future, and the start time must be before the end time. The simplest option is to:
- Click the "Start time" menu and choose a time that is one hour from now.
- Click the "End time" menu and choose a time that is one hour after the start time.
- Scroll to the bottom of the webpage and click "Save changes."
After these steps, a basic scheduler will appear. To learn more, view the scheduler as a student or explore the options below.
Overview of Scheduler screens
My appointments
This screen allows the teacher to manage his or her own appointments independently from any other teacher in the course. Basically, the features are similar to the All Appointments screen, but the slot list has been filtered so only your appointments and free slots are visible.
Adding a slot or a series of slots
When first added to a course, the scheduler will not have any slots set up. Each enrolled teacher can add their own slots if they have the capability on the site.
Clicking on "Add slots" allows you to add either one slot or repeated slots. You will be able to add slots using the form below:
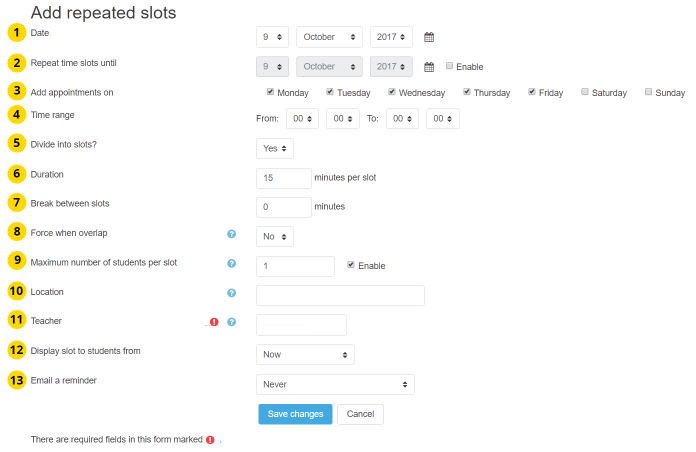
Add Slot Form Elements
- Start date for making slots.
- End date for making slots. Keeping it equal to start date will make slots for a single day. Over these dates, slots will be repeated based on the day of week and time.
- You can choose which days of the week to create slots on. Take care to not disable all of the days in the date range you selected.
- The hour range for making slots can be set here. The hour range can roll over 00:00.
- Selecting "Divide into slots" will create multiple slots fitting within the range specified above. If not selected, a single slot with the given duration will be created at start of the hour range.
- Set the duration for each slot.
- You may set a break to appear after each slot, allowing you time to write notes or rest.
- The "Force when overlap" setting will allow the slot creating procedure to continue even if there are some other slots on the way. This will also remove the old slots after the new ones are created.
- Using "Maximum number of students per slot" you can specify how many students should be able to sign up for each slot. For one-on-one meetings, this would be 1 student.
- Here, you can set the location where you will meet students.
- If you own the "mod/scheduler:manageallappointments" or the "mod/scheduler:canscheduletootherteachers" capability, you may appoint for someone else than yourself.
- You may change these setting to limit availability of slots to students based on how far away the slots are. Options include "Now" (always available), "1-6 days before", and "1-6 weeks before."
- You may control when a reminder will be sent by mail to the student. Options include "Now" (always available), "1-6 days before", and "1-6 weeks before."
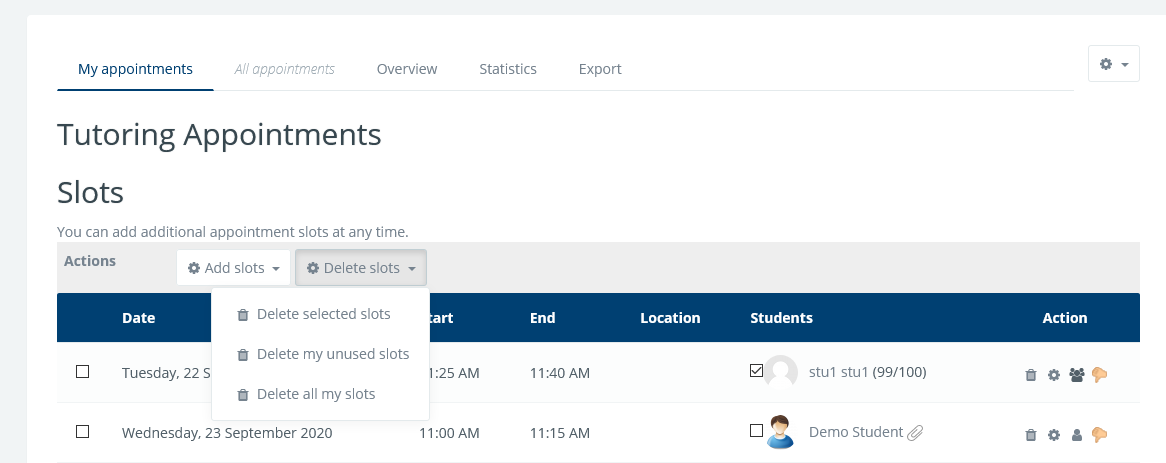
Add And Delete Buttons
At top of the screen is an Add And Delete control buttons that allow opening forms for adding a single slot or a series of slots. When slots have been entered, the bar adds more "Delete" features. This bar may have more or less Delete features, depending on whether you can manage appointments for colleagues or not.
|
|
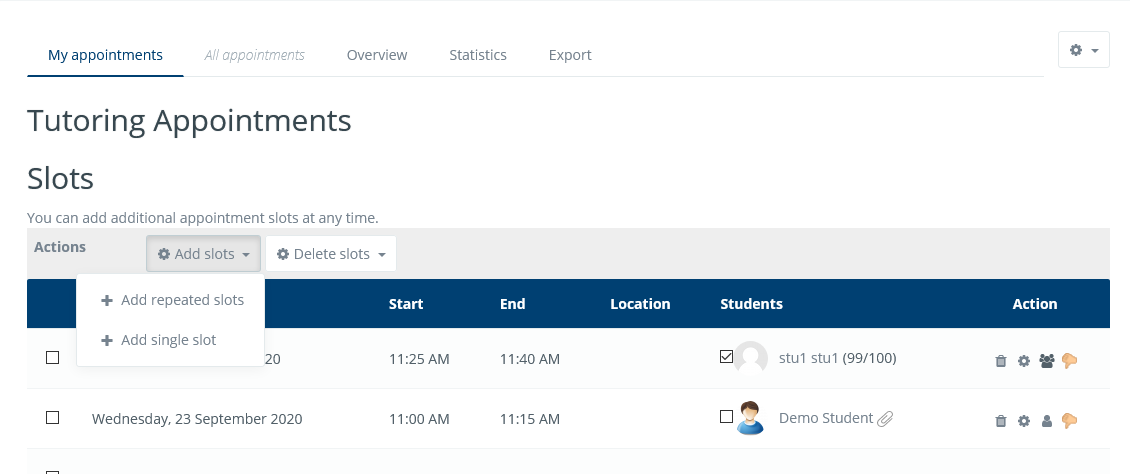
Slot List
Below the Add and Delete bar, there is a slot table that shows the complete status of the used and available slots. In the My Appointments screen, only the slots belonging to the current user are shown. The free slots show an empty appointment cell, while booked slots show the list of students who are scheduled.
Slots can be individually edited to change parameters or the composition of attendee list, which is one way to schedule people.

Settings
Scheduler Name And Description (not shown)
As usual, the name and the description are used as short references (resp. description) in the course or the scheduler index.
Mode
This parameter allows switching between the "one only" and the "one at a time" mode.
- One only: The student will be allowed to appoint only one time in this scheduler. He will not be allowed to appoint a new slot, even if his previous appointment has been concluded and marked as "seen".
- One at a time: The student will be allowed to appoint as soon as his current appointment has been marked as seen. This allows multiple encounters between student and teacher in the scope of this scheduler purpose.
Guard Time
This parameter sets a "guard time" from the time that an appointment takes place; within the "guard time", students cannot modify their booking. That is, if the "guard time" is set to 1 hour, then students must book slots at least 1 hour in advance, and they won't be able to cancel their booking less than 1 hour before the appointment.
Default Slot Duration
Specifies the default duration of a slot (in minutes) when adding slots. This value can be overridden when adding slots.
Scale
Specifies the grading scales that might be used to grade the student's interview.
Notifications
Allows enabling or disabling mail notification service for this scheduler. If set to "no", no message will be sent when moving, removing or adding an appointment.
Grading Strategy
Attention! Appointments can not be graded using the quick grading screen. Students must be graded individually within the activity.
When the mode is "one at a time", a single student might accumulate more than one "seen" appointment. There are two ways of calculating the given grade for the appointments:
- Take the mean grade: The grade will be the mean of all given grades for that student in the scheduler.
- Take the highest grade: The highest grade over all the appointments will be retained for grading.
Features
Scheduling modes
The Scheduler activity allows two behaviors relative to appointing, depending on configuration settings. When set to "one only", a student can propose a unique appointment. When set to "one at a time", the student may propose one appointment and will have to wait to be seen, before being able to make a subsequent appointment.
Slots exclusivity
A slot may accept an unlimited number of students (say, when scheduling for open meetings), or only one (face-to-face meeting), or maybe set to accept a predefined number of students.
Messages and notifications
An optional notification service sends messages to teachers and students on certain changes:
- To teachers, when a student books or cancels an appointment,
- To students, when a teacher declines an appointment. (Note, no message is sent when the teacher deletes the slot instead.)
This can be enabled or disabled on each Scheduler's settings page.
The scheduler also sends reminders of upcoming appointments to students, if the teacher has selected this on a per-slot basis.
Further, teachers can use a web form for manually sending invitations or reminders to students who did not yet make an appointment.
Behavior with groups
Scheduler has two different group-related features, both of which can be enabled independently on a per-scheduler basis:
- Restriction to groups: Students can schedule appointments only with teachers in their group,
- Booking in groups: Students can schedule an appointment for the entire group at once.
Restriction to groups is controlled by the usual Group mode feature (in "Common settings"). Setting "Group mode" to "Visible groups" or "Separate groups" will mean that students can see, and book, only slots that are offered by a teacher with whom they are in a common group. Additionally, in "Separate groups" mode, teachers won't be able to see slots outside their group unless they have permission to access all groups.
Booking in groups means that each student of the group can make an appointment for the entire group, i.e., when they click the "Book slot" button, they have the option to assign the entire group to that slot. In order for a student to schedule a group, they will have to belong to at least one group in the course. In the special case where the student belongs to several groups and they wish to make an appointment within a group, they will not be able to make the appointment until the student has been seen (one-at-a-time setting) or at all (only-one-time setting). With "Booking in groups" enabled, teachers, will also be able to assign an entire group to a slot at once.
Note that irrespective of the group features, slots always remain assigned to one teacher and zero or more individual students, and are not as such tied to a group.
Scheduling conflicts
The scheduler will, in some situations, warn the user if they are creating scheduling conflicts, i.e., two appointments for the same person at the same time.
When offering or booking time slots in Scheduler, a user might end up with scheduling conflicts, that is, with two overlapping appointments at the same date and time; either within the same scheduler activity or across several scheduler activities on the system.
The scheduler attempts to warn teachers of such scheduling conflicts, but it does not ultimately enforce conflict-free appointments. When a student makes a booking, however, no checks for conflicts are performed.
Teacher side: In the teacher screens, Scheduler will generally warn when a new or updated slot would create a conflict for a teacher. It does not check whether students on the slot have scheduling conflicts.
Slots that happen in the past will never be regarded as conflicting. Since these are normally added/moved for documentation purposes only, it is not useful to check for conflicts in this case.
Adding or editing a single slot
When the edit form for a single slot is saved, Scheduler will check whether the time range of the slot overlaps with any other slots of the same teacher, in any scheduler activity on the system. If a conflict is found, this will result in a warning message. You can override the warning - and save the conflicting slot nevertheless - by ticking the "Ignore scheduling conflicts" box.
Adding repeated slots
When adding a series of (empty) slots, Scheduler will check while creating the slots whether any of them conflicts with existing slots for the same teacher.
In case a conflict is found, the behavior depends on the setting "Force when overlap" in the Add multiple slots screen. If this is set to "no", then those new slots that would create a conflict will not be created. If the switch is set to "yes", then existing conflicting slots will be deleted before the new slot is being created.
However, Scheduler will never delete a conflicting slot if students are already booked on it, or if the slot is located outside the current scheduler activity.
Mark as seen now
When a teacher clicks "mark as seen now" on a student, this will always create an appointment with the student at the current time, with no checks for conflicts performed.
Student side: Scheduler does not detect any scheduling conflicts in the student screens. That is, nothing prevents a student from scheduling two appointments at the same time, either in the same scheduler or in separate schedulers.
The assumption here is that students will check their calendars for other commitments (whether Scheduler appointments or otherwise, online or offline) before making a booking.
Booking forms and student-supplied data
When students book a slot in a Scheduler, they can optionally be presented with a separate booking screen before the actual booking is made. This screen may just display information to the student, or it may require the student to enter some text, to upload files, or to solve a CAPTCHA security question.
Configuring the booking screen
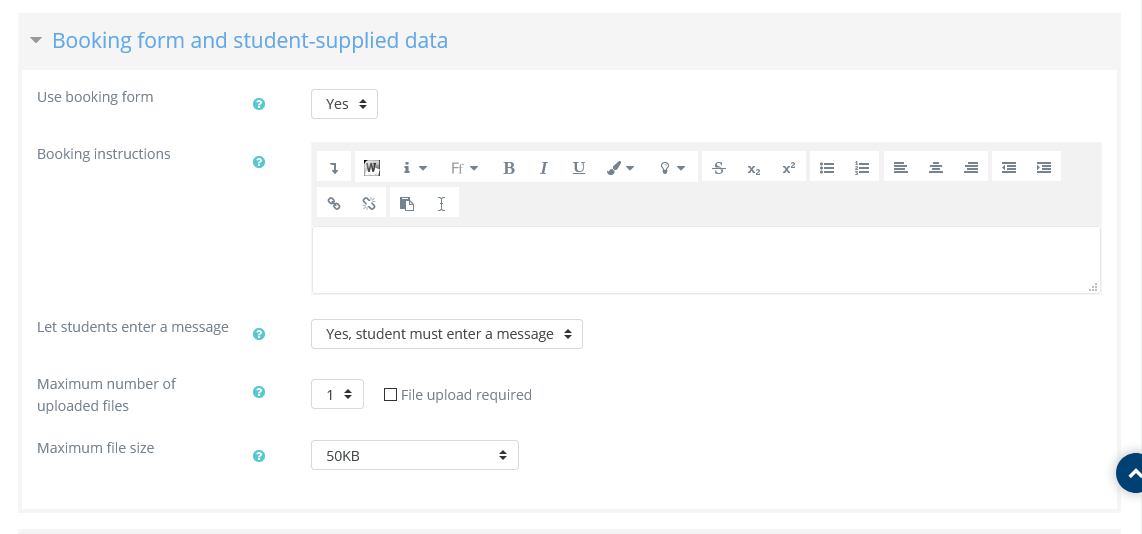
Scheduler booking form settings
To set up the booking screen, go to the Settings page of the Scheduler, and expand the section "Booking form and student-supplied data". Here you can activate the booking screen (first entry field) and, if enabled, configure its contents:
- You can enter a text message which will be shown to students at booking time. Here you should include instructions on what students should enter in the data fields described below.
- You can add a (optional or mandatory) text box where students can enter a message for the teacher.
- You can ask students to upload files (again optional or mandatory).

Booking form as seen by student
Students will need to fill out the booking screen before they make a new booking. They can later return to edit their data, up until the Guard Time if enabled.
Using a CAPTCHA
On the settings page, you can activate a CAPTCHA security question which will be shown to students when they make a new booking. (Existing bookings are not affected.) This can be useful if you suspect that students use automated programs (bots) to snap up appointments as they become available.
The scheduler uses the same captcha system as the Email-based self-registration feature, that is, based on Google's reCAPTCHA system. Before using captchas in Scheduler, you need to register an account with Google and set this up in the global configuration settings. Only after that, the captcha option will be visible in your Scheduler settings screen.
Accessing data supplied by students
If a student has entered data in the booking screen, a little "paperclip" symbol will be displayed next to their name. Clicking on the student's name will take you to the appointment screen, where the data supplied by the student is displayed.