Parent Quick Guide
Parent Portal is designed for parents to access their student's progress using their accounts quickly. Using a parent account allows users to switch between the students and access their progress, such as grades, assignments, attendance, behavior, and standards-based assessments, without having to do multiple logins. They can also update contact information and send messages to teachers.
Registering a new parent account and adding students
As a valued parent or guardian, you now have a more streamlined way to monitor your child's academic progress, attendance, discipline, upcoming events, and more through Radix LMS. To start, the school administration will send an invitation email to your preferred address, providing a hassle-free setup. Once you've verified one child, all other students associated with you will be automatically added.
Here's how to create your account:
- Look out for an email from the school administration containing a link for you to create your parent account on our LMS. If you cannot find it, please check your spam folder or contact the school.
- Click on the link provided in the email, which will take you to the registration page.
- Here, you'll be asked to verify your child's birth date, state your relationship to the child, and provide your Student ID if requested. If the information matches our records, you'll see your student's name. Confirm that this is your child by clicking 'continue.' If there's an error, click 'cancel' and contact the school for assistance.
- After successful verification, you'll be directed to finalize your account creation. Remember, the email address to which the invitation was sent will serve as your username. The only detail you need to provide is a unique password for your account. When you're done, click "Create my new account."
- Finally, you will receive a confirmation email containing a link to complete the account activation. By clicking on this link, your account will be activated and you'll be redirected to the site, ready for use.
- One important benefit of registering is that only registered parents can receive correspondence from the LMS. This includes weekly progress updates, discipline notifications, messages from teachers, and more. Furthermore, there's no need to manually add each child. After successful registration, all your students will automatically appear in your account.
Take note: You can also access the parent portal through the Radix Mobile App, available for both iOS and Android devices. Visit your device's app store, search for "Radix Mobile", and install the app. This enables you to monitor your child's school performance on the go. Should you encounter any difficulties or have any questions, please don't hesitate to contact your school for assistance.
By accepting this invitation, you are enhancing your connection with your child's educational journey. Welcome to the family of engaged parents!
Frequently asked questions for parents and students
I logged in with my parent account successfully, but I don't see my student(s)
If you do not see your student after you successfully log in to the site please contact your school to check your contact information. The school may have to send you another invitation email to add your student.
I registered a new account but can't log in to the site
If you successfully confirmed your student and registered a new account on the site, the system will send you a confirmation email to make sure you have access to the email you provided. After you click on the confirmation link in the email, you can log in to your account on the site. Please make sure to check your spam box too. If you didn't receive a confirmation email within an hour, please get in touch with your school for further assistance. The email service providers may delay the delivery if this is your first time receiving email messages from the Radix LMS. Please add "radixlms.com" to your safe sender list in your mailbox settings.
I didn't receive a confirmation email after I registered a new account
Make sure to check your spam folder first. The confirmation email may take several minutes to be sent to the new accounts. If you haven't received a confirmation email after a few minutes or accessed the email beyond the deadline to confirm, a button will be available to resend the confirmation.
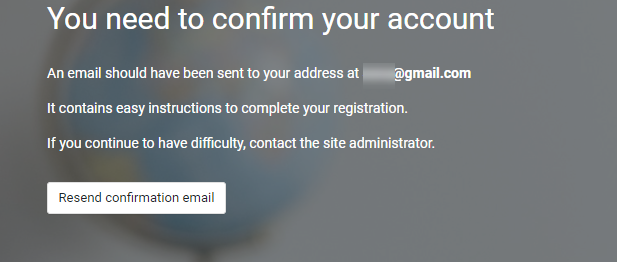
Go to the login page of your site and try to log in with the email and password you used to create your account. If the account was successfully created, you should see a message like the one below on the login page. Please click on the "resend confirmation email" button to have the system send another confirmation message.
I only see a blank screen or infinite spin when I open the Radix Mobile App
If you are experiencing a blank screen, or infinite spin and cannot access the app’s settings, please delete your app’s data by following the below guides based on your Operating System. You should then be able to add your site and log in using your credentials. Removing or deleting the app data will not delete your students' data on the Radix LMS site. It will only delete your phone or tablet's locally stored temporary data.
IOS users
To delete the app data for Radix Mobile on your iPhone or ipad, please delete the app and reinstall it from the app store. After installing your app, please follow these instructions to add your site and log in using your credentials.
Android users
Android version 11 and above:
Open the Settings.
Tap on Storage.
Select Apps or Other Apps.
This will open a list of apps currently installed on your phone. By default, it will show you the apps with the most data used at the top. On older Android versions, you also get the option to sort the apps by size.
Select the Radix Mobile app to clear the data.
You will see two options: Clear storage and Clear cache. Tap Clear data and select ok.
After installing your app, please follow these instructions to add your site and log in using your credentials.
Android version 10 and below:
Open the Settings.
Tap on Apps or Other Apps.
This will open a list of apps currently installed on your phone. By default, it will show you the apps with the most data used at the top.
Select the Radix Mobile app.
Tap on Storage.
You will see two options at the bottom: Clear data and Clear cache. Tap on Clear data and select ok.
After installing your app, please follow these instructions to add your site and log in using your credentials.