Restrict access
Access restriction can be used to differentiate the instruction in your course based on certain criteria. The restriction can be applied to any activities (assignments, SBAs, chat, forum, etc), resources, or even sections in the course.
To use the restrict access feature, it must be enabled by an administrator by checking the "Enable conditional access" box in Administration > Site administration > Advanced features. A restrict access section will then appear for teachers on the Activity settings screen, with an 'Add restriction' button. This section applies to all activities and resources and is the second to last section in each activity settings area, above Activity completion (if it has been turned on). In Site Administration> Plugins > Availability restrictions > Manage restrictions site administrators can enable or disable (hide/show)any of the individual restriction types for use throughout the site.
Restriction settings
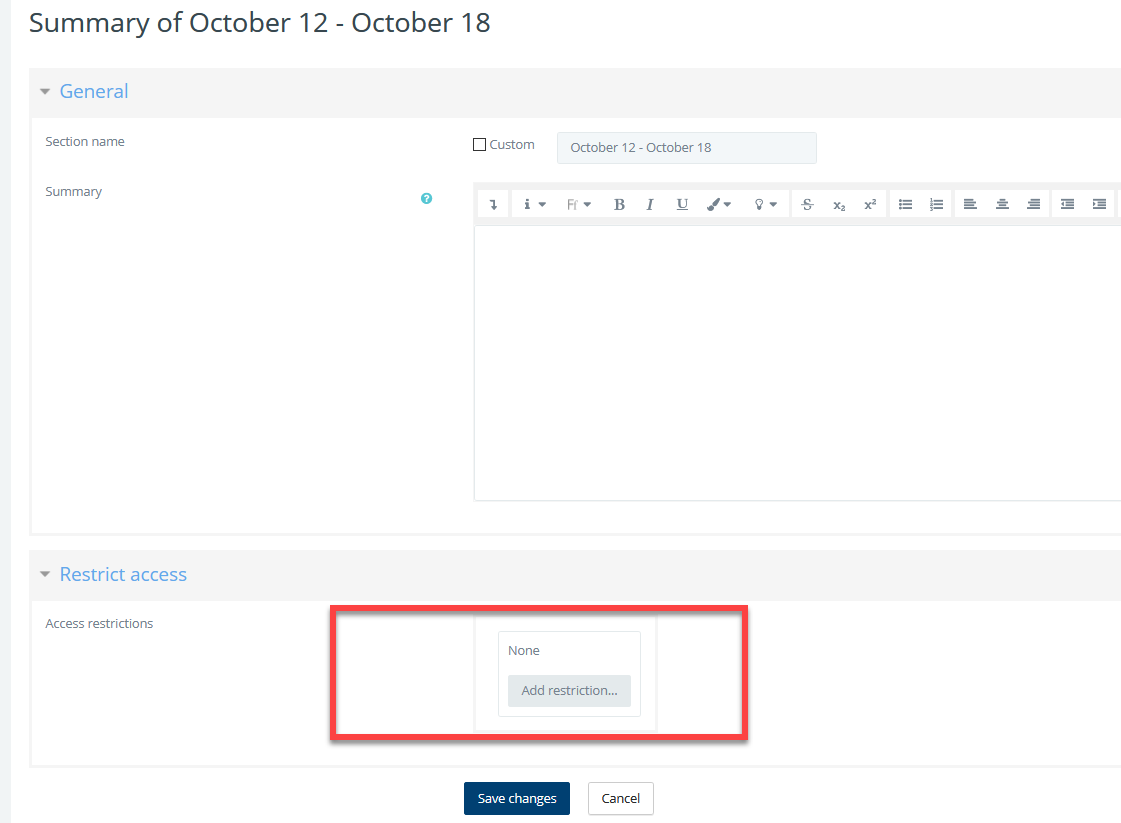
In the settings of each activity or resource, there is a Restrict Access section. To get to this, click 'Edit' alongside the activity or resource you want to restrict and then choose 'Edit Settings', or add a new activity/resource, which will bring you to the settings page.
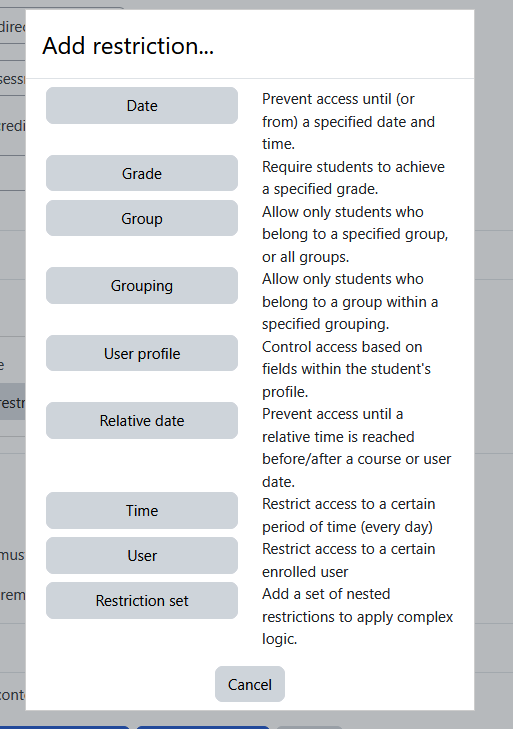
In the 'Restrict Access' section of the activity or resource settings page, click the 'Add restriction' button. A choice of conditions appears:
Access restrictions
Restriction can be based upon Activity completion, date, grade, the group, or grouping the students are in, or even user profile fields. The 'Restriction set' button also allows for more complex criteria requiring nested conditions.
Activity completion
See Activity Completion. Note that this button only appears if you have Activity completion enabled by the administrator in your site, and it is enabled in your course in Course administration > Edit settings > Completion Tracking.
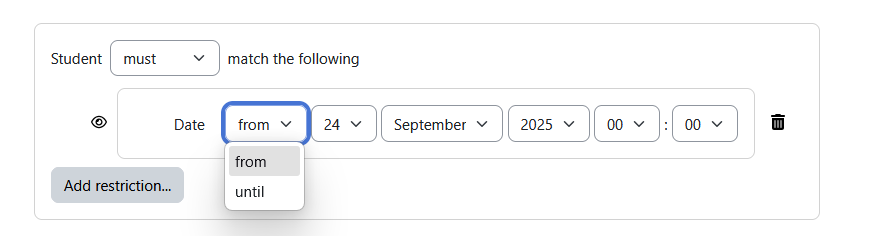
Date
Access can be restricted from or until a certain date and time.
Grade
You can specify a condition on any grade in the course: the full course grade, term grade, the grade for any activity, or a custom grade that you create manually. You can enter either a minimum value (at least a percentage), a maximum value (less than a percentage), both, or neither. The activity will only appear if the student has a value for the specified grade and if it falls within any specified number range. You can add more than one grade condition. All conditions must be met in order for the activity to appear.
The range numbers can be fractional (with up to five decimal places) if necessary.
Be careful with the maximum value; if the maximum is 7, a student who scores exactly 7 will not see the activity. You could set it to 7.01 if you wanted to include 7.
If creating several different activities that appear according to grade ranges, use the same number for the maximum of one activity, and the minimum of the next. For example, you might create one activity with a maximum of 7 and another with a minimum of 7. The first would appear to everyone scoring between 0 and 6.99999, and the second would appear to everyone scoring 7.00000 to 10. This guarantees that everyone with a grade will see one or another. To remove a grade condition, set the assessment name to 'none' and remove the range number values
If you want to use a condition for students with blank grades then you can add a grade restriction and select the activity you want to use as a restriction. Do not select a checkbox for either the greater than or less than criteria. This will require the student to have a grade. This means students with blank grades do not meet that criterion.
Group and groupings
If groups or groupings are used in the course, it is possible to restrict the activity to a certain group or grouping. If they are turned off for this course and not available, these options will not be present for use as a restriction.
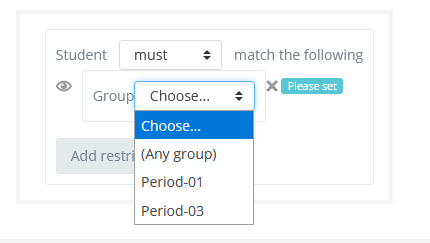
NOTE: This button only appears if you have groups enabled in your course.
User profile
Access can be restricted using any of the user fields such as
Email Address - This is the value in the 'email' column
First name - This is the value in the 'firstname' column
ID number - This is the value in the 'idnumber' column
Surname - This is the value in the 'lastname' column
Restriction set
This allows you to add a set of complex restrictions to apply complex logic. See Using Restrict Access below for an example.
Hiding the conditions
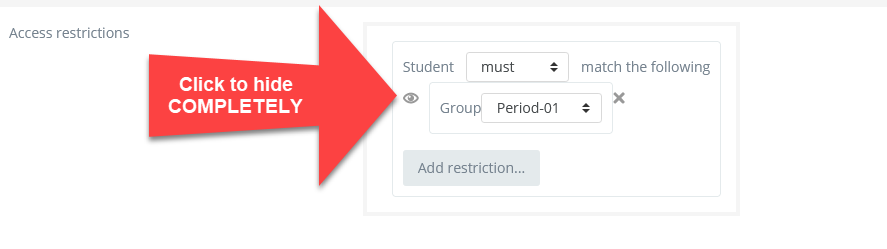
If the eye is SHUT then students who do not meet that part of the condition will not see the activity at all.
If the eye is OPEN the students who do not meet that part of the condition will see the activity but it will be greyed out and have information about why they can't access it yet.
The shut-eye takes precedence. For example, you could have 2 conditions, one based on the date (with eye shut) and one based on completing a previous activity (with eye open). That way, the activity will not appear at all until the date; then it will appear, but tell you that you need to complete the other activity; then when you complete the other activity you can access it.
For OR and NOT AND type conditions, you only get a single eye icon instead of one for each condition
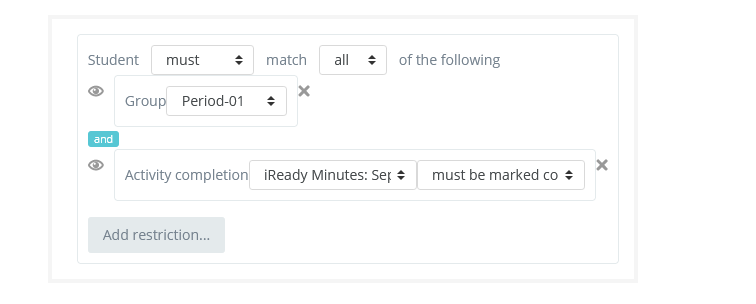
ALL or ANY Conditions
Further restrictions may be added by clicking the 'Add restriction' button again, and it is possible to specify that ALL the conditions or ANY of the conditions are required before the activity is made available. Thus, it is possible to use 'Or' as well as 'And' conditions. See Using Conditional activities for an example.
 'and' condition | 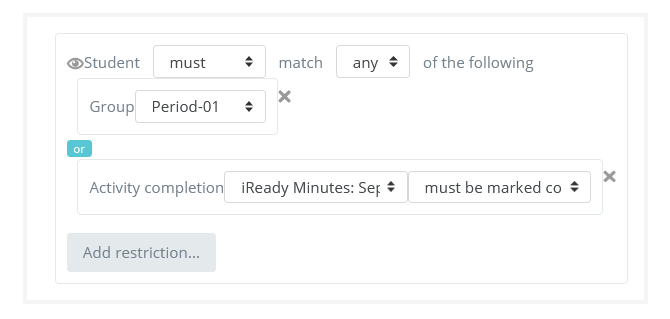 'or' condition |
Restricting access to a course section
It is possible to restrict access to activities and resources within a whole course section by specifying the conditions in the settings for that particular section. Do this by editing the section settings in the Topic menu > Edit topic > Restrict access.
Using restrict access
Basic examples
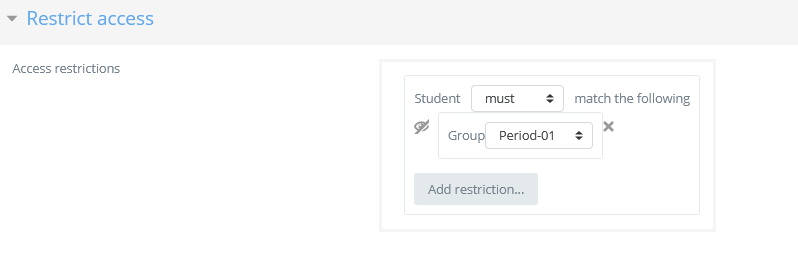
Students are required to be in the "Period-01" group to see and interact with this activity. A group or set of groups (grouping) or multiple groups can be used to restrict activity. Teachers can create as many groups as they want in their courses.
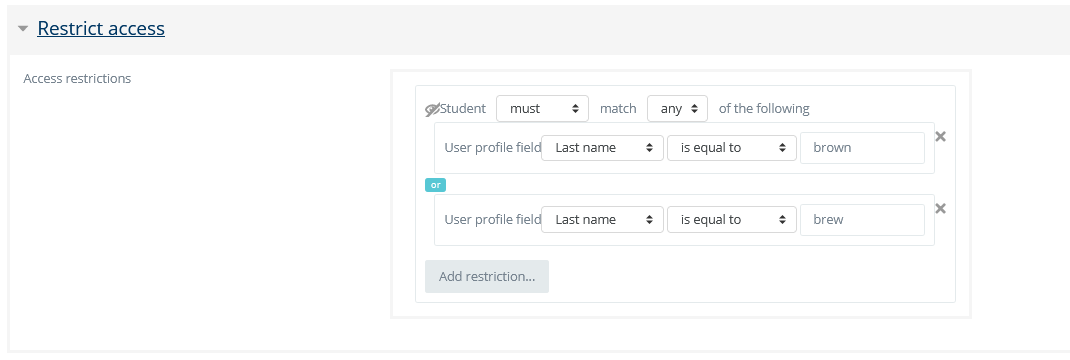
Only an individual student or a few students can be assigned an activity based on the user profile, in the below case the last names.
An advanced example
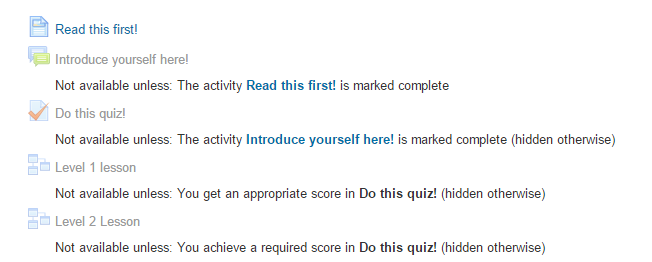
Students are required to undertake 4 tasks in a precise order. According to their score on a quiz, the fourth task - a lesson - is either at a lower or more advanced level. They must
view a page explaining the course
post an introductory message in a forum
take a quiz
move onto a lesson tailored to their performance in the quiz.
Here is the teacher's view.
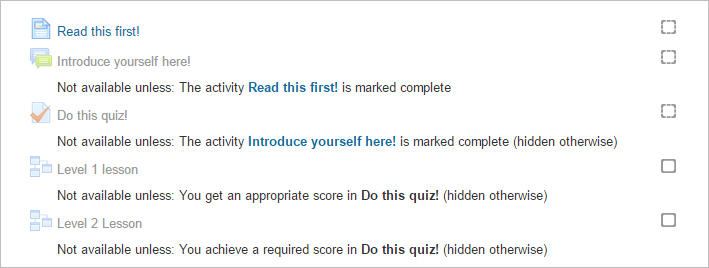
Students will only see the first task (the webpage)with the second task (the forum) greyed out. The other tasks only appear once the conditions have been met.
How's it done?
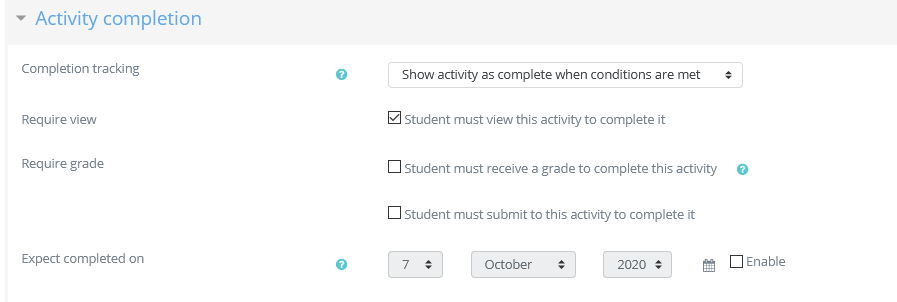
Task 1, the page must be read (or at least viewed) before students can access the forum. In task 1 the activity completion condition is set to require view
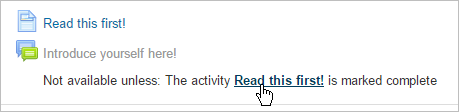
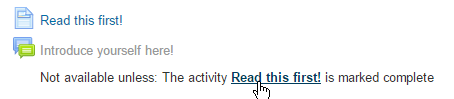
Task 2, the forum, needs to have the restrictions set such that the page Read This First must be marked complete. The "open" eye icon means the forum is greyed out until available:
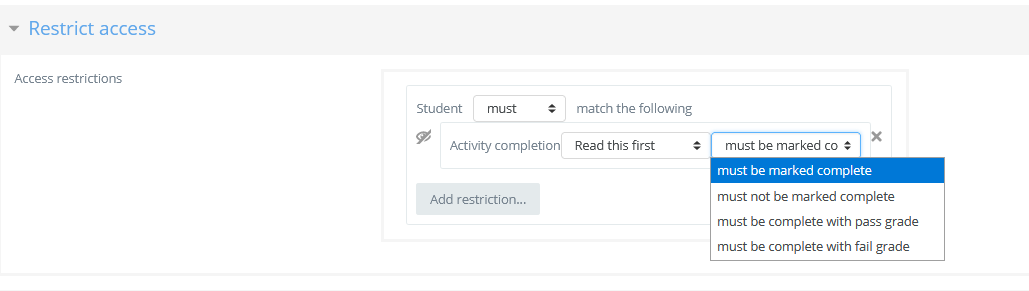
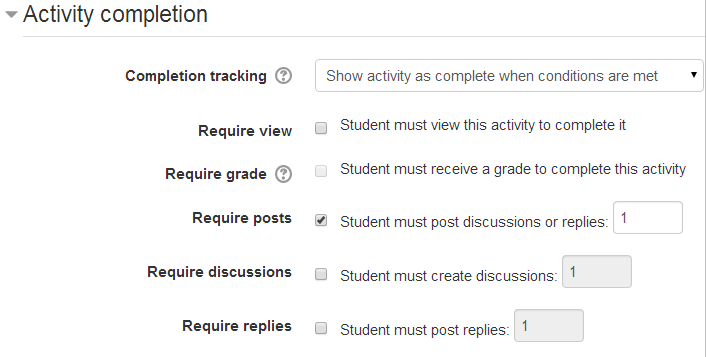
Task 2, the forum, needs to require students to make a post before they can do the quiz. The activity completion condition is set to " require posts"
Task 3, the quiz, needs to have the restrictions set such that the forum must be marked complete. The "crossed out eye" icon means the quiz is completely hidden until a student has posted in the forum:

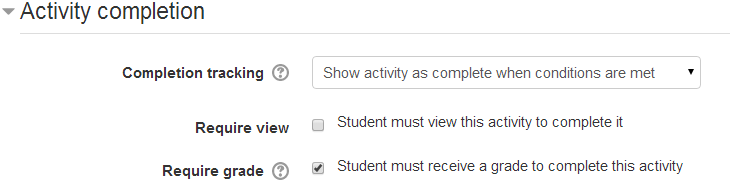
The student must get a grade in the quiz for the activity to be complete:
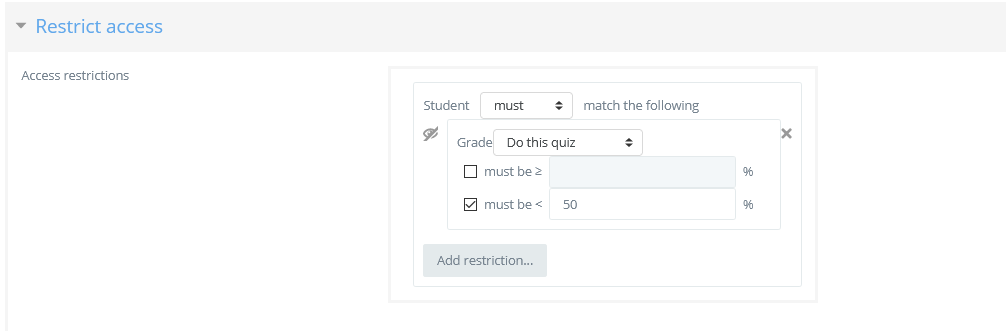
Task 4 is two lessons - either at level 1 (basic) or level 2 (advanced). If the student scores less than 50% in the quiz they do Level 1; if they score more, they do Level 2. In the Level 1 lesson, the restriction is set such that students can only access it if they get under 50% in the quiz
The Level 2 lesson has the restriction set such that students can only access it if they get 50% or more:

An example of "all or any"
It's possible to set conditions such that a particular activity is available if one or more previous activities are marked complete, rather than all of them. In this screenshot, the Advanced task will become available either if the student gets above a certain grade in the quiz or if they receive a grade in the assignment.
When the first restriction is set, the teacher can then click the "Add restriction" button again to add a second (and subsequent) restrictions. The teacher can then change the "all" to "any" , thus changing the "and" to "or":
Restriction set (nested restriction)
To use the "restriction set" for a set of an independent set of conditions, you can use "restriction set". See below example:
1- You must first add the initial restriction, in this case "date" | 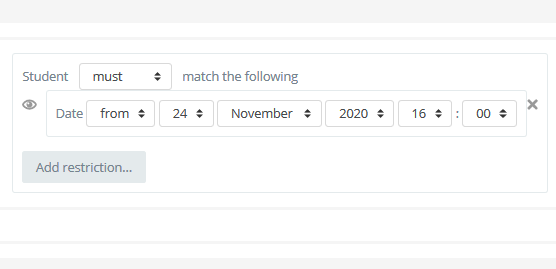 2- This is a simple date restriction which allows students to interact with the activity only after selected date | 3- Next, click on add restriction and select the "restriction set". |
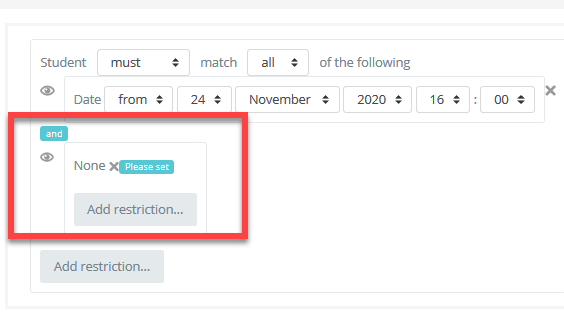 4- This will add a nested restriction under the first one you added. Now click on the add restriction button of the nested one and select your condition. | 5- Add your nested restriction |  5- Once you added your nested restriction, it will look like the above. In this case, only the students who doesn't belong to "Period-06" group will be able to interact with the activity starting from the set date and time. |
Tricks and techniques
With a bit of lateral thinking, you can achieve some interesting results beyond the most obvious uses of the system. Here is one example:
Project allocation
Imagine that you let students choose one of two projects. Each project has its own activities (a forum for all the people doing that project, resources with information about the project, etc). You want it to hide all the activities that a student isn't doing.
This can already be achieved in RAdix LMS using the Groupings system. However, conditional activities give another way to set this up which might be preferable in some cases. Here's how:
Create two forums called 'Frog project sign-up forum' and the 'Zombie project sign-up forum'.
Set both forums to be automatically marked complete once the user makes 1 post.
Set each forum to be conditionally available only if the other forum is NOT complete.
Create other activities for the frog and zombie projects. For each Frog activity, set it to be conditionally available only if the Frog sign-up forum is marked complete. For each Zombie activity, set it to be conditionally available only if the Zombie sign-up forum is marked complete.
When a student first visits the site, they see the frog and zombie sign-up forums and none of the project activities. As soon as they post in one of the forums, the other forum will disappear, and all the activities for their preferred project will appear. (If they want to change their mind, they can delete their forum post so that it isn't marked complete anymore, and it'll be back to square one.)