
This guide explains how teachers use groups and groupings in Radix LMS to organize students, filter grading and activity views, restrict access to course materials, and manage group-based activities. In Radix LMS, groups may be created automatically from official school schedules or manually by teachers for classroom needs. Understanding the difference between official groups and teacher-created groups is important before adding, editing, or using groups in a course.
Official groups and teacher-created groups
-
Radix LMS uses two main types of course groups:
-
Official groups are usually class periods created from the school schedule, SIS sync, or the Radix Schedule menu. These groups represent the official roster for a period or scheduled section. Teachers can use official groups for filtering and instruction, but they cannot add, remove, or edit official group membership from the course Groups page. Schedule or roster changes must be handled by the school administrator or the SIS process.
-
Teacher-created groups are unofficial groups created inside a course by a teacher. Use these for classroom teams, intervention groups, project groups, reading groups, lab groups, or any temporary grouping that is not part of the official schedule. Teachers can create, edit, and manage membership for these groups.
-
Important: If you cannot edit a group or change its membership, it is likely an official group. Official groups are locked in the course Groups area to protect schedule and attendance data.
Why use groups?
-
You teach multiple periods in the same course and want to filter assignments, submissions, attendance, or gradebook views by one class at a time.
-
You share a course with other teachers and want to focus on only the students you teach.
-
You want to assign an activity, resource, quiz, assignment, or course topic to a specific set of students.
-
You want students to work in teams for forums, projects, labs, discussions, or collaborative activities.
-
You want to create a temporary intervention, enrichment, or makeup-work group without changing the official schedule.
Group levels and group modes
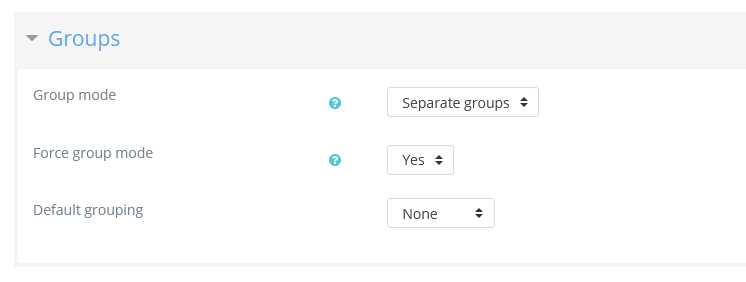
Group settings in course settings
A group or grouping can be applied at two levels:
-
Course level — The group mode selected in the course settings becomes the default group mode for activities in that course. Course-level group mode is usually configured from the course settings. If the site or course forces a group mode, teachers may not be able to change the group mode for individual activities.
-
Activity level — Activities that support groups can have their own group mode. For example, an assignment, forum, or other activity can use separate groups or visible groups even if the rest of the course does not. If the course setting Force group mode is turned on, the activity-level group mode option may not be available.
Group modes
There are three group modes
-
No groups — Students are not separated into subgroups for the activity. Everyone participates together.
-
Separate groups — Students can only see and interact with members of their own group. Teachers can use the group filter to view one group at a time.
-
Visible groups — Students work in their own group but may be able to view other groups depending on the activity. Other groups are typically read-only for students.
For example, enabling separate or visible groups on an assignment lets teachers filter the submissions list and grading page by period, classroom group, or project team. Groups can also be used in forums to control which students discuss together.
Creating a group
-
Open the course where you want to create the group.
-
Open the course Groups page. Depending on the theme and navigation, this is usually under the course participants or course administration area.
-
Select Create group.
-
Enter a clear group name. The group name is the only required field. Optionally, add a description, enrolllment key, or group picture if your school uses those options.
-
Review the group visibility and messaging settings before saving. If you want the group to appear in grading or submissions filters, make sure the group is allowed to show in the dropdown menu.
-
Select Save changes.
-
Select the group, then choose Add/remove users.
-
Select the students or teachers to add from the potential members list. Use the search box to find users quickly.
-
Select Add to move the selected users into the group.
Tip: Teacher-created groups can be used in grading and submissions filters when the group visibility settings allow the group to appear in the dropdown menu. Students do not need to see each other or the group list for teachers to use a group as a filter.
An optional group ID number may be available in advanced settings for matching the group against external systems. Group ID numbers are not displayed to students. Within a course, each group ID number must be unique.
Group messaging
Some group settings allow a group conversation to be created in the messaging system. Use this carefully because group messaging is not the same as a one-way teacher announcement.
Attention: Once group messaging is turned on, students will be able to see the list of other group members and send group messages to the group. If you would like to be part of the group conversation, or to see past messages, you must add yourself to the group.
If you only need to email or message students as a teacher, consider using Quickmail or the Participants page instead of enabling a group conversation.
Where groups are used in Radix LMS
Groups are useful because they appear in several teacher workflows:
-
Assignment submissions and quick grading — Filter the submissions list or quick grading table by official periods or teacher-created groups.
-
Gradebook and grader report — Use group filters to focus on a specific period or group when reviewing grades.
-
Attendance — Select the correct period or group when taking or reviewing attendance, depending on how the course and attendance sessions are configured.
-
Forums and group activities — Keep student interactions separated by group when using separate groups, or allow read-only visibility across groups when using visible groups.
-
Restrict access — Make an activity, resource, assignment, quiz, or course topic available only to selected groups or groupings.
Auto-create groups
Groups may be created automatically from the Groups page by selecting Auto-create groups. This is useful when you want Radix LMS to divide students into several groups for projects or activities. To see all available settings, select Expand all if that option appears.
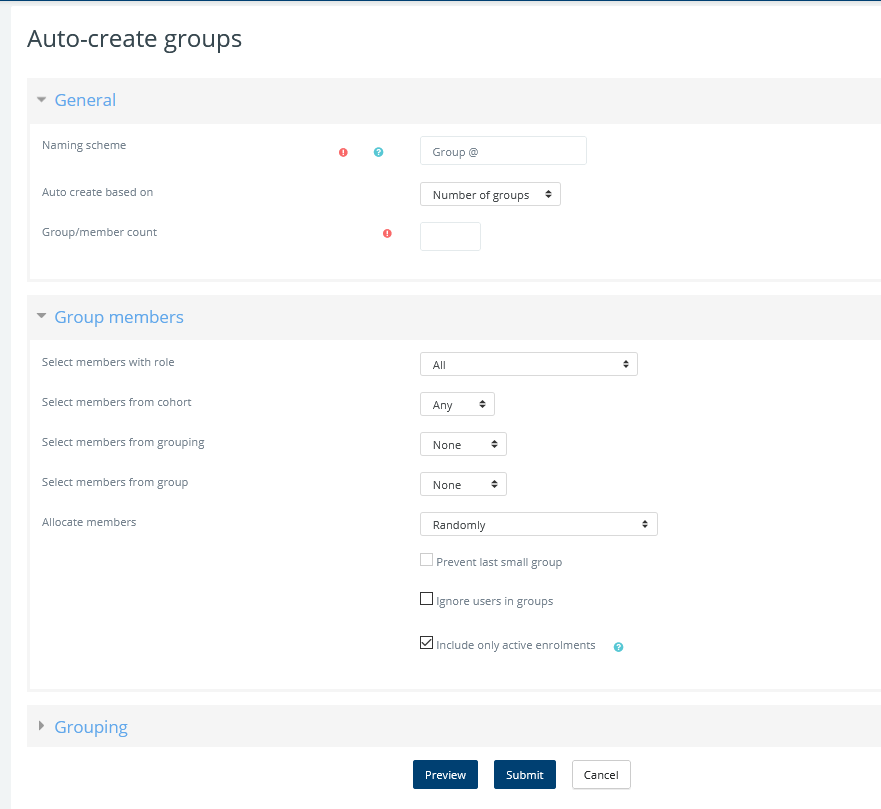
General
A naming scheme can be created automatically. # is replaced by sequential numbers, and @ by letters. For example:
-
Group @ will create groups with a naming scheme Group A, Group B, Group C . . .
-
Group # will create groups with a naming scheme Group 1, Group 2, Group 3 . . .
You can specify if you would like to create
-
an x number of Groups or
-
each group contain x number of students
When selecting Members per group the Prevent last small group will allocate additional members to an existing group rather than create a new group with fewer members than x. This setting is found by clicking on the Show More link.
Group members
Select members from ... allows you to choose from roles assigned within the course, available cohorts, groups, or groupings. Specify and Group/Member count work together.
The setting 'Select members from cohort' lists all cohorts that users enrolled in the current course are part of. The number in brackets is the number of users enrolled in the course in that cohort.
The 'Ignore users in groups' checkbox should be ticked to only select group members from users that are NOT already in a group in the course.
Prior to creating the groups, you can view the groups.
Restricting access by group
To make an activity, resource, assignment, quiz, or course topic available only to a specific group, open the item settings, expand Restrict access, and add a group restriction. This is useful for differentiated instruction, period-specific materials, makeup work, or project teams.
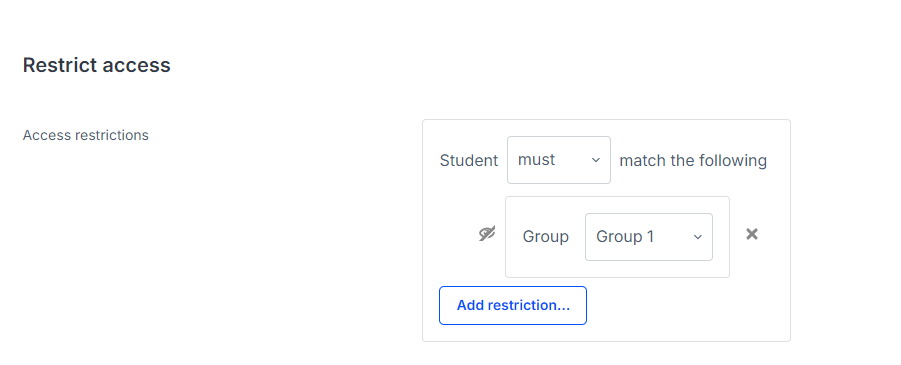
More information about restricting access in a course, click here:Restrict Access - Differentiation
What is a grouping?
A grouping is a collection of groups within a course. Using groupings allows you to direct tasks to one or more groups in your course so that they can work together on the tasks.
Grouping example
-
You teach students in a course called 'The Art of Language'.
-
Your students are divided into four groups, Listening, Reading, Speaking, and Writing, and for much of the course, they work in these groups.
-
You wish the students to work on a project, exploring passive and active language. You create a grouping Passive Language and assign the Listening and Reading groups to this grouping. You create a grouping Active Language and assign the Speaking and Writing groups to this grouping.
-
Using the Restrict access feature you set certain tasks only for the Passive Language grouping and other tasks only for the Active Language grouping.
-
Now the groups can work together, within their grouping, on their respective focus areas.
-
At the end of the project, you can bring the groups together in an activity for all participants to share their learning.
Adding groups to a grouping
Use groupings when you need to collect several groups together and apply one setting to all of them. For example, you might place several project teams into one grouping, then assign an activity or restrict a topic to that grouping.
-
Open the course Groups page. Depending on the theme and navigation, this is usually under the course participants or course administration area.
-
Select the Groupings tab.
-
If needed, select Create grouping, enter a grouping name, and save it. An optional grouping ID number may be available in advanced settings for matching the grouping against external systems. Grouping ID numbers are not displayed to students, and each grouping ID number must be unique within the course.
-
In the edit column, select the people icon to show groups in the grouping.
-
Select the groups you want to add from the potential members list.
-
Use the arrow button to move the selected groups into the existing members list.
-
Select Back to groupings. The groups you added will now be listed on the groupings page.
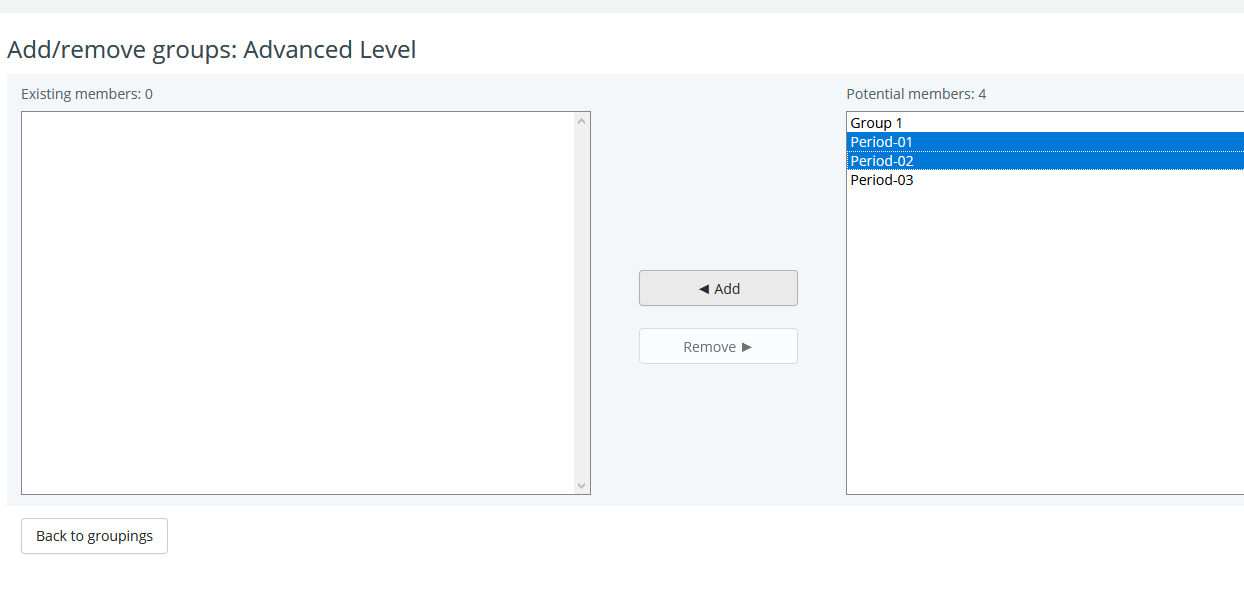
Existing groupings can be edited and/or deleted using the appropriate icons in the edit column of the table on the groupings page.
Setting the default grouping
After groupings have been created, a default grouping may be selected in the course settings. The default grouping is used when an activity or course area needs a grouping value and no separate activity-level grouping has been chosen.
-
Open the course settings.
-
Find the Groups section.
-
Select the default grouping from the grouping dropdown menu.
-
Select Save and display or Save changes.
Selecting a grouping for an activity
Some activities allow you to choose both a group mode and a grouping. This lets you decide which set of groups the activity should use.
-
Turn on edit mode in the course.
-
Open the activity settings.
-
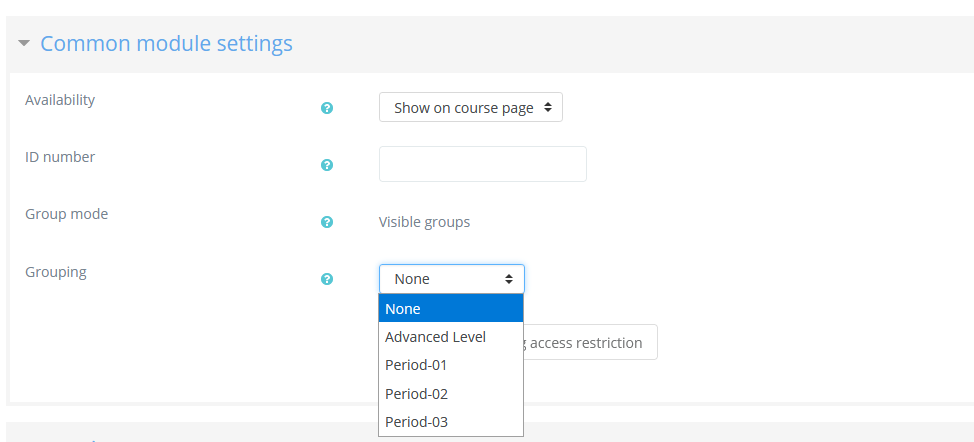
In the common module settings section, select a group mode such as Separate groups or Visible groups.
-
Select the grouping from the grouping dropdown menu.
-
Select Save and display or Save changes.
If the activity uses separate groups, students are limited to the groups assigned through that activity's grouping. Teachers may see the grouping name or group information in activity views, depending on the activity type.
The grouping option appears only in activities that support group modes.
Troubleshooting
|
Problem |
What to check |
|---|---|
|
I cannot edit a group or change its members. |
The group is likely an official group or period created from the school schedule. Official groups are locked in the course Groups area. Contact your school administrator or ask them to update the roster through the Radix Schedule menu or SIS sync. |
|
The group filter does not appear on grading or submissions. |
Make sure the course has at least one group. If the course has no groups, the filter dropdown may not appear. Also check that the activity or gradebook view supports group filtering. |
|
Students can see each other’s names and send messages in a group. |
Group messaging is turned on for that group. If you do not want students messaging each other, edit the group settings and turn off group messaging. Use Quickmail or the Participants page for teacher-only communication. |
|
I cannot see past messages in a group conversation. |
Teachers must add themselves to the group to access the group conversation. Open the group, add yourself as a member, and the message history will become visible. |
|
An activity restricted to a group is visible to everyone. |
Check whether the restriction was applied to the correct group or grouping. Open the activity settings, expand Restrict access, and confirm the correct group or grouping restriction is listed. |