
This guide explains how assignments work after they are created, including how students submit work, how teachers review submissions, and how grading, feedback, annotations, quick grading, and bulk actions work in Radix LMS.
What options are there for submitting work in Radix LMS?
The standard ways students can submit assignments are:
-
File submissions, where students upload one or more files for assessment.
-
Online text, where students type or paste their response directly into Radix.
-
Submission comments, if comments are enabled for the assignment.
You can also use an assignment for work completed outside of Radix, such as a presentation, paper packet, lab activity, or in-class project. To do this, leave the submission options turned off and use the assignment for grading and feedback only.
If you are not sure which assignment type best fits your activity, review the Which type of assignment submission suits you best? section on the Assignment Settings page.
How do students submit their assignments?🔗
The first page students will see when they click on the assignment activity link from the course page will display the assignment name, description, and submission status. The first time a student views the assignment it will look like this:
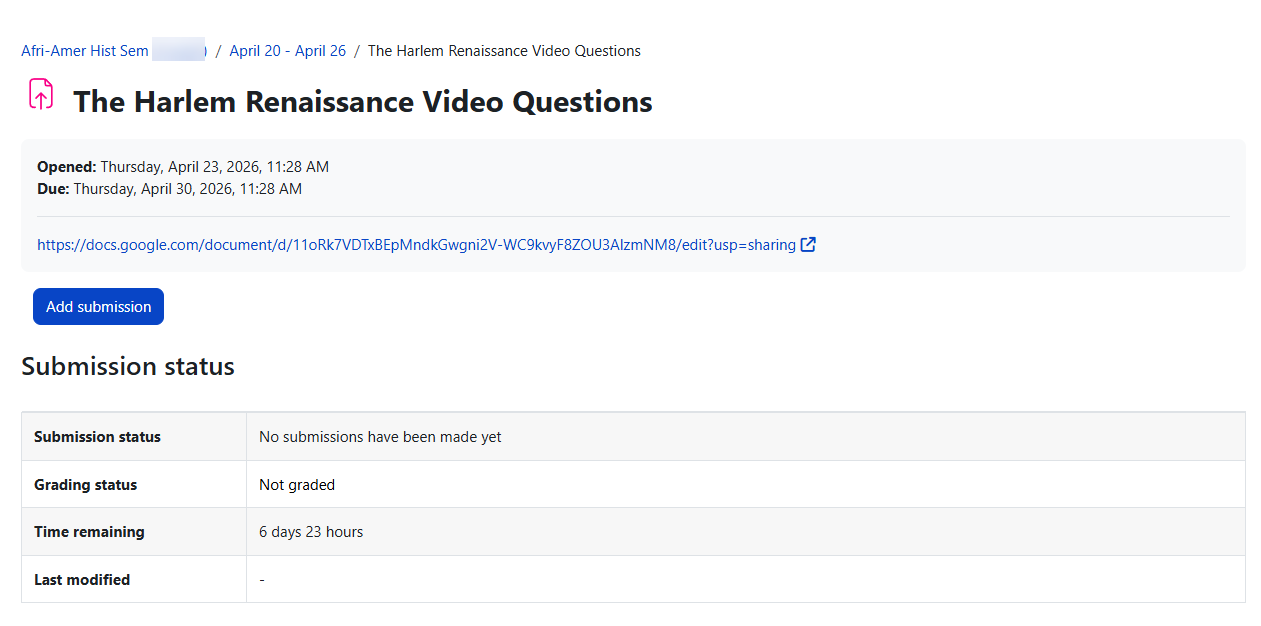
The submission status section includes:
-
Submission status
-
Grading status
-
Due date
-
Time remaining
-
Last modified
-
Submission details
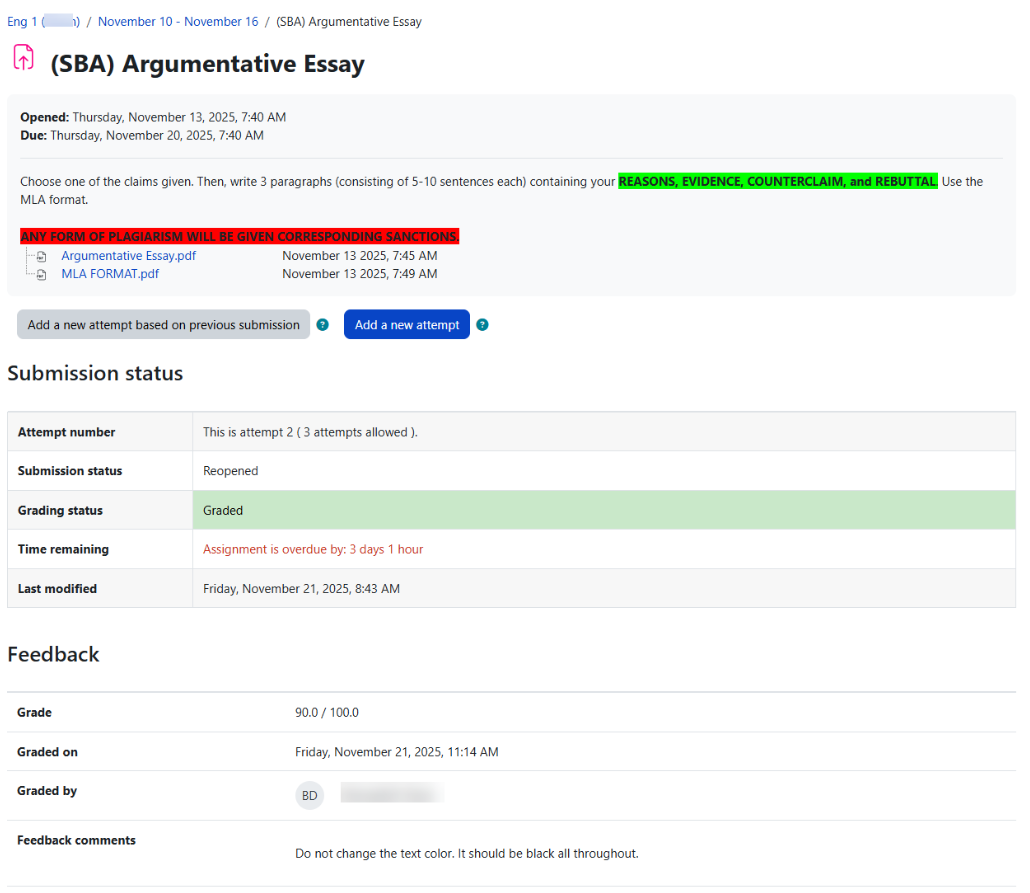
As they progress through the assignment the Submission status and Grading status will update and the Last modified date will appear.
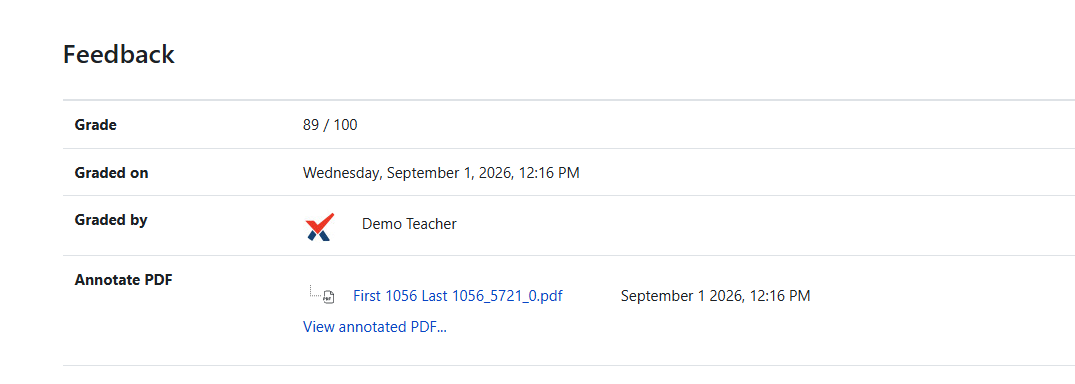
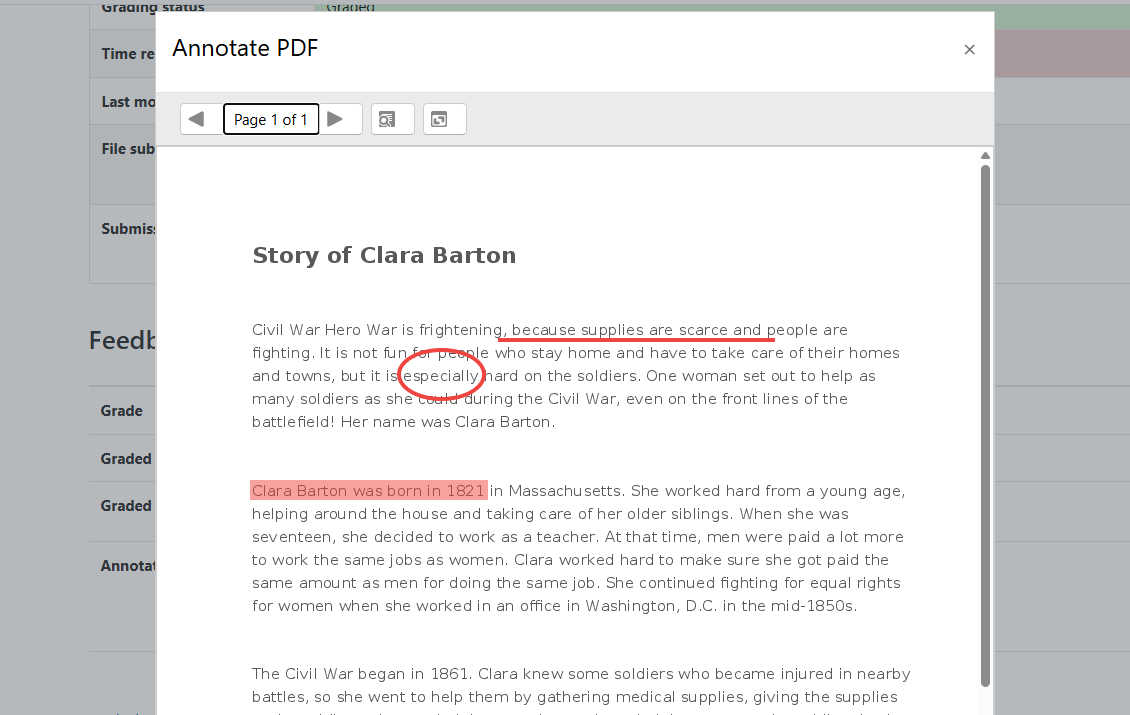
If the student uploaded a file which the teacher has annotated, this will be made available in the feedback section. The student can search through the document and filter specific comments.
|
|
Submission statuses include:
-
Nothing submitted for this assignment
-
Draft (not submitted)
-
Submitted for grading
Grading statuses include:
-
Not graded
-
Graded
File submission
To submit a file submission, students complete the following steps:
-
Click the ‘Add submission’ button to bring up the file upload page.
-
Upload the relevant file into the submission. They are able to ‘drag and drop’ the file into the submission box.
-
Click ‘Save Changes’.
After the student saves, the page shows the last modified date and the uploaded file. Depending on how the assignment is set up, the status will show either Submitted for grading or Draft (not submitted). If it shows Submitted for grading, no further action is needed.
-
If changes are needed, click Edit my submission.
-
When the work is ready, click Submit assignment.
After the assignment is submitted, students cannot make more changes unless the teacher allows another attempt or returns the submission to draft.
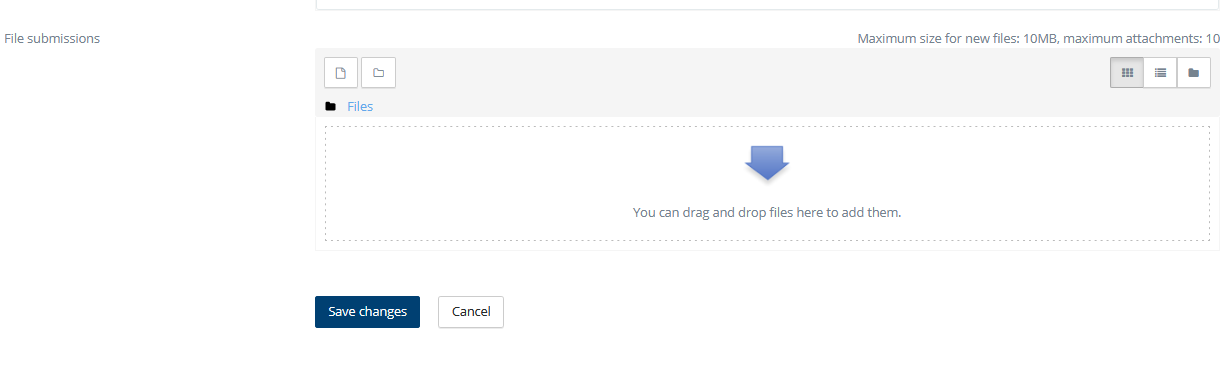
Student view when adding a submission |
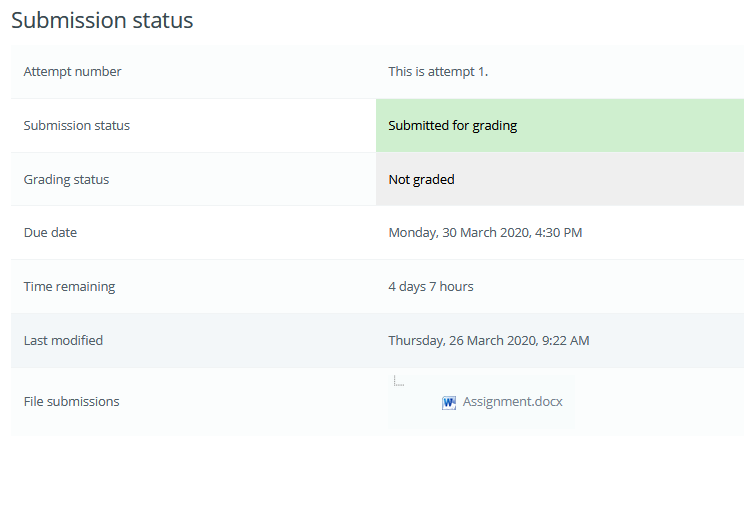
Student view once file is uploaded |
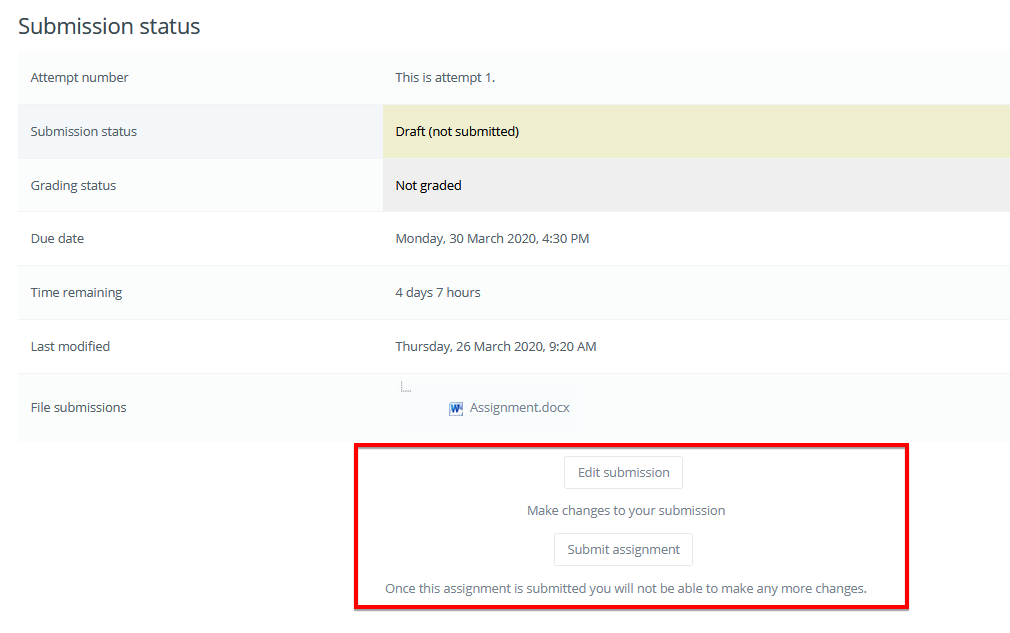
Student view when submitting assignment |
Note: Depending on how the assignment is setup students may see both a file submission page and an online text editor.
Access controlled links
If the administrator has enabled this feature for either the Google Drive repository or the OneDrive repository then students can upload a file as an 'access controlled link' from either of these repositories. The file is then copied to the site account and the student is no longer able to edit it.The student retains the original file in their own Google Drive or OneDrive. The teacher is given permission to edit the file for grading purposes, and the student is sent a copy of the edited file.
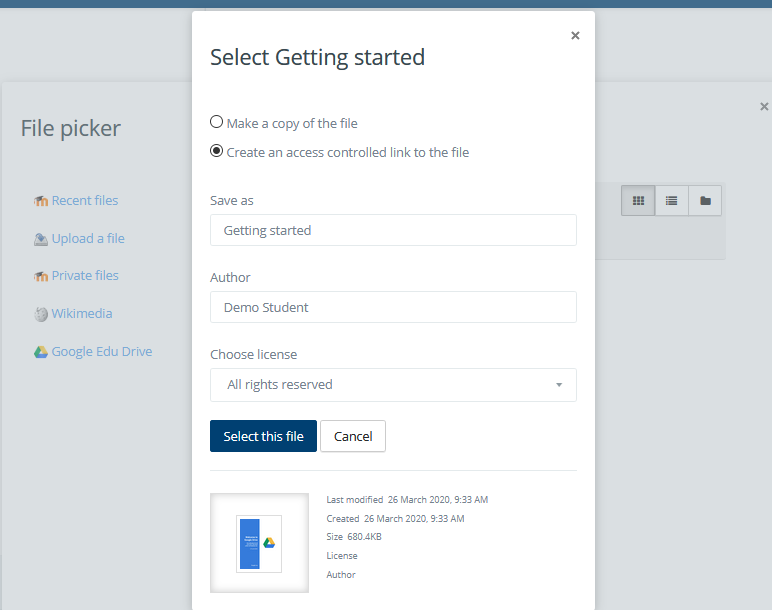
Student submits an access controlled link
Online text
To submit online text, students complete the following steps:
-
Click the ‘Add submission’ button to bring up the online text editor page.
-
Type the relevant text into the text editor, or paste from a previously written file.
-
Click ‘Save Changes’.
After the student saves, the page shows the last modified date and a short preview of the online text. Depending on how the assignment is set up, the status will show either Submitted for grading or Draft (not submitted). If it shows Submitted for grading, no further action is needed.
-
If changes are needed, click Edit my submission.
-
When the work is ready, click Submit assignment.
After the assignment is submitted, students cannot make more changes unless the teacher allows another attempt or returns the submission to draft.
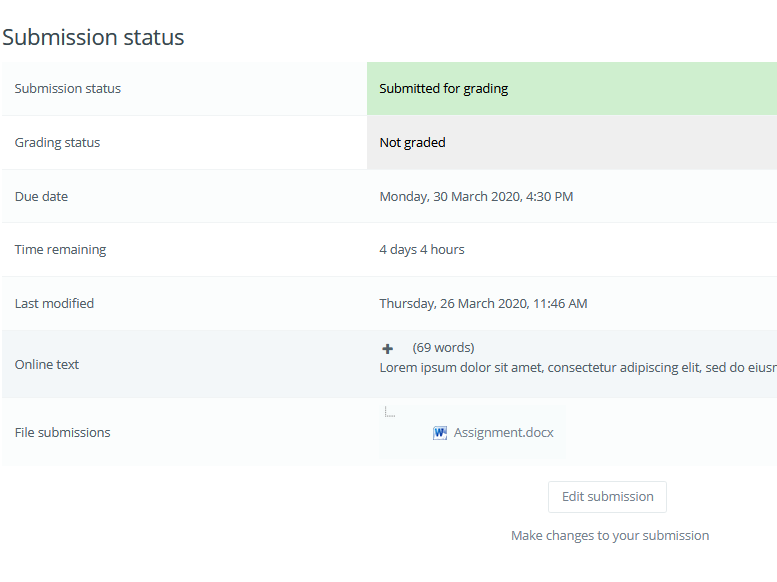
Online text entered |
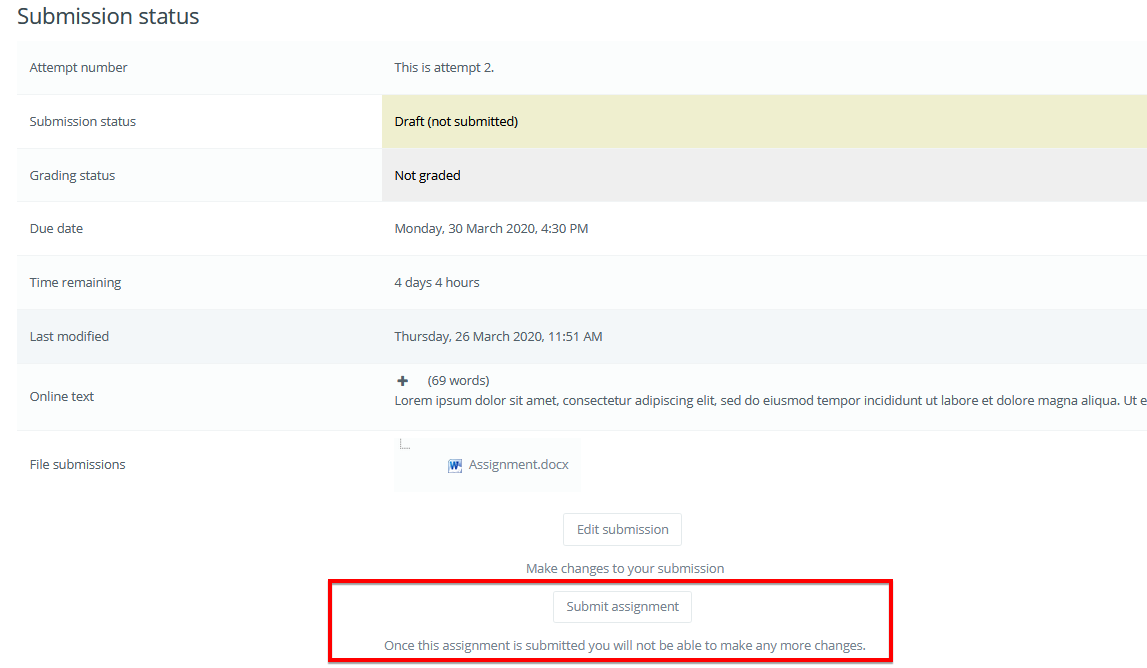
Submitting assignment |
Voice and video recording submissions
Students can make a voice or video recording and insert it into their text submissions. To do that, they will need to expand the icons area by clicking on the down arrow shown below. Once expanded, the voice and video recording options will appear.
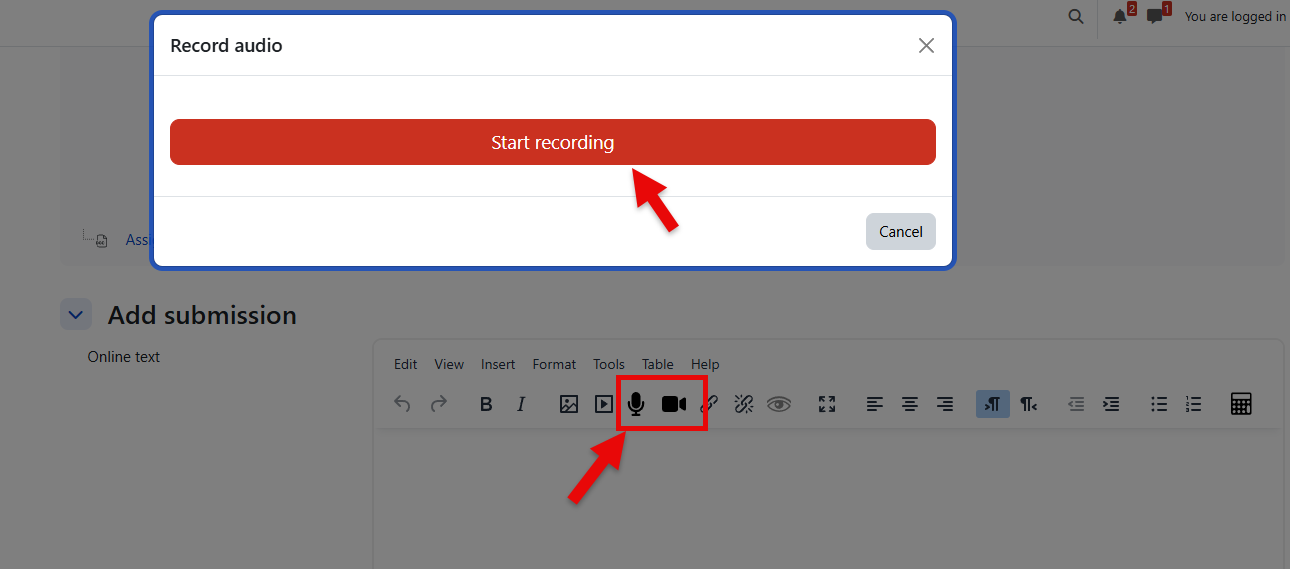
The recordings can be submitted along with the text entered into the text box. Each recording can be a maximum of 5 minutes long.
Submission comments
Depending on how the assignment has been set up, there may be a section where students can leave submission comments.
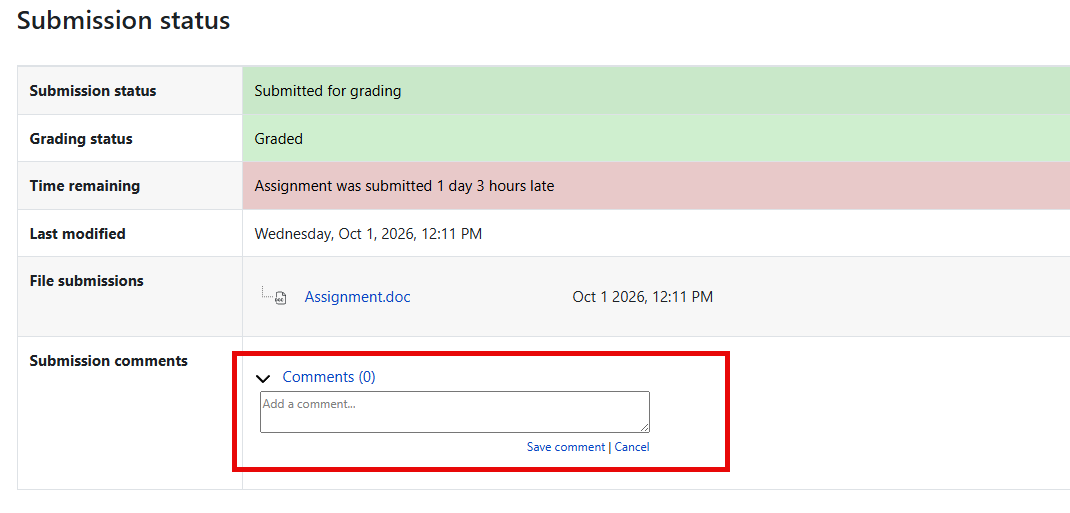
Grading and feedback
After students begin submitting work, open the assignment to review the grading summary. From there, you can choose whether to grade one student at a time or view the full submission list.
The grading summary shows helpful information such as the number of participants, drafts, submitted assignments, due date, and time remaining.
-
Select View/grade single submission to open one student’s submission and move through submissions one at a time.
-
Select View/grade all submissions to open the grading table and review the whole class list.
The grading table shows each student, their submission status, links to submitted work, grading actions, feedback options, and any files or online text that were submitted.
In the current grading table, Radix keeps long submissions easier to scan. Online text submissions show a short preview, and file submissions display the file name with the date and time directly below it.
Filtering submissions
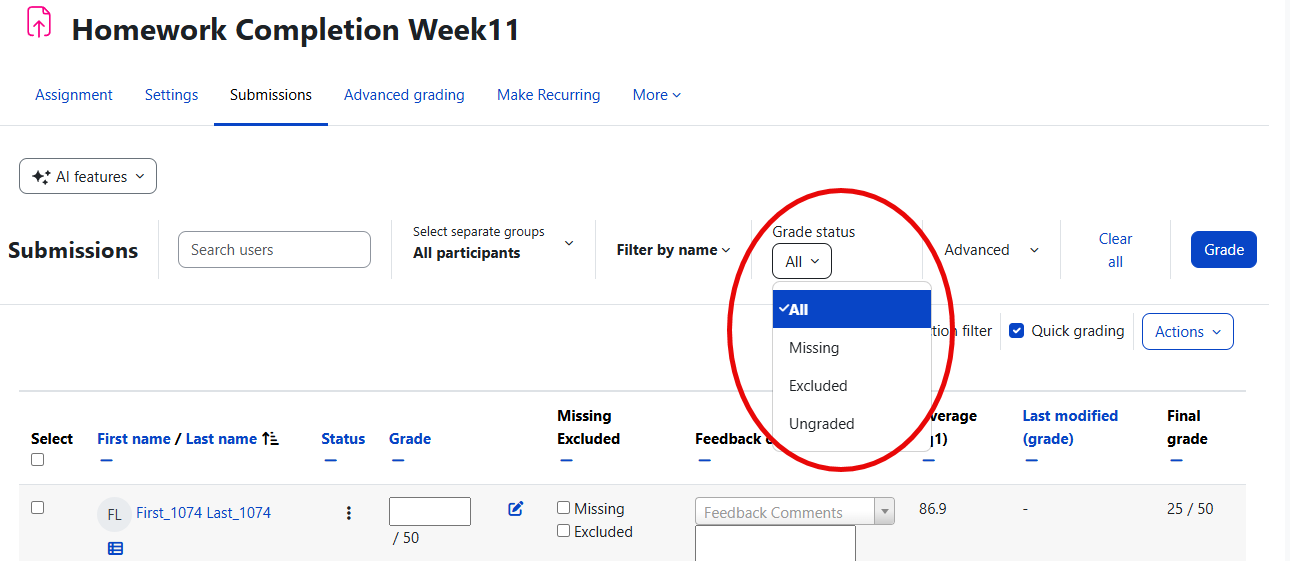
Use the submission status filter to narrow the grading table to the students you want to review. For example, you can quickly view students who have not submitted, students who need grading, or students with extensions.
The active filter appears near the filter icon so you can easily see which status is currently selected. If you want to return to the full list, choose All Statuses or use Reset filter.
The submission status filter changes what you see on the grading page. It does not limit the Download all submissions option, so downloaded files may still include submissions outside the current status filter.
Allocating submissions to graders
If more than one person will grade the assignment, you can divide the work by group. For example, each teacher can grade the students in their assigned group.
You can also use marking allocation to assign each student submission to a specific grader. This is helpful when different teachers are responsible for different students, groups, or subject areas.
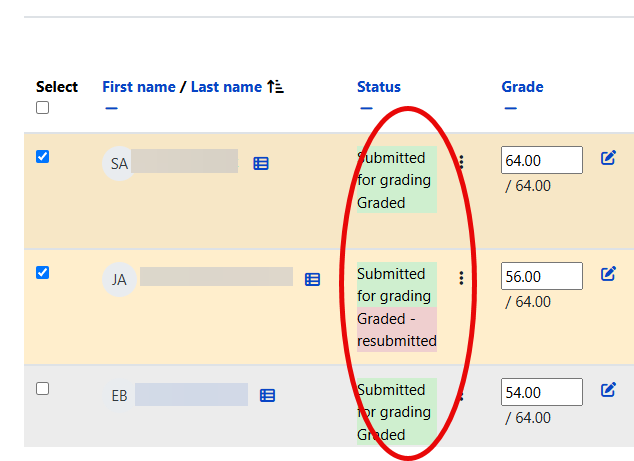
Submission status
Before grading, check each student’s submission status. This helps you see whether the student has submitted, saved a draft, or still has nothing submitted.
If students were required to click Submit assignment, some work may still show as Draft (not submitted). This usually means the student uploaded a file or entered text but did not complete the final submit step.
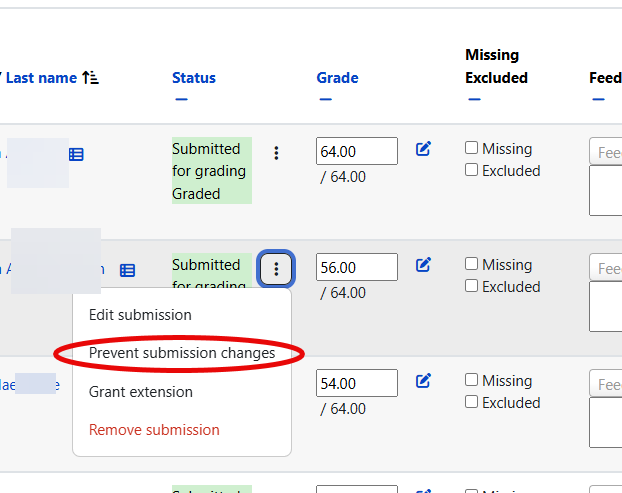
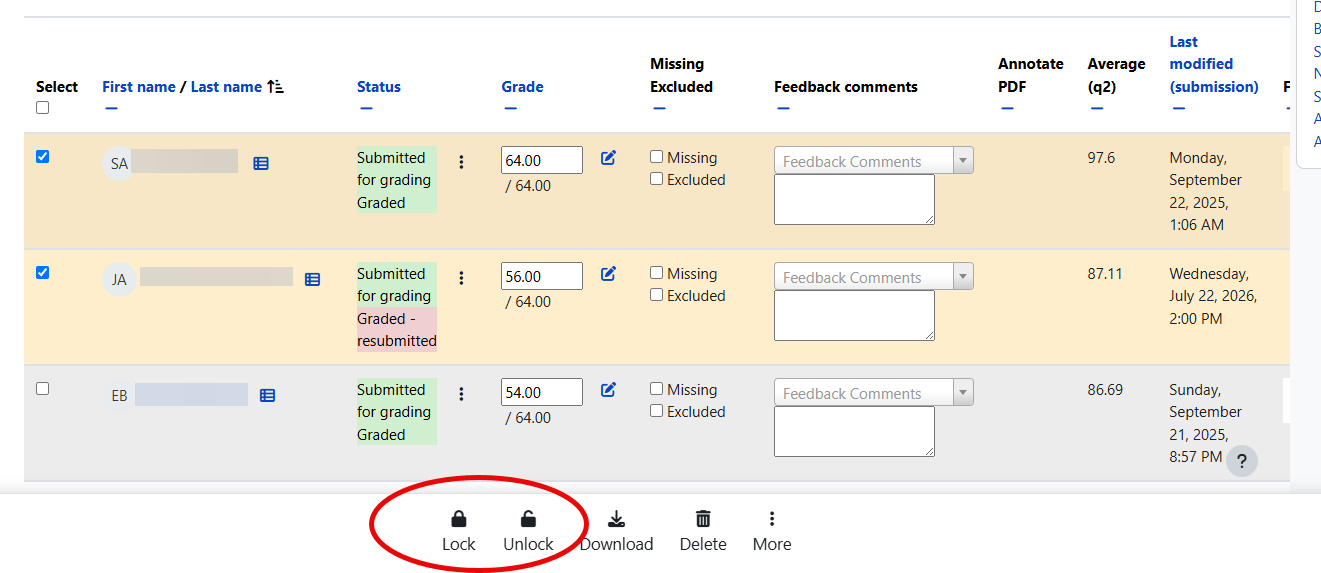
After the due date, you can prevent students from changing their submissions while you grade. You can do this for one student from the action menu, or for several students at once by selecting them and choosing the lock option from the bulk action menu.
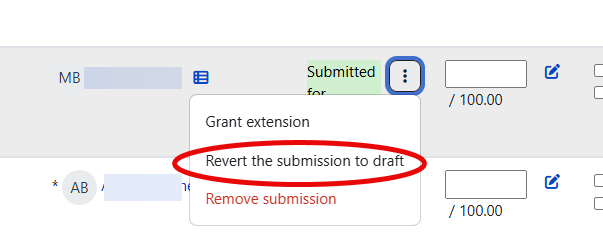
You can also return a submission to draft if a student needs to fix or replace the submitted work.
If the assignment setting Prevent marking as missing before due date is turned on, teachers cannot mark a student’s work as Missing until the due date has passed. When this applies, Radix shows that the missing option is not available yet.
Submission statuses
|
|
|
|
|
If the assignment allows another attempt, Radix can reopen the submission for the student. This may happen automatically when the student has not reached the passing grade, or manually when a teacher chooses Allow another attempt. Once reopened, the student can update and resubmit their work.
Overriding assignment deadlines
A teacher can override a deadline for an individual or group from the assignment settings link (gear menu or Assignment dropdown menu)
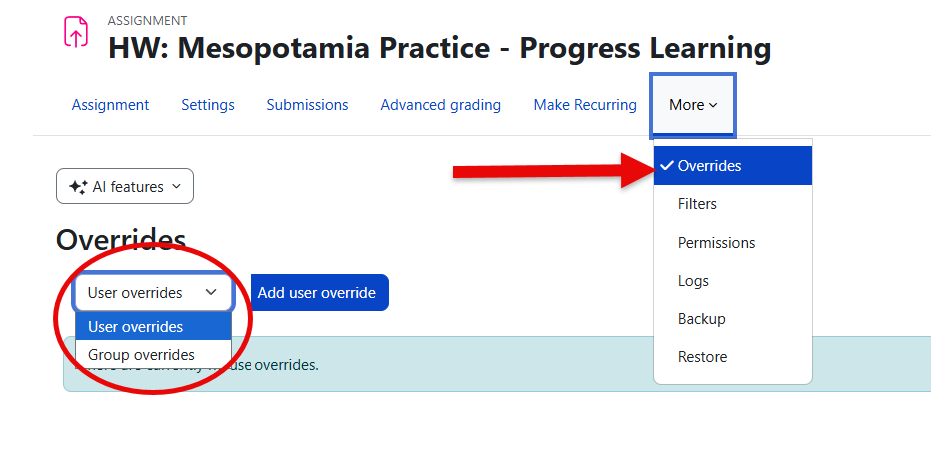
When adding overrides for a group, it is possible to have one group override trump another. This is achieved by moving the override up/down on the group overrides page:
Note also that if there exists a user override for a student, it will always take precedence over any group overrides.
Granting extensions
If an assignment has a deadline, a teacher can grant individual or group assignment extensions by selecting the Edit link next to a particular student or group.
-
To grant an extension, open the assignment
-
Click on "View/grade all submissions"
-
Locate the student who needs be allowed to submit after the "Cut-off date"
-
Click on the adjacent "Edit" drop-down menu and select "Grant extension"
-
Set the extension date and time. The student's or group's name is also shown on this screen.
-
Click on "Save changes".
Quick grading
Quick grading lets you enter grades directly in the grading table. This is helpful when you need to grade several submissions quickly and do not need to leave detailed feedback for each student.
Use the full grading screen when you need to add feedback comments, upload feedback files, annotate a submission, or review the student’s work in more detail.
To use quick grading:
-
Open the assignment.
-
Select View/grade all submissions.
-
Turn on Quick grading in the grading table options.
-
Enter grades directly in the table.
-
Select Save all quick grading changes.
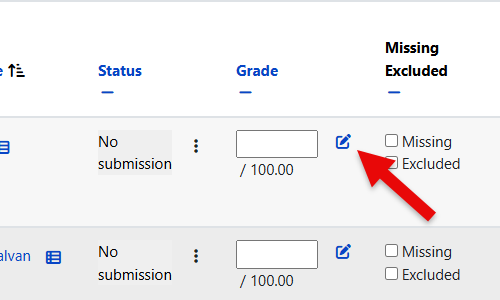
In the grading table, Radix may show a direct Grade icon when grading is the only available action for that student. This makes it easier to open the single grading page without using an extra step.
Bulk actions
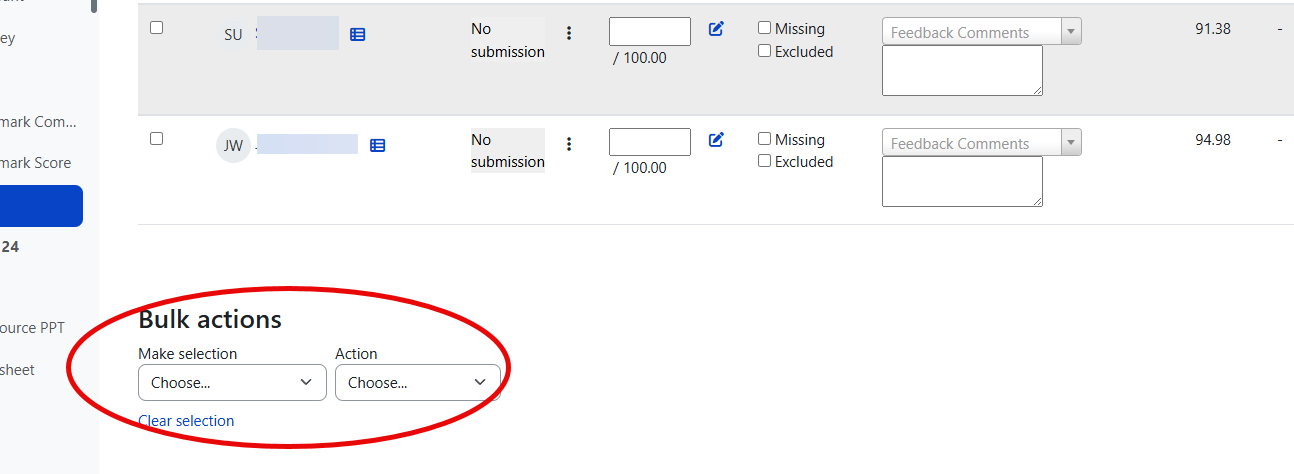
Bulk actions let you update several student submissions at the same time from the grading table. Use them when the same change needs to be applied to more than one student, such as entering a shared grade, marking work as missing, excluding grades, adding the same feedback comment, or sending a message.
To use bulk actions:
-
Open the assignment and select View/grade all submissions.
-
Use Make selection to choose the students you want to update. You can select students manually with the checkboxes, or choose a group such as students who are missing, excluded, or failing.
-
Choose an option from the Action menu. Available actions may include entering a grade, marking or unmarking work as Missing, marking or unmarking work as Excluded, adding a feedback comment, or sending a message to the selected students.
-
If Radix asks for more information, enter it in the field that appears. For example, enter the grade or feedback comment you want to apply.
-
Select Apply.
-
When you are finished, select Save all quick grading changes before leaving the page.
Bulk action choices can change based on the students you selected and the assignment settings. For example, Unmark missing only appears when selected students are already marked as missing. Bulk selections apply to the students shown on the current grading page.
Grading individual submissions
Use the full grading screen when you want to review a student’s work closely, enter a grade, add feedback, upload feedback files, or annotate a submitted file.
From the grading table, select the Grade action for the student you want to review. This opens the student grading page, where you can view the submission and enter feedback in one place.
If feedback files are enabled in the assignment settings, you can upload a marked copy of the student’s work, a feedback document, or an audio feedback file. Drag and drop is available for feedback files.
For online text submissions, teachers can use the copy option on the single submission page to copy the student’s full response to the clipboard. This is helpful for long responses because you do not need to expand the whole preview first.
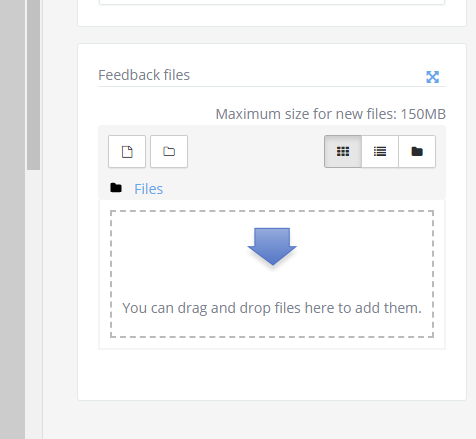
Feedback files |
Annotating submissions
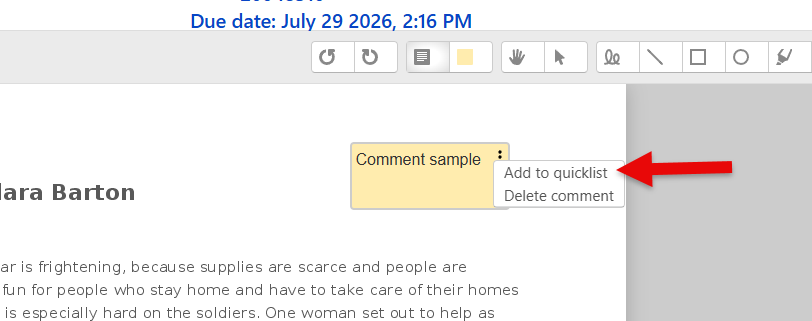
If annotation is available for your site, you can mark up supported submissions directly on the grading screen. This may include PDF, Word, Excel, or online text submissions when Comment inline is enabled. Use the annotation tools to add comments, notes, or marks, then save your changes so students can see the annotated copy in their feedback.
On the grading screen, you can review the submitted file, add annotations, download the file, enter a grade, add feedback, save your changes, and move to the next student.

Annotating a student's submission
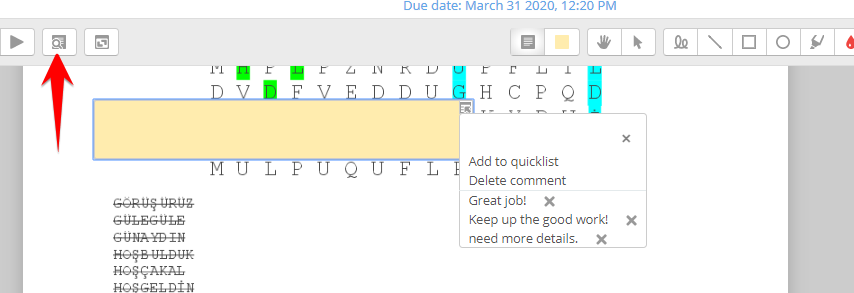
Comments may be added and then saved in a quick list for future use (1) Click the paper/magnifying glass icon to the right of the page selector to filter comments you have already added to the work(2):
-
In the Search comments pop-up window, enter the term you would like to search for in the Filter comments... box.
-
Clicking on the comment will take you to the part of the paper where that comment has been added.
|
|
Note: To ensure that comments display to students as the grader intends, do instruct students to download the annotated PDF rather than just previewing it. Preview sometimes displays comments in a way that obscures the original text.
The review panel and/or the grading panel may be collapsed by clicking the icons at the bottom right of the screen.
Controlling when to notify students of graded work
Notifying as you grade
If you need to notify individual students, one by one, as you grade, the Notify students checkbox is available when grading individual submissions. Choose Yes to notify the student immediately or No to grade without notifying the student. Assuming you are not hiding grades in the ways outlined below, then Radix will send a notification.
Note: How students receive Radix notifications depends on your local default settings, and any changes students have made to those.