Attendance Setup & Configuration
This page explains how to set up and configure attendance in Radix LMS. It covers creating the attendance activity, configuring official attendance sessions, managing status codes, reviewing attendance administration options, and understanding how attendance can sync from an SIS.
Note: Attendance reports, attendance alerts, and the student/parent dashboard attendance view are documented as separate attendance pages so each topic can stay focused.
What this page covers
-
Adding and configuring an attendance activity in a course
-
Creating attendance sessions for course periods
-
Configuring self-marking and auto-marking options
-
Deleting sessions that were created by mistake or fall on non-school days
-
Managing attendance status codes
-
Understanding attendance admin settings and SIS synchronization options
How to add attendance
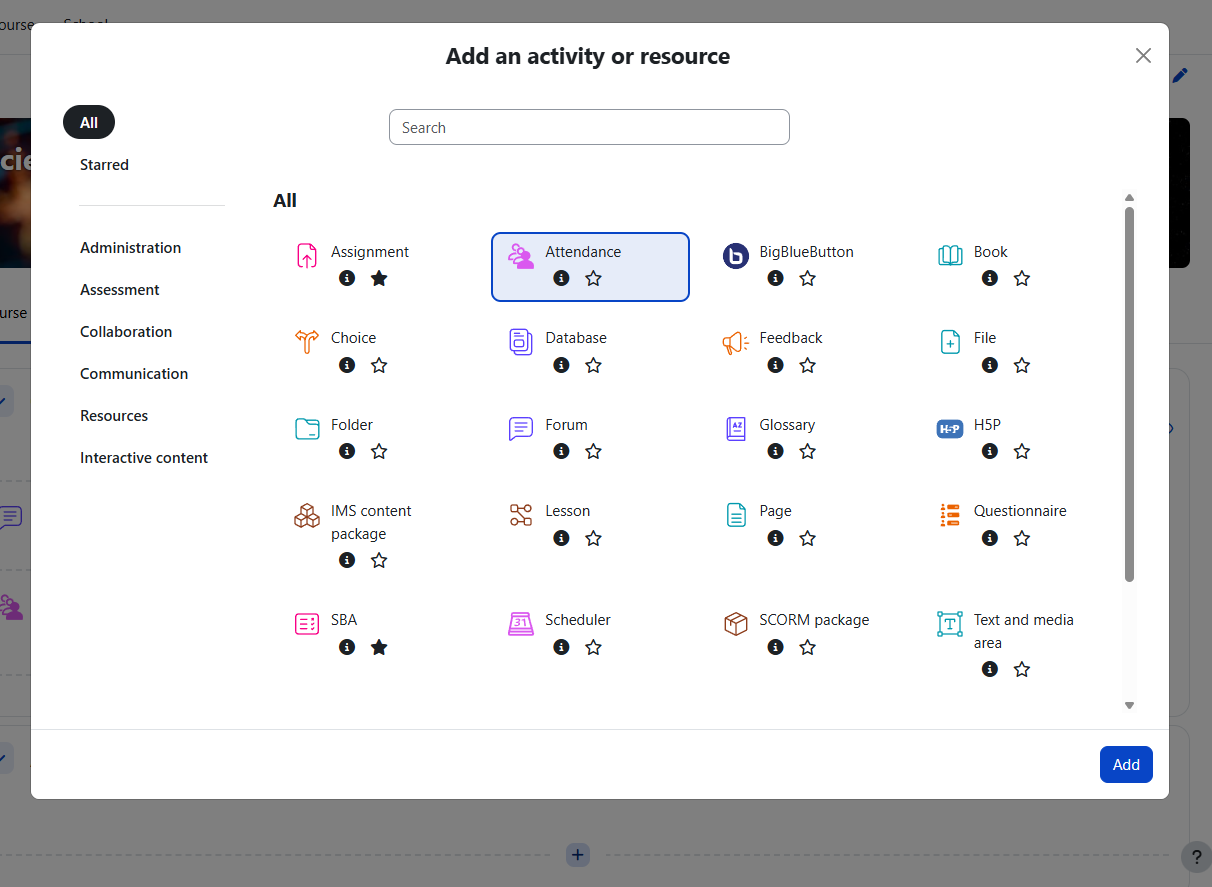
Step1: The first step to adding attendance is to add an "attendance activity" to the course. Go to the course that you want to add attendance and turn the editing on. Click the activity and resources plus icon of the top section and select attendance activity and click “add”.
If you already have an attendance module in your course, skip to step-3
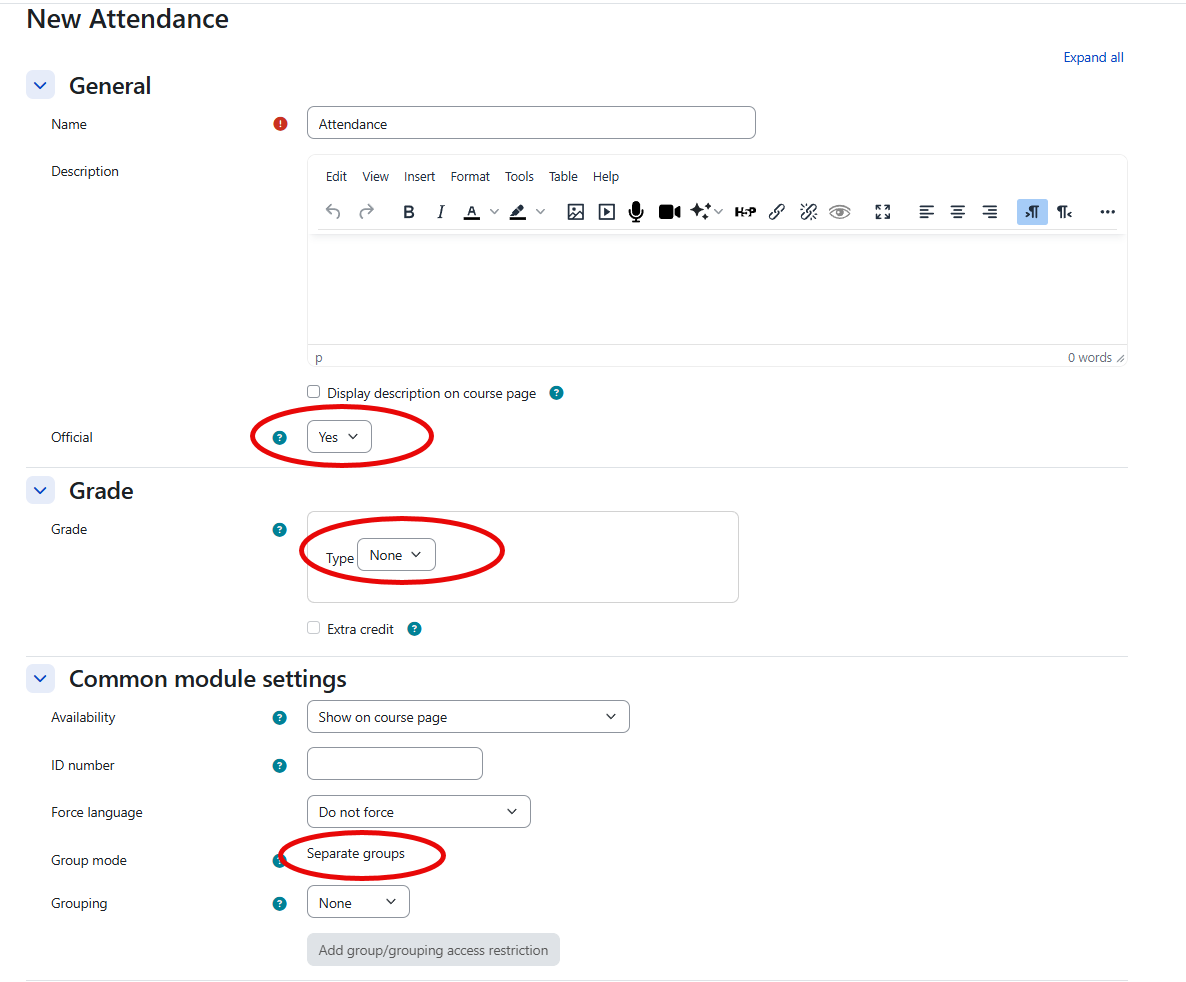
Step2: In the attendance settings, select “yes” for official and “none” for the grade. You may also make this attendance module "unofficial" by selecting "No". This means the attendance records will not show up on student's records such as report cards, attendance reports, etc. Unofficial attendance may be useful for clubs or tutoring courses. Under common module settings, the group mode must be "separate groups". If this setting is not available by default, it may have been turned off in the course settings. if that's the case, please go to the course settings to change the default grouping setting. When done, click "Save & display"
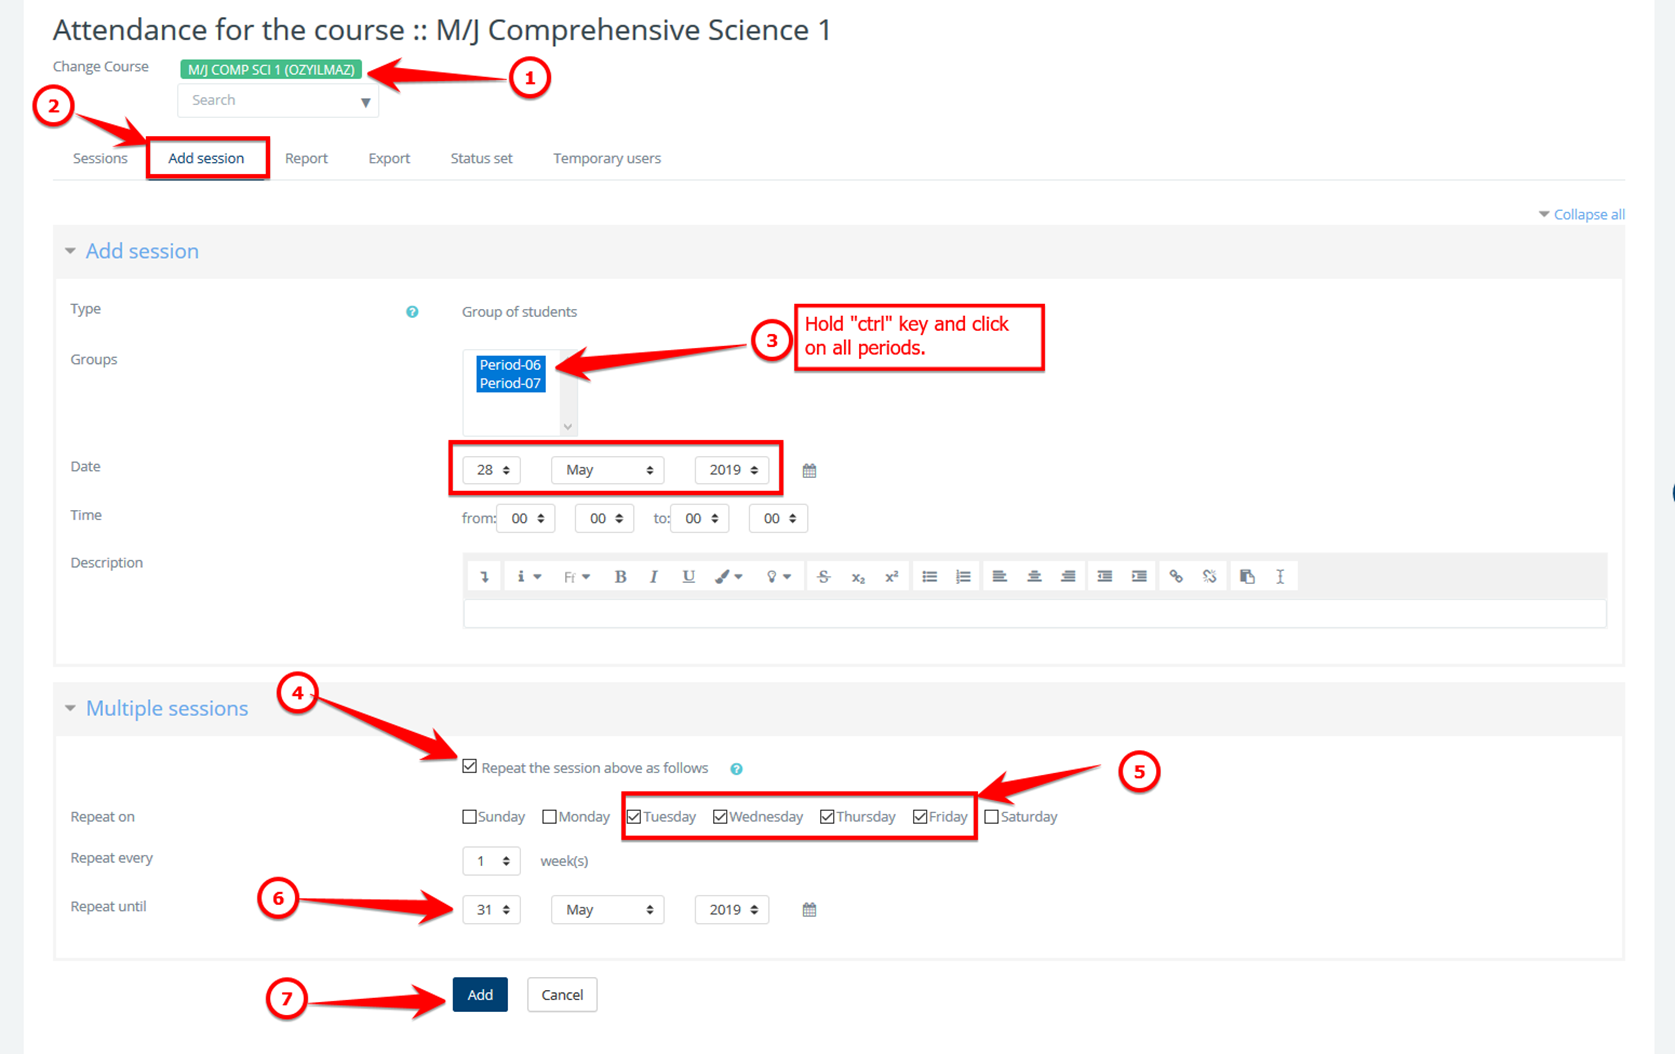
Step3: Add “sessions” by following the steps indicated on the screenshot below. Since you are already in the course, #1 below is just to double-check if you are in the right course. You can create sessions for all or one period of the course. Each period will have a separate attendance session.
If you would like the attendance session to take place within certain times of the day, you should change the time "from" and time "to" as well. This can be used to restrict students to take attendance outside the session time.
Step4: Self&Auto marking: If this attendance is going to be enabled for auto-marking or self-marking for students, the "Student recording" section should be configured.
#1 is for self attendance, if checked, students will be able to mark themselves present within the session hours,
#2 is for auto-marking; students will have to go to the course page within the session times to be counted as present,
#3 will make sure the students have been marked the highest available status for auto attendance which should be the "present"
the rest of the setting in this section should be kept as below unless you want to restrict your students to self/auto mark from a specific IP address.

The sessions will not skip your school holidays or off days for students. You can create sessions in multiple times to skip those days or delete those unwanted sessions later as explained in step 4.
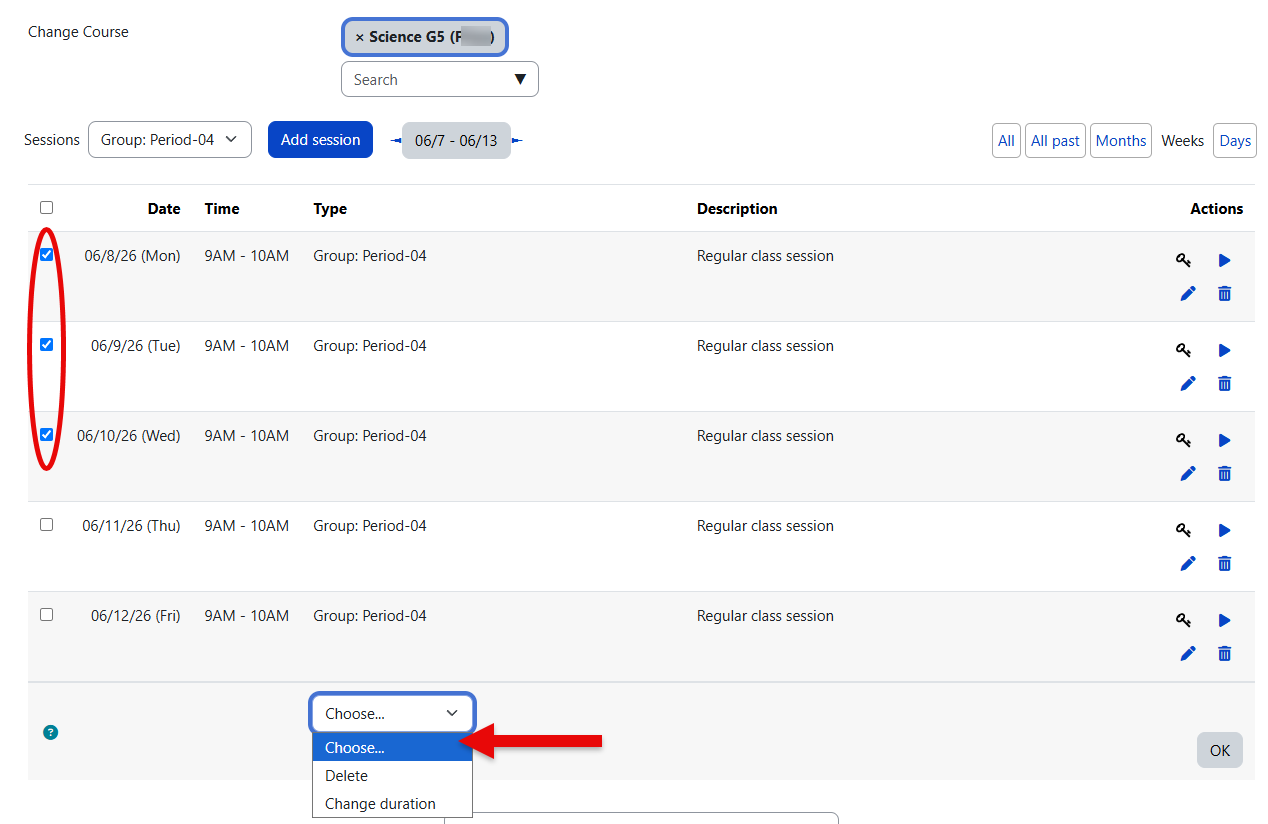
Step5: Deleting unwanted sessions: Any attendance sessions added by mistake can be deleted by going to the "Sessions" tab. Simply select the attendance session you want to delete and go to the bottom of the page and select "Delete" from the drop-down menu. For example, if you need to delete all sessions of a period including past sessions, click on "all" and select the period in the drop-down menu. To select all the periods on the page, check the box next to "Actions", go to the bottom of the page, and delete the selected.
If there are already attendance logs in any of the sessions you are deleting, they will permanently be deleted with the sessions as well.
If an enrolled student does not show up on the attendance list, this may mean the student's enrollment date has ended. You may check and update students' enrollment end dates via course participants.
Attendance Status Codes
Attendance status codes define the values teachers and attendance staff use when marking attendance, such as Present, Absent, Tardy, Excused Tardy, Excused Absence, In School Suspension, or Out of School Suspension. Radix LMS uses the site default attendance status set so schools can maintain the status codes that match their attendance policies.
Default attendance codes are managed from the attendance status configuration page. These codes are then used throughout the attendance module, including attendance taking screens, daily and cumulative reports, student monitor views, and the student/parent dashboard attendance view.
Important: If your school syncs attendance from an SIS, the attendance codes in Radix LMS must match the codes coming from the SIS. Code mismatches can prevent synced attendance records from displaying correctly.
Attendance Admin Tools
Attendance administration tools are available from the School > Attendance menu. Depending on a user's permissions, this menu can include cumulative attendance reports, daily reports, class monitor, student monitor, and attendance alerts.
Use these admin tools to review schoolwide attendance data, monitor whether teachers have completed attendance for each period, update student attendance when needed, and configure attendance-related alerts.
SIS Attendance Sync
Schools using SIS synchronization can sync period attendance into Radix LMS. SIS attendance sync is controlled by SIS integration settings, including whether period attendance should be synchronized and whether attendance for past days should be updated.
When past-day updates are enabled, Radix can update attendance for recent previous days, which is useful when attendance is entered or corrected in the SIS after the original date. The SIS and Radix LMS should use matching attendance codes so synced records are categorized correctly.
Site Admin Bulk Tools
Site admin only: The tools in this section make schoolwide changes and should only be used by a site administrator who understands the setup impact. Run these tools carefully, preferably during off-hours, and review the output after the process completes.
Bulk Add Attendance Activity
The Bulk Add Attendance Activity tool adds an official attendance activity to courses that do not already have one. It is intended for initial school setup or for schools that need to enable attendance across many courses at once.
Location: School > Tools > Bulk Attendance
When the tool is opened, it displays a confirmation message before making changes. After confirmation, it checks each course, skips courses that already have an official attendance activity, and adds the attendance activity where needed.
The results page may show the following statuses:
-
[ALREADY CREATED] — the course already has an official attendance activity, so no new activity was added.
-
[ADDED] — the tool added an official attendance activity to the course.
-
[SKIPPED] — the course was skipped and no attendance activity was added.
Bulk Add Attendance Sessions
The Bulk Add Attendance Sessions tool is designed to create attendance sessions for school days across courses that have an official attendance activity. It uses configured term dates, the school holiday calendar, and course period information to determine which sessions should be created.
Location: School > Tools > Bulk Attendance Sessions
Before using this tool, confirm that term dates, holiday calendar dates, course periods, and official attendance activities are configured correctly. Incorrect setup can create sessions on the wrong dates or for the wrong periods.
The results page may show the following statuses:
-
[EXISTING SESSION] — the course already has attendance sessions.
-
[ADDED] — sessions were created for the course.
-
[SKIPPED] — the course was skipped and no sessions were created.
Known limitation: The current UI version of the Bulk Add Attendance Sessions tool skips an entire course if any attendance sessions already exist for that course. Because of this, it should not be used to fill in missing sessions for courses that already have some sessions. It is best suited for initial session creation before attendance sessions have been created manually.