Page last reviewed: June 18, 2026 — Updated for current parent invitation workflows, dynamic email fields, account indicators, export details, troubleshooting, and tone consistency.
Overview
The Parent Portal gives families secure access to student information in Radix LMS. Administrators use the Parent Portal tools to manage parent invitations, monitor confirmation status, print access letters, and support families who need help connecting to their students.
Who uses this page: School administrators and registrars responsible for parent communication and account management.
When to review: Before the beginning of each school year, when new students enroll, or when parent invitation workflows change.
Quick note: Parent account access is invitation-based. Parents should use the email invitation from the school to create or confirm an account and connect students.
Important: Only registered parent accounts receive Radix LMS family communications, including progress emails, discipline notifications, report card notifications, teacher messages, and other parent-facing notices. Manually entered parent email addresses do not receive these communications unless the parent has completed account registration and is connected to the student.
As an admin, you can:
-
Configure parent invitation and access-letter templates.
-
Export or print student and parent access information.
-
Send parent account invitations and track invitation status.
-
Confirm whether parent accounts are connected to students.
-
Troubleshoot account access, opt-out, custody, and email-confirmation issues.
When Admins Use the Parent Portal
Admins typically use the Parent Portal tools for:
Beginning of the School Year
-
Print or export login and access information using Student/Parent Access Information
-
Send parent invitations using Parent account invitation
New Student Enrollment
-
Generate individual letters for families
-
Send invitations to new parent contacts
Ongoing Support
-
Re-send invitations to parents who have not yet registered
-
Monitor invitation history and parent account confirmation status
Configuring Parent Portal Settings
Navigation: School → Parent Portal → Parent Portal Settings
Use this page to configure access letter templates, parent role settings, parent-update options, student ID verification, and parent invitation email templates.
Parent Portal Settings fields
The Parent Portal Settings page controls invitation behavior, access-letter wording, and parent-facing account messages.
|
Setting |
What it controls |
|---|---|
|
Access letter body |
HTML template used when generating student/parent access letters. Supports dynamic fields such as student ID, student name, login credentials, site URL, parent signup URL, access code, school name, and homeroom teacher. |
|
Parent role on student |
Selects which role is assigned to parents on the student's user context. |
|
Parent role permission |
Provides access to configure permissions for the selected parent role. |
|
Updatable student fields |
Controls which student information sections parents may update, such as student demographics, health, Parent 1 contact, Parent 2 contact, authorized contacts, sibling info, and media participation. |
|
Info update start date |
Sets when the parent student-information update window opens. |
|
Info update duration |
Sets how long the student-information update window remains open. The default duration is 7 days. |
|
Student ID verification |
Controls whether parents must verify the student's ID during the workflow. |
|
Invitation email subject |
Subject line used for parent account invitation emails. |
|
No account invitation email |
Email template sent when no parent account exists for the contact. |
|
Confirmed account invitation email |
Email template sent when the parent has a confirmed account but the student is not linked. |
|
Unconfirmed account invitation email |
Email template sent when an account exists but has not been confirmed. |
Template tip: The default parent invitation templates work without changes. Edit them only when the school needs different wording, and use the dynamic fields below to keep messages personalized.
The system selects a template automatically based on each parent's account status. The default templates work without changes.
Invitation email dynamic fields
|
Field |
Inserts |
|---|---|
|
|
School name |
|
|
Student first name |
|
|
Student last initial |
|
|
Parent signup or confirmation link |
|
|
Invitation opt-out link |
Access letter dynamic fields
|
Field |
Inserts |
|---|---|
|
|
School name |
|
|
Student first name |
|
|
Student last name |
|
|
Student username |
|
|
Student default password |
|
|
School site URL |
|
|
Parent access code |
|
|
Parent signup URL |
|
|
Homeroom teacher |
|
|
Student ID number |
Parent Dashboard Settings
Navigation: Site Administration → Parent Portal → Parent Dashboard Settings
The Parent Dashboard Settings page controls what parents and students see on their dashboards. These settings include dashboard tabs, attendance count labels, grade display options, standards proficiency zones, and teacher dashboard summary behavior.
What parents can access
After registration and student linking are complete, parents can use the Parent Portal to review student progress areas such as grades, assignments, attendance, behavior, standards-based assessments, and progress reports. Depending on school configuration, parents may also update student information such as emergency contacts, medical information, address details, or other permitted student profile fields.
Parents can also access supported parent/student dashboard features from the Radix Mobile app for iOS and Android.
Important: These settings affect both the parent and student dashboard experience. The enabled optional tabs also control which matching links appear in the Parent Quick Menu block.
Parent and Student Dashboard settings
|
Setting |
Description |
Default / behavior |
|---|---|---|
|
Show Standard proficiency zones per grade levels |
Select which grade levels can see the Standards Performance proficiency zones chart. |
No grade levels selected by default. |
|
Term Grades |
Select which grading categories appear in the Academic summary, such as Q1, Q2, Q3, Q4, S1, S2, and Course Average. |
Course Average is commonly enabled by default. |
|
All courses |
Controls whether the dashboard shows all courses or only active courses. |
When disabled, the dashboard shows active courses only. |
|
Show grade letter |
Displays the letter grade alongside the numeric grade when enabled. |
Disabled by default. |
|
Enabled optional tabs |
Controls optional dashboard tabs such as Standards Performance, Attendance, and Behavior. |
Only enabled tabs appear to families and students. |
|
Low Grade threshold % |
Sets the percentage used to flag low-scoring assignments, such as assignments below 70%. |
Default threshold is 70. |
|
Attendance Count |
Defines four attendance code and label pairs for the attendance count summary on the dashboard. |
Common defaults are A / Absent, T / Tardy, EA / Excused Absence, and ET / Excused Tardy. Alternative names can be used, with a maximum of 15 characters. |
Parent Quick Menu Block
Navigation: Site Administration → Parent Portal → Parent Quick Menu Settings
The Parent Quick Menu block appears on the parent dashboard as a sidebar menu. It gives parents quick access to student performance pages and school-defined quick links.
Block settings
|
Setting |
Description |
Default / format |
|---|---|---|
|
Block Title |
The heading displayed above the quick menu. |
Parent Quick menu |
|
Custom menu items |
School-defined quick links. Enter one item per line. |
Use |
Student Performance links
The block automatically builds the Student Performance section for the selected student.
|
Link |
Destination |
When it appears |
|---|---|---|
|
Assignments |
Missing assignments page |
Always shown. |
|
Grades |
Grades summary page |
Always shown. |
|
Behavior |
Behavior entries page |
Only when the Behavior tab is enabled in Parent Dashboard Settings. |
|
Progress Reports |
Progress reports page |
Always shown. |
|
Attendance |
Attendance year view |
Only when the Attendance tab is enabled in Parent Dashboard Settings. |
|
Standards Performance |
Standards performance page |
Only when Standards Performance is enabled and the selected student's grade level is configured for proficiency zones. |
|
Resources |
Resources page |
Only when the Resources tab is enabled. |
Quick Links section
The Quick Links section appears only when custom menu items are configured. Use this area for school resources such as staff directory links, calendars, forms, or external family resources.
No linked student message
If a parent account has no linked students, the block displays a message directing the parent to contact the school and request a parent access email invitation.
Permissions
|
Capability |
Purpose |
|---|---|
|
|
Allows the user to see the Parent Quick Menu block. |
|
|
Allows the user to add the block to a page. Typically limited to managers. |
Student/Parent Access Information
Navigate to Student/Parent Access Information to view parent contact details and access codes. This list shows only the email addresses of parents who have registered an account in the system. If multiple registered parents are linked to a student, their email addresses appear as a comma-separated list.
Communication note: The parent email addresses shown here are registered parent account emails. These are the accounts used for Radix LMS parent communications. If a family contact exists in student information data but has not registered a parent account, that manually entered email address is not used for Radix LMS communications.
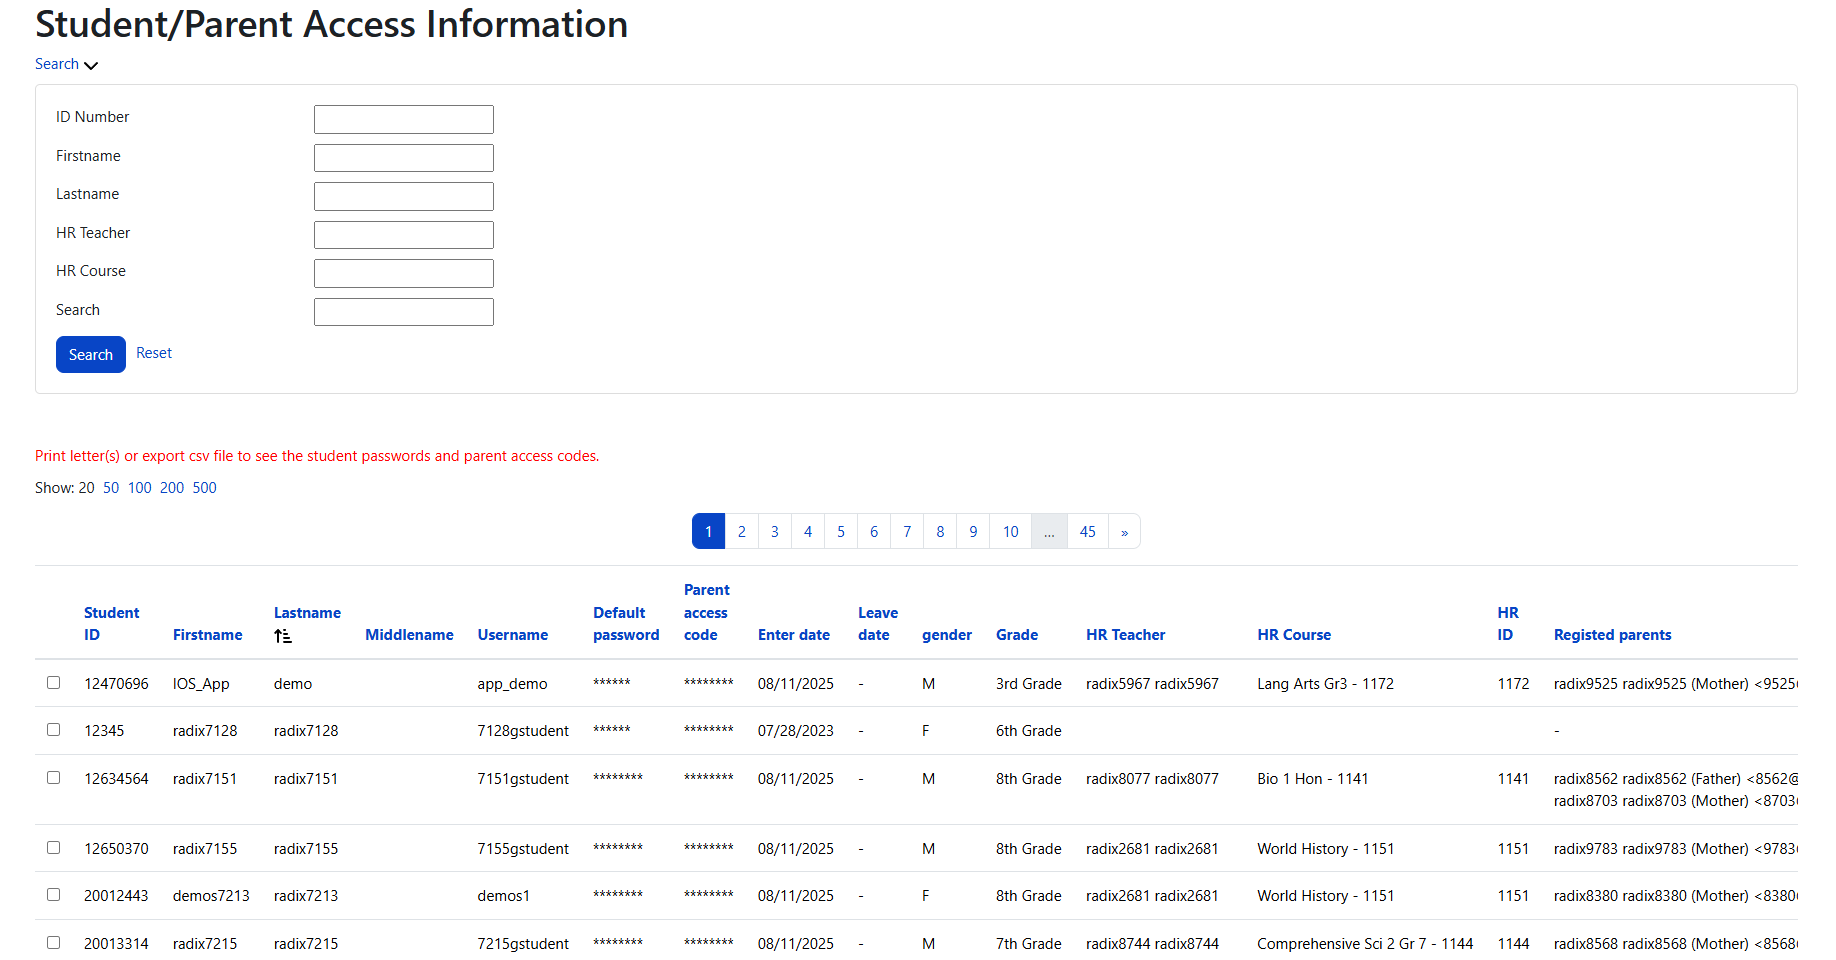
Available filters
-
Grade
-
Firstname
-
Lastname
-
HR Teacher
-
HR Course
-
Parent email
-
General name search (Search first or last names)
What you can do here
Generate access letters
Use the Letter action for a student to produce a PDF letter containing:
-
Student login information
-
Your customized Access letter body
Export student/parent access data
Use Export → CSV to download:
-
Student usernames
-
Default passwords
-
Registered parent email addresses
This export is useful for mass mail merges or record keeping.
The Parent Account Invitation CSV includes invitation tracking details such as time sent and opt-out status. Export filenames use a date-based format such as parent_invite_YYYY-MM-DD.csv.
Parent Account Invitation
Use this page to send email invitations to parents so they can create or confirm their Parent Portal accounts and link their children. Parents can no longer add students from the dashboard with a self-entered access code; they must use an invitation from the school.
Registration coverage: The Parent Account Invitation page displays the number of students linked to at least one registered parent account. Use this count to monitor parent registration progress during the beginning-of-year invitation process.
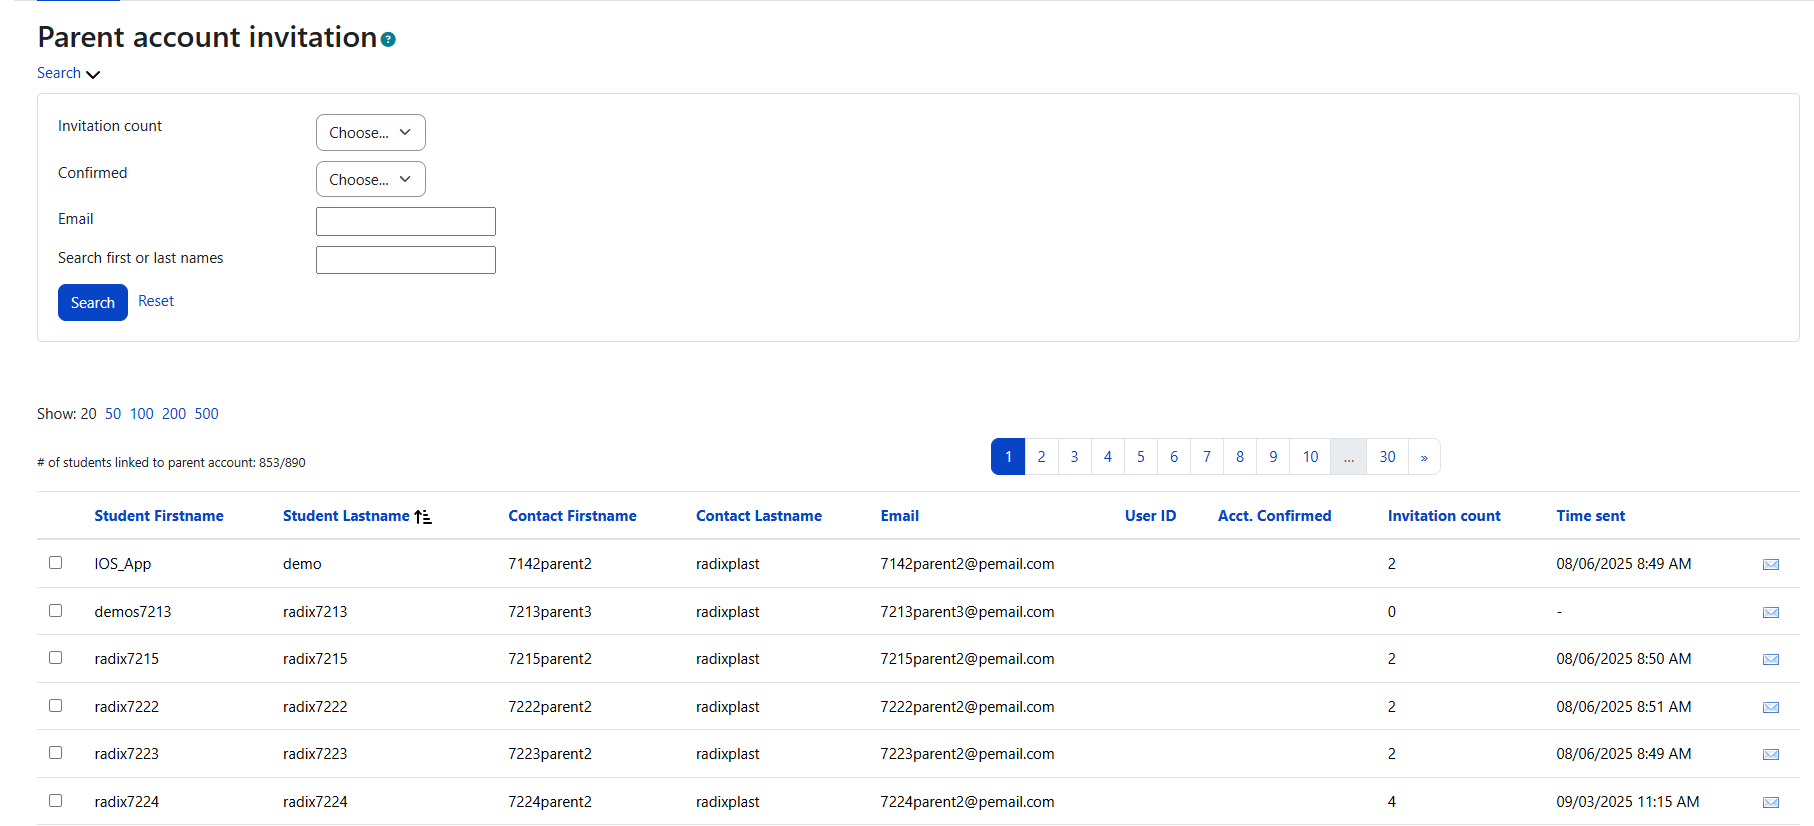
Understanding Which Contacts Appear Here
A parent contact appears on this list when they meet the invitation eligibility checks used by the school. Contacts are typically included when they are custodial guardians, have valid email addresses, are connected to active students, have not unsubscribed from invitations, and still require an invitation based on account status. Parents who have opted out remain visible with a disabled checkbox and an opt-out indicator so administrators can see why they cannot be selected.
-
They are marked as a custodial guardian
-
They have a valid email address
-
Their associated student is active
-
They have not unsubscribed from parent invitations
-
They still require an invitation based on their account status
-
Opted-out parents may remain visible with a deactivated checkbox and an opt-out icon. To opt back in, the parent must click the opt-out link again from a previous invitation email.
A contact will not appear if:
-
They are not a custodial guardian
-
There is no email address for them
-
Their student account is inactive
-
They have unsubscribed from email invitations
-
They already have a confirmed parent account with the student connected
Filters on This Page
You can target specific contacts using:
-
Invitation count
-
Confirmed
-
Email
-
Search first or last names
How the Invitation Emails Are Chosen
The system automatically sends one of the following based on each contact’s situation:
|
Parent Status |
Email Template Sent |
|---|---|
|
No parent account exists |
No account invitation email |
|
Confirmed account but no students linked |
Confirmed account with no student invitation email |
|
Account exists but is unconfirmed |
Unconfirmed account invitation email |
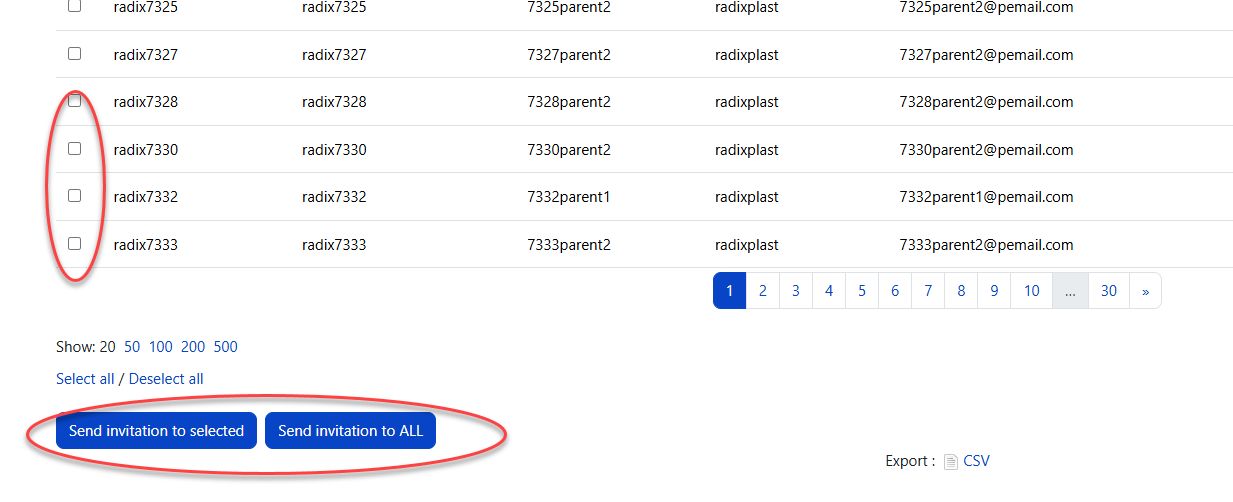
Sending Invitations
To send invitations to selected contacts:
-
Check the boxes for the contacts you want.
-
Click Send invitation to selected.
-
Confirm when prompted.
To send invitations to all contacts in the filtered list:
-
Apply filters.
-
Click Send invitation to ALL.
-
Confirm the number of invitations.
Invitation CSV export
Use the CSV export on the invitation page to review invitation tracking details outside Radix LMS. The export includes parent/student identifying information, parent email, invitation count, last invitation timestamp, confirmation status, opt-out status, and other invitation tracking fields. Export filenames use a date-based format such as parent_invite_YYYY-MM-DD.csv.
What happens after sending
-
Large batches may be queued as a background task.
-
Invitation count and timestamps update as messages are processed.
Best Practices
At the beginning of the school year
Send invitations in phases:
-
First to all custodial guardians
-
Then follow up using the Confirmed and Invitation count filters
When new students join
Invite new parents immediately.
When troubleshooting access issues
Check:
-
Whether the parent has unsubscribed
-
Whether they appear on the invitation list
-
Their invitation count and confirmation status
-
Whether they already have student connections
Parent Account and Student Link Behavior
|
Scenario |
What happens |
|---|---|
|
Parent email changes |
When a school admin or SIS sync changes a parent's contact email, the system updates the parent account email/username and sends a re-confirmation email. Admins see a warning before making manual email changes. |
|
Custody changes to No |
The student is automatically removed from the parent's dashboard. If custody is restored, the student appears again. |
|
Parent confirms one invited student |
Other students associated with the same parent contact are automatically linked to the parent account when eligible. Parents do not need to add each sibling one at a time. |
|
Parent opens Add Student |
The parent sees a message directing them to contact the school for an email invitation. Parents do not add students through self-service access code entry. |
|
Signup confirmation page |
The access code is read-only. If the parent cancels, they return to the login page. |
Registered parent email changes
When a parent contact email is changed by SIS sync or by a school admin, Radix LMS checks whether that contact is already connected to a registered parent account.
|
Situation |
What happens |
What admins should know |
|---|---|---|
|
New email is not already used by another account |
The parent account email and username are updated to the new email address. The account is set back to unconfirmed, and the system sends a re-confirmation email to the new address. |
The parent must confirm the new email address before logging in again. The old email address no longer works for login. |
|
New email already belongs to another active account |
The student contact is disconnected from the old parent account, and a new invitation is sent to the new email address. |
The invitation workflow determines whether the message is treated as a no-account, confirmed-account, or unconfirmed-account invitation. |
|
Admin manually changes the email |
Before saving, the admin sees a warning that the parent will receive a confirmation email at the new address, must confirm before logging in again, and can no longer use the old email for login. |
Confirm the change with the family before saving, especially if the parent is actively using the portal. |
|
SIS sync changes the email |
The same email-change logic runs automatically when synced contact data has a different primary email than the stored contact email. |
If a parent reports they cannot log in after SIS data changes, ask them to check the new email inbox for the re-confirmation message. |
Support note: This behavior protects account ownership when contact email data changes. A parent whose email was changed must complete the new email confirmation step before access is restored under the updated email address.
Tips and Troubleshooting
|
Issue |
What to check |
|---|---|
|
Parent says they never received the invitation email |
Verify the parent's email address, check opt-out status on the invitation list, and ask the parent to check spam/junk folders. Re-send if needed. |
|
Parent cannot add a student from the dashboard |
This is expected. Parents must receive an email invitation from the school to add a new student. |
|
Student does not appear on the parent dashboard |
Check custody status and verify the student account is active. Students are hidden when custody changes to No. |
|
Invitation list shows a parent with a deactivated checkbox |
The parent opted out. They can opt back in by clicking the opt-out link in a previous invitation email. |
|
Access info page shows an Account disabled indicator |
The parent account is suspended. Reactivate it if appropriate. |
|
SIS sync changed a parent's email and they cannot log in |
The system updates the account email and sends a re-confirmation email. The parent must confirm the new email before logging in with it. |
|
Calendar events do not show for a second student |
Select any course from the all courses dropdown to refresh the calendar. |
Checking Parent Registration Status from the Student List
Schools can also verify a parent’s registration and student-connection status from the Student List. Navigate to School → User → Students, then click the parent icon next to a student.
This panel may show one of three indicators next to the “Parent Acct” field.
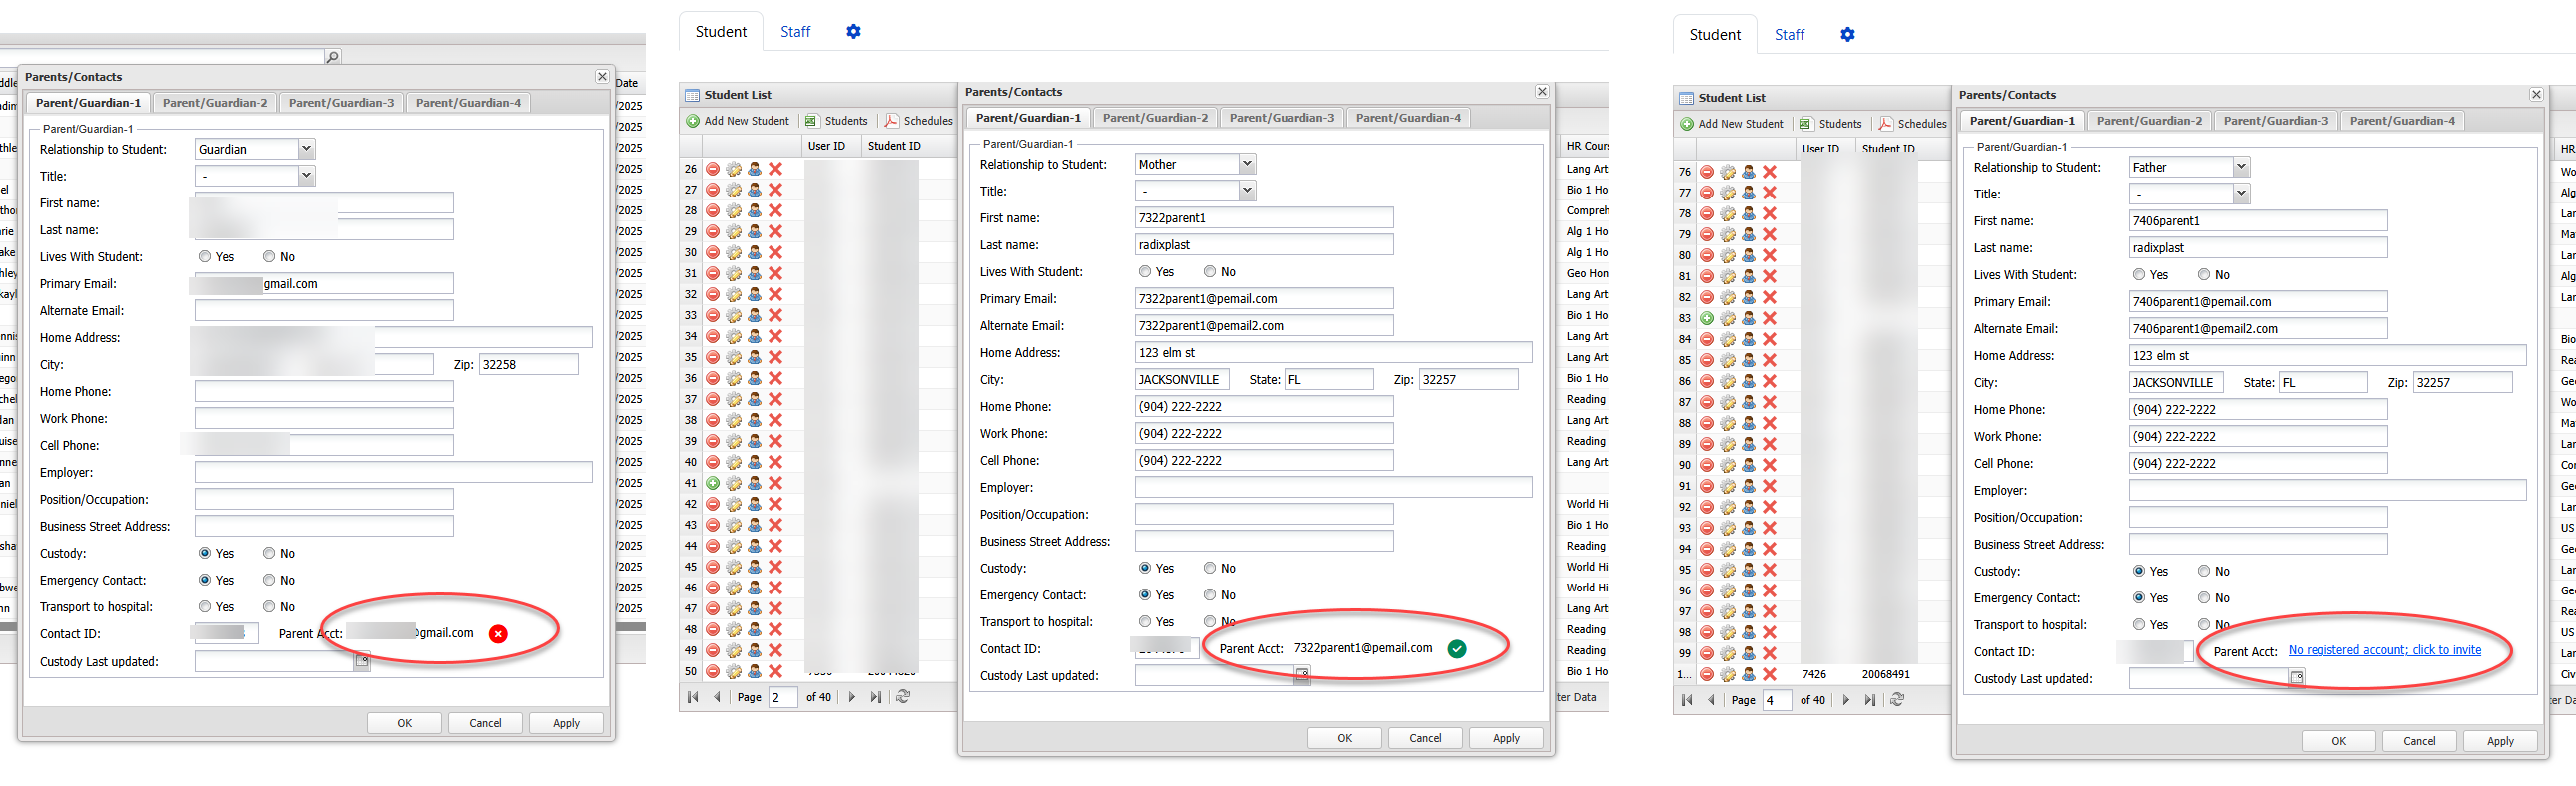
Status Indicator Reference
Use the indicators as a starting point. If the status does not match what the family reports, verify the parent email address, custody setting, account confirmation status, and student connection before re-sending invitations.
|
Indicator |
What it means |
Parent dashboard result |
Admin action |
|---|---|---|---|
|
Red cross |
A registered parent account exists, but the student is not fully connected or the parent does not currently have custody access. |
The student may not appear on the parent dashboard. |
Check custody status, student confirmation status, and whether the parent should be invited again. |
|
Green check |
The parent account is registered and the student is confirmed. |
The student appears on the parent dashboard. |
No action is needed unless the parent reports an access issue. |
|
No registered account |
No registered parent account is linked for this student contact. |
The parent cannot access the student until an account is created and linked. |
Use the invite link or the Parent Account Invitation page to send an invitation. |
Shortcut: When the Student List displays No registered account; click to invite, selecting that message takes the admin directly to the invitation screen for that parent/student contact.
Administrative permissions
Access to Parent Portal management tools depends on school role permissions. Administrators who manage parent accounts should have permission to view student and parent contact information, access Parent Portal settings, send parent invitations, export invitation/access data, and manage dashboard/block settings. Limit these permissions to staff who are responsible for family account support because the tools expose parent contact information and student access details.