Run Periods, Behavior Resolutions & Resetting Entries
This page covers the three admin workflows that manage how behavior entries move from recorded incidents to processed outcomes: Run Periods, Behavior Resolutions, and Reset Behavior Entries. These tools are closely connected — run periods collect eligible entries for a date range, behavior resolutions let administrators review and finalize outcomes, and resets deactivate older entries when a school is ready to clear progression.
Before using these tools, make sure your school has already configured Behavior Forms Setup, Discipline Matrix & Major Offenses, and Administrative Decisions & Letter Templates. Those setup pages determine what outcomes appear here, how points are interpreted, and what letters or notifications can be sent.
Run periods and resets affect progression. Use them carefully and in a consistent school process. If your school wants progression to continue across a quarter, semester, or year, avoid resetting too frequently.
Overview
|
Area |
What it does |
Why it matters |
|---|---|---|
|
Run Periods |
Processes behavior entries through a selected end date and groups them into a run for admin review. |
Creates the basis for behavior resolutions and tracks when entries were processed. |
|
Behavior Resolutions |
Shows the student-level outcomes generated from a run period and allows admins to review, adjust, notify, and print letters. |
Turns accumulated points into school action such as consequences or rewards. |
|
Reset Behavior Entries |
Deactivates older entries before a selected date without deleting them. |
Lets schools clear progression when appropriate while preserving history for audit and reporting. |
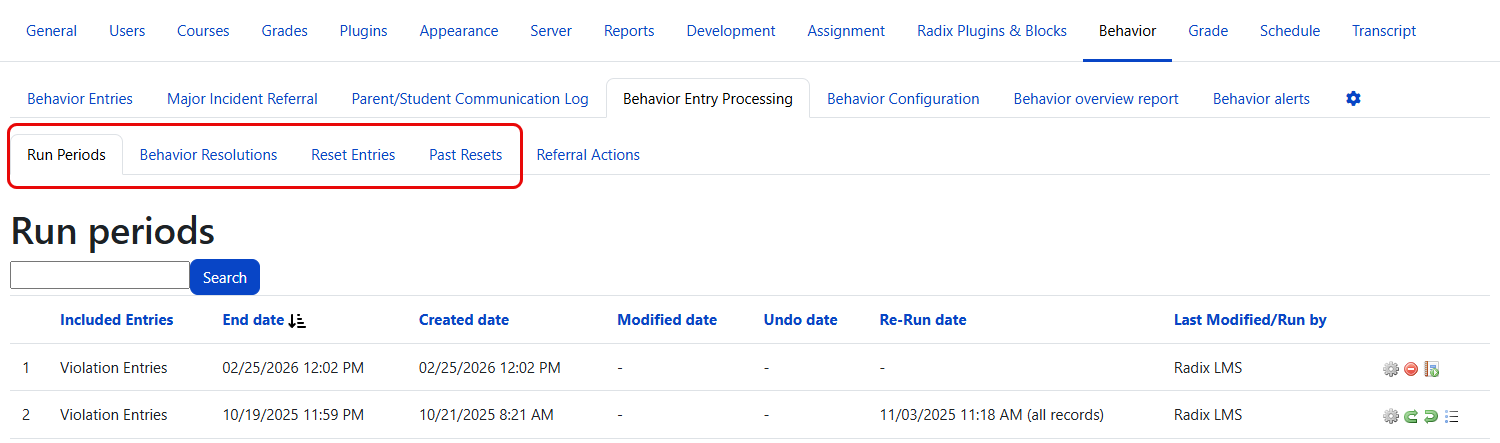
Run Periods
Navigation: School → Behavior → Run Periods
Run periods are used to process behavior entries up to a selected end date. In a typical workflow, an administrator creates a run period, chooses whether to include violations, recognitions, or both, and then runs it. The system evaluates eligible entries, calculates points, matches outcomes, and creates the records that appear in Behavior Resolutions.
This is usually done on a regular schedule such as weekly, biweekly, or by term, depending on the school's discipline process.
What happens when a run period is executed
When a run period is executed, the system performs several steps automatically:
-
Tardy auto-import — If the run includes violations, the system first imports any tardy records from the attendance module (entries marked with the Tardy code configured in the plugin settings) into the behavior log before processing. Admins do not need to manually enter tardies — they are pulled in automatically.
-
Point calculation — For each student, the system totals points from all eligible behavior entries. For progressive/countable behavior categories, entries up to the configured limit number receive the base point value, while entries exceeding the limit receive the “point after limit” value. All direct step points from the discipline matrix are added on top.
-
Outcome matching — The system matches each student's total points against the configured behavior outcomes. It finds the outcome where the minimum point threshold is met, selecting the highest qualifying outcome first.
-
Resolution or referral creation — Based on the matched outcome type:
-
If the outcome type is Minor → the system creates a behavior resolution
-
If the outcome type is Major → the system creates a referral with status “Resolution Entry”
This is important — a run period can generate both resolutions AND referrals depending on the student's point total and the configured outcome thresholds.
-
-
Auto admin decision — If only one admin decision exists for the matched outcome, it is automatically assigned to the resolution or referral. If multiple decisions exist, the admin must select one manually.
-
Email notification — After the run completes, the system sends an email to the admin who triggered the run with a summary: “X resolution(s), Y referral(s)” along with links to both the resolutions and referrals lists.
A single run period can produce both resolutions and referrals. If a student's accumulated points match a Major outcome, the system creates a referral instead of a resolution. Review your Discipline Matrix & Major Offenses setup to understand which outcomes are configured as Major vs. Minor.
What admins do on this page
-
Create a new run period
-
Select the run period end date
-
Choose which entries to include: Violations, Recognitions, or Both
-
Run the period
-
Review past runs, including created and modified dates
-
Use action icons to open related lists or available actions
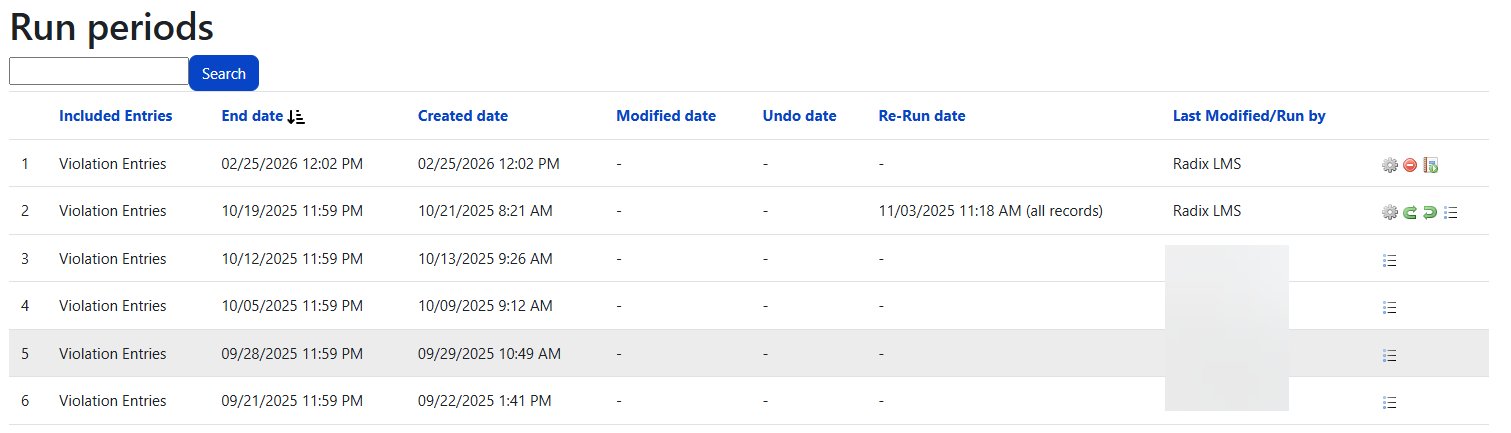
Run period list
The run periods list provides a running history of each processing cycle. This page is useful not just for starting a new run, but also for reviewing what has already been processed and when.
|
Column or feature |
What it shows |
Why it matters |
|---|---|---|
|
End date |
The date through which entries are included in the run. |
Helps admins confirm which entries were considered. |
|
Included Entries |
Whether the run processed violations, recognitions, or both. |
Important for schools using both negative and positive behavior workflows. |
|
Created date |
When the run period was first created. |
Supports audit review. |
|
Modified date |
When the run was last updated. |
Shows whether changes were made after creation. |
|
Undo date |
When the run was undone, if applicable. |
Helps explain why expected resolutions may no longer be active. |
|
Re-Run date |
When the run was re-processed, if applicable. |
Useful for tracking corrections or changes. The system tracks the first run time and re-run time separately. |
|
Last Modified/Run By |
The user who most recently changed or ran the period. |
Improves accountability and troubleshooting. |
Common run period workflow
-
Open School → Behavior → Run Periods.
-
Select Add.
-
Choose the run period end date.
-
Select whether to include violations, recognitions, or both.
-
Save and run the period.
-
Check your email for the run summary showing how many resolutions and referrals were created.
-
Open the related Behavior Resolutions list to review outcomes for that run.
The resolutions list can be opened from the run period workflow. The run period filter on the resolution page uses the run period end date, which makes it easier to confirm you are reviewing the correct cycle.
Undo and re-run
Some schools need to correct a run after setup changes, late entries, or processing mistakes. Radix supports undo and re-run actions, but these should be used carefully.
-
Undo reverses a run completely — it deletes all resolutions AND referrals generated by that run, resets all affected behavior entries back to unprocessed status, and reactivates the run period so it can be modified or re-run.
-
Re-run processes the run period again after corrections have been made. The system tracks the original run time and re-run time separately for audit purposes. An “all records” option is available to control the re-run scope to ALL or to the unprocessed entries .
Undo is a destructive action — it permanently deletes all resolutions and referrals created by that run. If any of those resolutions have already been communicated to parents or marked as served, undoing the run will remove those records. Make sure this is intentional before proceeding.
If a reset exists on or after the same timeline, certain undo or re-run actions may be restricted. This protects data consistency and helps prevent using entries that were already voided by a reset.
Important warnings for runs and resets
Radix includes safeguards when resets and runs overlap.
-
If a reset date is earlier than the latest run date, the system warns that some entries may not be deactivated because they have already been used in a run period.
-
Run periods dated on or before an existing reset may have undo or re-run actions disabled.
A simple best practice is to agree on one school rhythm. For example: run weekly, process resolutions, and only reset at a larger checkpoint such as quarter or semester end.
Behavior Resolutions
Navigation: School → Behavior → Behavior Resolutions
Behavior Resolutions is where administrators review the outcomes produced by run periods and finalize what a student receives. This is the step where accumulated entries become a documented consequence or reward, paired with an admin decision, scheduling details, and optional family communication.
Students may appear more than once if your school is using both consequence and reward workflows.
Resolution list
The resolutions list organizes generated and manual resolution records for admin review. Filters on this page are especially important because many schools process a large number of records over time.
List columns (24 columns)
|
Column |
What it shows |
|---|---|
|
Checkbox |
Row selection for bulk operations |
|
Action icons |
Edit, delete, and other actions (see below) |
|
First Name |
Student's first name |
|
Last Name |
Student's last name |
|
Grade |
Student's grade level |
|
Run Period |
The run period end date associated with this resolution |
|
Point |
Total points calculated for this student |
|
Minor Count |
Number of minor consequences — linked to the entries list if count is greater than 1 |
|
Reward Count |
Number of rewards the student has received |
|
Consequence |
The behavior outcome (consequence or reward name) |
|
Admin Decision |
The administrative decision assigned |
|
Date Scheduled |
When the consequence is scheduled to be served |
|
Parent Contacted |
Whether a parent was contacted |
|
Letter Sent |
Whether a letter was sent |
|
Served |
Whether the consequence has been served |
|
Date Served |
When the consequence was served |
|
Times Between |
Time range for the scheduled consequence |
|
Scheduled Day |
Number of days scheduled |
|
Scheduled Hour |
Number of hours scheduled |
|
Parent Notification |
Whether parent notification was sent |
|
Parent Notification Date |
When the parent notification was sent |
|
Comment |
Admin comment (visible in reports and letters) |
|
Private Comment |
Admin comment NOT included in notifications or letters |
|
Action icons (end) |
Additional action icons |
Action icons (5 per row)
|
Icon |
Action |
Description |
|---|---|---|
|
|
Letter preview |
Opens the resolution letter in a new tab for review or printing |
|
|
Notification history |
View sent notification log for this resolution |
|
|
Edit |
Open the resolution form to modify fields |
|
|
Delete |
Remove the resolution record |
|
|
Behavior entries |
View the behavior entries linked to this resolution from the run period |
List features
|
Feature |
What it does |
Why it matters |
|---|---|---|
|
Run period end date filter |
Filters resolutions by the selected run period end date. |
Helps admins review one processing cycle at a time. |
|
Student and grade filters |
Narrows the list to specific students or groups. |
Makes review faster and more targeted. |
|
Behavior outcome and Admin Decision filters |
Lets admins isolate specific resolution types, including reward-related records. |
Useful for auditing and follow-up. |
|
Search and sorting |
Refines the visible list. |
Helps find a resolution quickly. |
|
Export |
Downloads current results as CSV. |
Useful for administrative review or meetings. |
|
Add New Resolution |
Creates a manual resolution outside the run period cycle. Requires |
Helpful for documenting actions outside the normal workflow. |
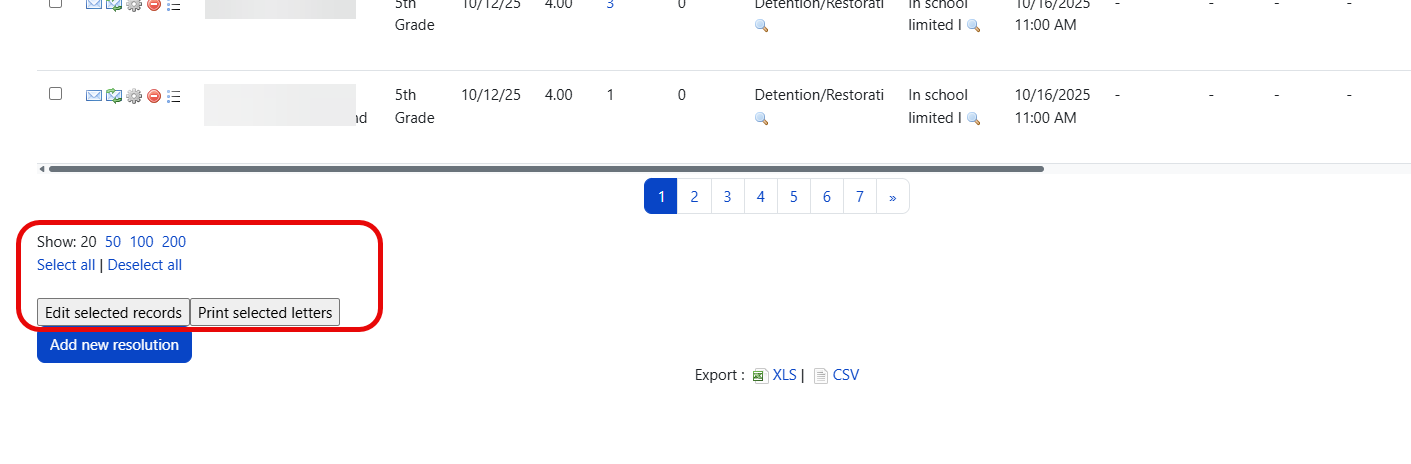
Bulk operations
The resolution list supports bulk actions for efficient processing:
-
Select All / Deselect all — Toggle selection of all visible rows
-
Edit Selected Records — Opens a bulk edit form to update multiple resolutions at once
-
Print Selected Letters — Generates and prints letters for all selected resolutions
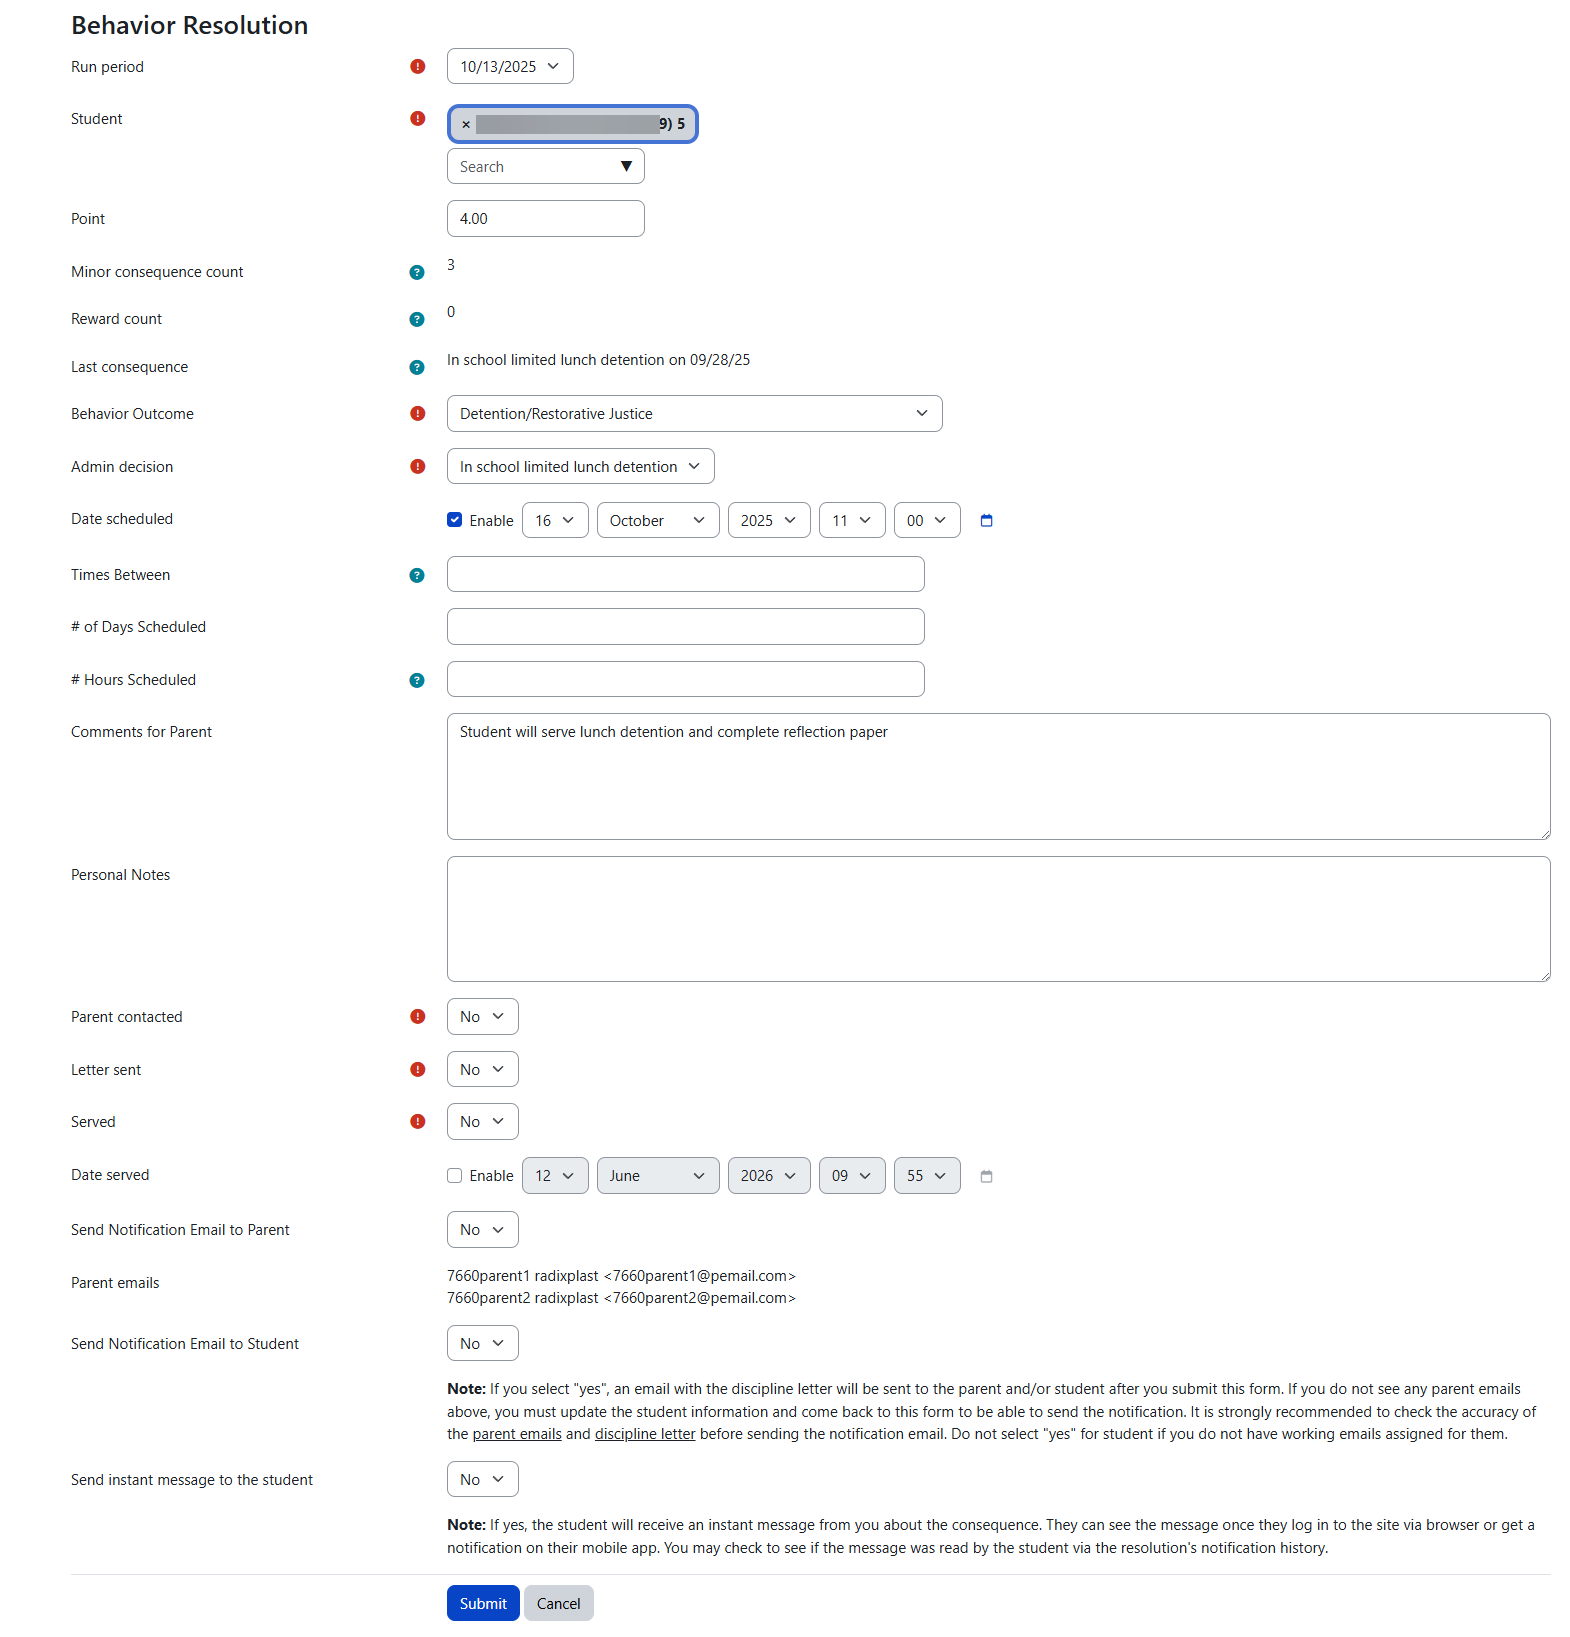
Processing a resolution
When an admin opens a resolution to process it (gear icon), they review the suggested outcome and complete the fields needed for final action and communication. The form has 22 fields, and the exact fields visible depend on whether the resolution is for a consequence or a reward.
Full resolution form fields
|
Field |
Type |
Purpose |
Admin guidance |
|---|---|---|---|
|
Run Period |
Select (required) |
Dropdown of all run periods by end date. |
Confirms which processing cycle this resolution belongs to. |
|
Student |
Autocomplete (required) |
Student selector with search. |
For manual resolutions, selecting a student refreshes all related counts and history. |
|
Point |
Text (float) |
Total points calculated for this student. |
Review to confirm the point calculation matches expectations. |
|
Consequence Count |
Static display |
Number of prior minor consequences for this student. |
Helps admins consider progression and consistency. |
|
Reward Count |
Static display |
Number of prior rewards for this student, including those not yet processed. |
Useful when reviewing recognition-based resolutions. |
|
Last Consequence |
Static display |
The student's last consequence name and the run period end date when it was processed. |
Provides immediate context before assigning the current resolution. When editing the latest run period's resolution, the system shows the previous consequence, not the current one. |
|
Consequence (Outcome) |
Select (required) |
The behavior outcome — filtered by type (consequence or reward). |
For rewards, only reward outcomes appear. |
|
Administrative Decision |
Select (required) |
Filtered by the selected outcome. |
Choose a decision with a valid letter template if notifications are needed. A warning appears if the selected decision has no letter template configured. |
|
Date Scheduled |
Date picker |
When the consequence is scheduled to be served. |
Hidden for rewards. |
|
Times Between |
Text |
Time range for the scheduled consequence (e.g., “8:00 AM – 3:00 PM”). |
Hidden for rewards. |
|
Scheduled Day |
Text |
Number of days for the consequence. |
Hidden for rewards. |
|
Scheduled Hour |
Text |
Number of hours for the consequence. |
Hidden for rewards. |
|
Comment |
Textarea |
Admin comment visible in reports and letters. |
Write clearly and professionally — this may be seen by parents. |
|
Private Comment |
Textarea |
Admin comment NOT included in notifications or letters. |
Use for internal notes that should not be shared with families. |
|
Parent Contacted |
Yes/No (required) |
Whether a parent was contacted about this resolution. |
Use for internal tracking/records. |
|
Letter Sent |
Yes/No (required) |
Whether a letter was sent for this resolution. |
Use for internal tracking/records. |
|
Served |
Yes/No (required) |
Whether the consequence has been served. |
Hidden for rewards. |
|
Date Served |
Date picker |
When the consequence was served. |
Hidden for rewards. |
|
Send Notification to Parent |
Yes/No |
Triggers parent email notification with PDF letter attached. |
Only registered parents with custody receive notifications. |
|
Parent Emails |
Static display |
Auto-populated from the student's registered parent contacts with custody. |
Cannot be edited — reflects the current contact records. |
|
Send Notification to Student |
Yes/No |
Triggers student email notification. |
Students must have working email accounts |
|
Send Message to Student |
Yes/No |
Sends a direct message to the student within the system. |
Uses the Radix instant messaging system, not email. |
Reward vs. Consequence forms: When the selected outcome type is a Reward, the following fields are automatically hidden: Date Scheduled, Times Between, Scheduled Day, Scheduled Hour, Served, and Date Served. This keeps the form clean and relevant for recognition-based resolutions.
Manual resolutions
Admins can also add a resolution directly by clicking Add New Resolution. This is helpful when a school needs to document an action outside the normal run-period cycle. When adding a manual resolution and selecting a student, the form refreshes to show the current consequence count, reward count, and last consequence information.
Letters and notifications
Behavior resolutions can trigger letters and notifications based on the selected Admin Decision and your Administrative Decisions & Letter Templates setup.
How notifications are processed
-
When a resolution is saved with “Send Notification to Parent” or “Send Notification to Student” set to Yes, the notification is queued.
-
A scheduled task (usually runs every minute) picks up queued notifications.
-
The system generates a PDF letter based on the letter template configured for the selected Admin Decision.
-
The PDF is attached to the email and sent to the parent(s) and/or student.
-
Each notification is logged for audit purposes — viewable via the notification history action icon on the resolution list.
-
After sending, the notification flags are reset and the Parent Notification Date is recorded.
Notification rules
-
Parent notifications depend on a valid letter template attached to the selected Admin Decision.
-
Only registered parents with custody are eligible to receive these notifications.
-
Students can also receive notifications or direct messages where enabled.
-
If an Admin Decision does not have a letter template, notifications will not be sent for that resolution.
Review your Administrative Decisions & Letter Templates setup before relying on automated communication. If the selected Admin Decision does not have a letter template configured, no notification will be sent — even if “Send Notification to Parent” is set to Yes.
Printing letters
Admins can print parent-facing letters from processed resolutions when templates are configured. Use the letter preview action icon on individual resolutions, or select multiple resolutions and use Print Selected Letters for bulk printing. This supports consistent communication and a formal paper trail for conferences, detention notices, suspensions, or rewards.
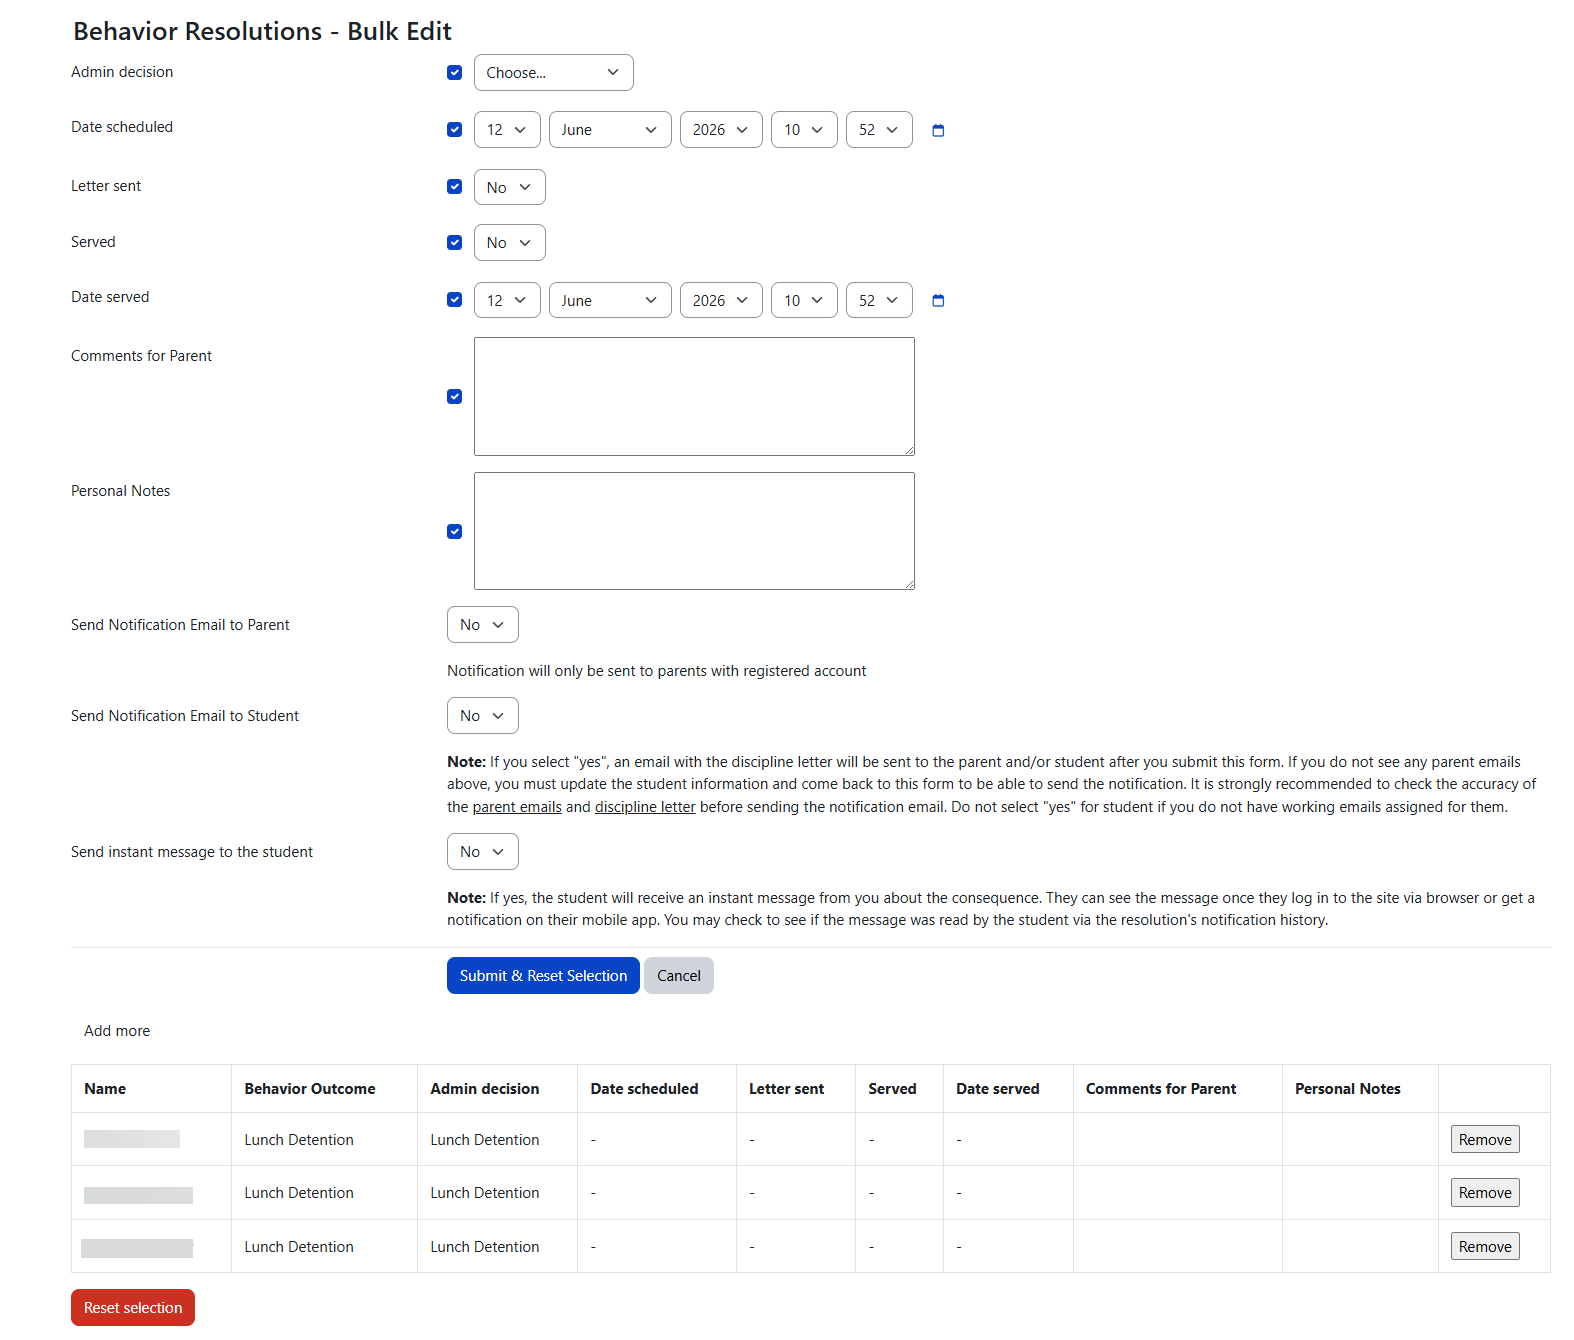
Bulk Edit Form
When an admin selects multiple resolutions using checkboxes and clicks Edit Selected Records, the bulk edit page opens with two sections:
-
Top section: The bulk edit form with fields to apply across all selected records
-
Bottom section: A reference table showing all selected resolutions with their current values
How bulk editing works
Each field in the bulk edit form has an enable checkbox next to it. Fields are disabled, or greyed out, by default until the admin checks the enable box. Only enabled fields are applied to the selected records — unchecked fields are left unchanged on all records. This prevents accidental overwrites.
Bulk edit form fields
|
Field |
Enable checkbox? |
Notes |
|---|---|---|
|
Administrative Decision |
Yes |
Only shown when ALL selected resolutions share the same consequence. If the selected resolutions have different consequences, this field is replaced with a red warning — the admin cannot bulk-change the admin decision across different outcome types. |
|
Date Scheduled |
Yes |
|
|
Letter Sent |
Yes |
|
|
Served |
Yes |
|
|
Date Served |
Yes |
|
|
Comment |
Yes |
|
|
Private Comment |
Yes |
|
|
Send Notification to Parent |
No (always active) |
|
|
Send Notification to Student |
No (always active) |
|
|
Send Message to Student |
No (always active) |
|
The notification fields (Send Notification to Parent, Send Notification to Student, Send Message to Student) do not have enable checkboxes — they are always active in the bulk edit form.
Selected resolutions table
The bottom of the bulk edit page shows a reference table with all selected resolutions, including these columns:
|
Column |
|---|
|
Name (student full name) |
|
Consequence |
|
Administrative Decision |
|
Date Scheduled |
|
Letter Sent |
|
Served |
|
Date Served |
|
Comment |
|
Private Comment |
|
Remove (button to deselect individual records without leaving the page) |
Additional controls
-
Add more — Returns to the resolutions list to select additional records to include in the bulk edit
-
Reset Selection (red button) — Clears all selected records from the session
-
Submit and Reset — Applies the enabled field changes to all selected records and clears the selection
When bulk editing, only check the enable box for fields you actually want to change. All other fields will remain untouched on each selected resolution. This is especially useful when you need to update just the served status or notification flags across many records at once.
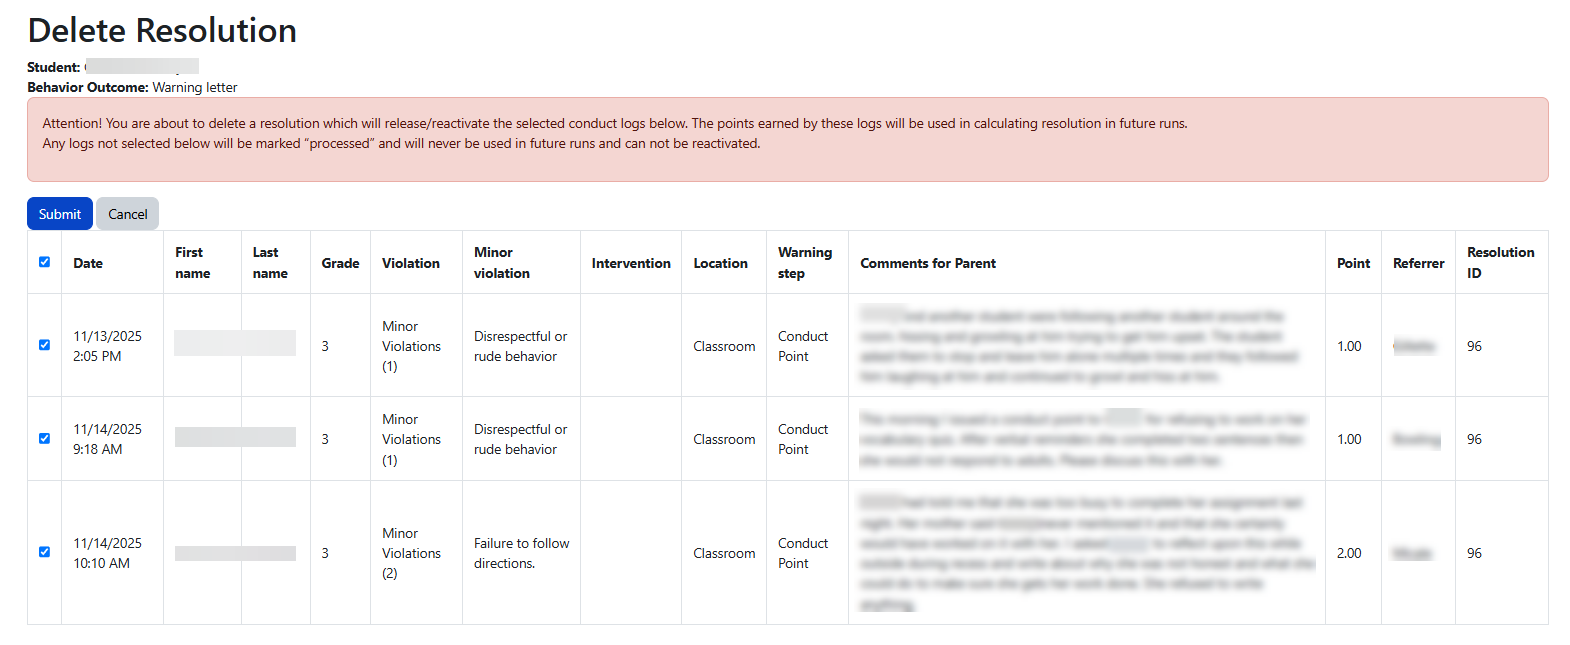
Deleting a Resolution
When an admin clicks the delete action icon on a resolution, the system opens a confirmation page that gives the admin selective control over what happens to the linked behavior entries.
What the delete confirmation page shows
-
Student name and consequence name for the resolution being deleted
-
A danger alert confirming this is a destructive action
-
A table of ALL behavior entries linked to this resolution — each with a checkbox, all checked by default
Behavior entries table on delete confirmation
The table uses a Check All header checkbox and shows these columns for each linked entry:
What happens when the admin confirms deletion
The system performs two separate operations based on the checkbox selections:
|
Step |
What happens |
Result |
|---|---|---|
|
Checked entries |
Sets |
These entries are unlinked from the resolution AND reset to unprocessed — they become eligible for the next run period |
|
Unchecked entries |
Sets |
These entries are unlinked but keep their processed status — they do NOT return to the unprocessed pool |
The resolution itself is soft-deleted, marked as deleted with the user ID and timestamp recorded for audit and can’t be restored by the admin.
All checkboxes are checked by default. If you confirm without unchecking any entries, ALL linked behavior entries will be reset to unprocessed and will be picked up by the next run period. If you only want to delete the resolution without releasing entries back into the pool, uncheck the entries before confirming.
This selective control is useful when the admin needs to delete a resolution due to an error but does not want all the linked entries to flood back into the next processing cycle. By unchecking specific entries, those entries stay in their current processed state — essentially orphaned from any resolution but not re-processable.
Deleting a Behavior Entry
Behavior entries can be deleted from the behavior entries list (School → Behavior → Behavior Entries). When an admin clicks the delete action icon, the system shows a confirmation page.
What the delete confirmation page shows
-
Date of the behavior entry
-
Student name
-
Behavior category name
If the behavior entry is currently processed and linked to a resolution or referral, the system displays a danger warning alerting the admin that they are about to delete a processed entry.
What happens on confirmation
-
The behavior entry is soft-deleted — marked as deleted with the user ID and timestamp recorded for audit
-
The entry is NOT automatically unlinked from its resolution — the resolution still exists and still references this now-deleted entry
-
The resolution's point totals, consequence counts, and other calculated data are not recalculated
Deleting a behavior entry that is linked to a resolution does NOT update the resolution. The resolution will continue to exist with its original data, but the deleted entry will no longer appear in behavior entry lists or reports. If you need to correct a resolution after deleting one of its entries, consider deleting the resolution as well and re-running the period.
Delete permissions
The delete action has two permission levels:
|
Capability |
Who can delete |
Restriction |
|---|---|---|
|
|
The referrer (person who created the entry) |
Can only delete their own unprocessed entries — the delete icon does not appear for processed entries |
|
|
Administrators |
Can delete any entry including processed ones — the danger warning appears for processed entries |
Teachers with the deleteconductlog capability can only see the delete icon on entries they created that have not yet been processed. Once an entry has been included in a run period and linked to a resolution, only an admin with manageconductlog can delete it.
Reset Behavior Entries
Navigation: School → Behavior → Reset Behavior Entries
Resetting behavior entries deactivates older entries before a selected date. It does not delete them. This is an administrative cleanup action used when a school wants to stop older entries from continuing to contribute to progression or future processing.
Because resets affect progression, they should be part of a clear school policy. Some schools reset quarterly or by semester. Others intentionally avoid resets so progression continues longer.
What a reset does
-
Deactivates eligible entries before the chosen reset date
-
Changes the entry's processed status to Voided (internal value: 2) — distinct from active/unprocessed (0) and processed (1)
-
Prevents those entries from being used in future consequence or reward calculations
-
Preserves the historical record for reporting and audit purposes
Reset options
Schools using recognitions can control what kind of entries are reset.
|
Option |
What it means |
Typical use |
|---|---|---|
|
Include Violation Entries |
Resets negative behavior entries before the chosen date. |
Used when consequence progression should start over. |
|
Include Recognition Entries |
Resets positive behavior entries before the chosen date. |
Used when recognition tracking should restart for a new cycle. |
|
Both |
Resets both violations and recognitions. |
Used at major school checkpoints when both systems are being cleared. |
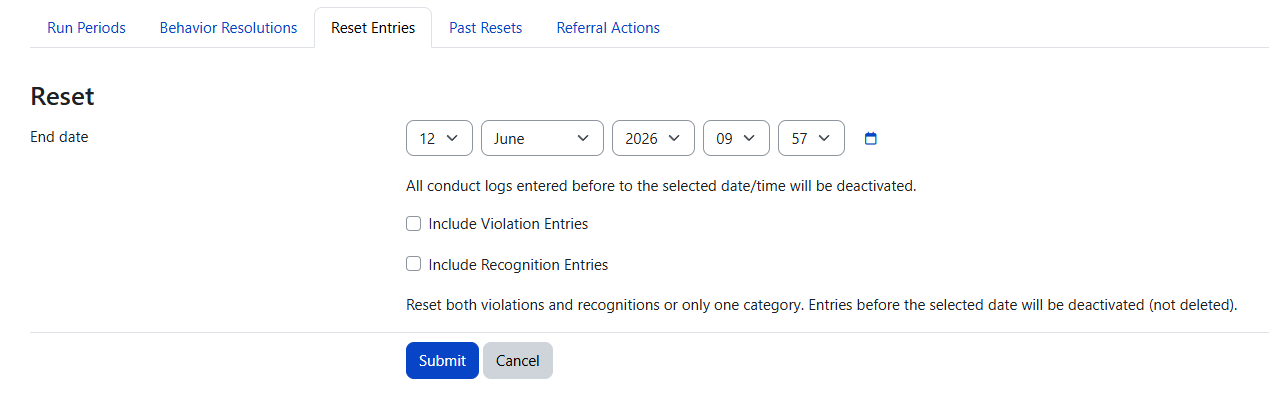
Reset warnings and restrictions
Resets can overlap with run periods, so Radix includes warning messages to help prevent unexpected results.
If the selected reset date is earlier than the latest run date, the system warns that some entries may not be deactivated because they were already used in a run period. Review the date carefully before continuing.
This matters because run periods may already have converted those entries into resolutions. A reset does not rewrite the school's processing history retroactively.
Past Resets
The Past Resets page provides the audit trail for reset actions. Use it to confirm what was reset, when it was done, and what type of entries were included.
|
Column or feature |
What it helps you verify |
Why it matters |
|---|---|---|
|
Reset date |
The cutoff date used for the reset. |
Confirms the intended scope. |
|
Included Entries |
Whether the reset applied to violations, recognitions, or both. |
Prevents confusion later during reporting. |
|
User / timestamp |
Who performed the reset and when. |
Provides accountability. |
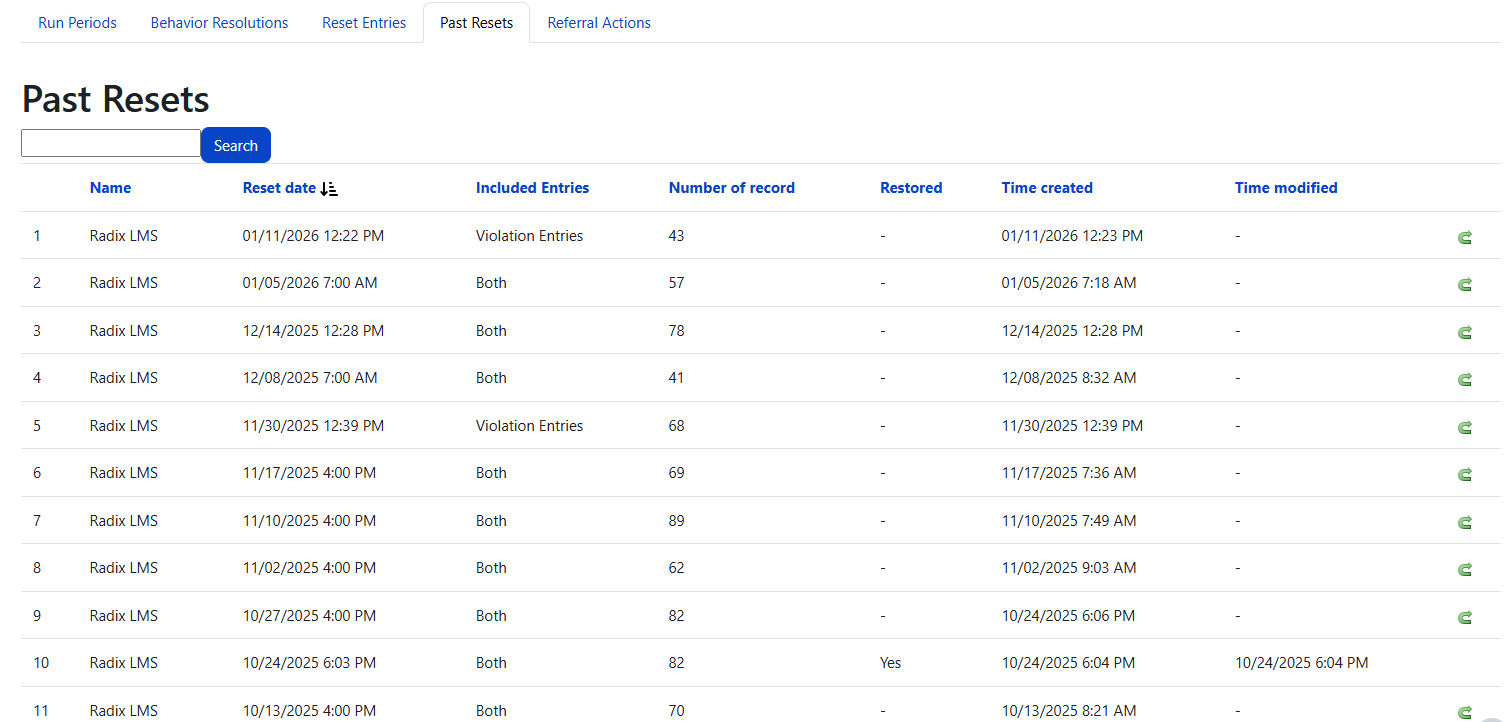
How reset entries appear in reporting
Reset entries are not deleted from the system. Instead, they remain part of the historical record and appear as Voided in behavior reporting.
-
Behavior entry reports label reset items as (Voided).
-
Behavior overview reports can include total voided points.
-
Some sites may choose whether voided entries appear on overview reports through plugin settings.
-
In the behavior entries list, voided entries show as “Yes (Voided)” in the processed column.
Recommended admin workflow
-
Review recent behavior entries and make sure data entry is complete.
-
Create and run the next Run Period — check your email for the summary showing resolution and referral counts.
-
Open Behavior Resolutions filtered by the run period end date.
-
Review each resolution — check the student's consequence count, reward count, and last consequence for context.
-
Assign the correct Admin Decision and complete scheduling, served status, and notification fields.
-
Print letters or send notifications as needed — use bulk operations for efficiency.
-
Only perform a Reset Behavior Entries action when your school is intentionally clearing progression.
-
Use Past Resets and run period history to confirm what has happened over time.
If your school wants progression to carry across longer periods, avoid frequent resets. Many schools find the best balance by running behavior weekly but resetting only at quarter, semester, or year-end checkpoints.
Best practices
-
Use a consistent processing schedule so staff know when consequences or rewards will be reviewed.
-
Filter behavior resolutions by run period end date to avoid mixing cycles.
-
Check the student's last consequence and consequence count before assigning a new one to support consistency and fair progression.
-
Review admin decisions and letter templates regularly so notifications do not fail unexpectedly.
-
Use Private Comment for internal notes and Comment for anything that may appear in letters or reports.
-
Treat resets as a policy decision, not just a cleanup task — discuss with school leadership before clearing progression.
-
If a run or reset does not seem to behave as expected, review the sequence of actions first: run date, reset date, and any undo or re-run activity.
-
Use bulk operations (Edit Selected Records, Print Selected Letters) to save time when processing large numbers of resolutions.
Permissions
|
Capability |
What it allows |
|---|---|
|
|
Create, edit, and delete behavior resolutions. Add manual resolutions. Run periods for violations. |
|
|
Create, edit, and delete recognition-based resolutions. Run periods for recognitions. |
|
|
Manage discipline matrix steps and related configuration. |
|
|
Add behavior entries to the conduct log. |
|
|
View behavior entries list. Required for all users who need to see behavior entry data and export to Excel or CSV. |
|
|
Delete own unprocessed behavior entries. The delete icon only appears for entries the user created that have not been processed. |
|
|
Full management access to behavior entries including editing and deleting any entry, processed or unprocessed. Also controls access to advanced filters and admin features on the behavior entries list. |